Deploy Develocity on Amazon EC2
This setup is intended for evaluation and testing purposes only. It isn’t recommended for production environments.
This guide doesn’t include SSL setup because it’s intended solely for evaluation purposes; you must enable SSL in production environments.
This guide doesn’t work on GovCloud accounts (us-gov regions).
Overview
This guide walks you through quickly deploying Develocity on an Amazon EC2 instance. It assumes that you have a basic understanding of AWS and EC2.
If you aren’t familiar with AWS and EC2 and need more detailed step-by-step instructions, follow the Amazon EC2 Standalone Installation Guide.
This guide uses the AWS Management Console to create an EC2 instance and the Amazon EC2 console to connect to the instance.
You publish your first Build Scan to your Develocity instance using the Build Scan® example project.
Before You Start
Before you start, ensure that you have the following:
- Account and access
-
-
An AWS paid account (a free tier account isn’t sufficient)
-
An AWS IAM user with the AmazonEC2FullAccess AWS managed policy
-
Familiarity with launching and managing EC2 instances
-
- License
-
-
A Develocity license. If you have purchased Develocity or started a trial, you have a license file called
develocity.license. Otherwise, you may request a Develocity trial license.
-
- Local software (install on your local machine, not on the EC2 instance)
-
-
curl -
git -
A terminal
-
A Java Development Kit (JDK)
-
Launch an EC2 Instance
-
Go to the AWS Management Console and sign in with your credentials.
-
Navigate to the EC2 Dashboard and select Launch instance.
-
Select the Ubuntu 26.04 LTS AMI for the x86_64 architecture. In the AMI search, look for the official Canonical AMI (owner ID
099720109477). -
Choose the
m7i.4xlargeinstance type. -
Configure the instance with the following settings:
- Key pair (login)
-
Select your key pair.
- Network settings
-
-
Assign a public IP (needed for the Amazon EC2 console).
-
Select Create security group.
-
Allow SSH (default: Anywhere 0.0.0.0/0).
-
Allow HTTPS access (port 443).
-
Allow HTTP access (port 80).
-
- Configure storage
-
Add 300 GiB of storage using a gp3 volume.
-
Review your configurations and launch the instance by selecting Launch instance.
The following table summarizes the configuration settings for reference.
| Setting | Value |
|---|---|
AMI |
Ubuntu 26.04 LTS (x86_64) |
Instance Type |
|
Key Pair (Login) |
Select an existing key pair |
Network: Public IP |
Enabled |
Network: Security Group |
Create new |
Network: SSH |
Allowed from anywhere (0.0.0.0/0) |
Network: HTTPS |
Port 443 allowed |
Network: HTTP |
Port 80 allowed |
Storage |
300 GiB, gp3 volume type |
Once the instance is running, navigate to the EC2 Dashboard , select your newly created instance, and note the Public IPv4 DNS. You need this URL during the installation.
Installation
The installation process involves uploading your Develocity license, downloading the installation script, and running it on your EC2 instance.
Connect to the Instance
-
In the AWS Management Console, navigate to and select your instance.
-
Choose Connect.
-
On the EC2 Instance Connect tab, choose Connect.
A browser-based terminal opens. Run the following commands to update the instance before proceeding:
sudo apt update -y && sudo apt upgrade -yIf prompted to restart services or reboot, do so before continuing.
Upload Your Develocity License to the EC2 Instance
On the instance, create a new file called develocity.license, copy-and-paste your Develocity license into this file and save it.
Download and Validate the Installation Script
Download the ec2-install.sh and the ec2-install.sh.sha256 files from GitHub by running the following curl commands:
Download the script:
curl -O https://raw.githubusercontent.com/gradle/develocity-quickstart-scripts/refs/heads/main/AWS/EC2/ec2-install.shDownload the checksum for validation:
curl -O https://raw.githubusercontent.com/gradle/develocity-quickstart-scripts/refs/heads/main/AWS/EC2/ec2-install.sh.sha256Validate the script against the checksum:
sha256sum -c ec2-install.sh.sha256ec2-install.sh: OK
The values generated by the sha256sum utility must match. If they differ, your download is incomplete or corrupted. Download the files again.
If, after several attempts, you can’t download a copy of the file that produces a valid checksum value, you should open a support case to report the problem.
Adjust the permissions of the script to make it executable for your user:
chmod u+x ec2-install.shRun the Installation Script
|
Review |
The installation script sets up a lightweight Kubernetes (K3s) environment in which the entire Platform is deployed using Helm.
It performs the following actions in a sequence:
-
Installs K3s server
-
Starts K3s server
-
Installs Helm
-
Fetches the Develocity charts from the Helm repository
-
Initializes the Develocity Pods in K3s
-
Creates a base
settings.gradle.ktsfile which is pre-configured for your new instance
./ec2-install.sh --license DEVELOCITY_LICENSE \(1)
  --hostname DEVELOCITY_HOSTNAME (2)
| 1 | develocity_license The path to your Develocity license |
| 2 | develocity_hostname The public DNS name of your EC2 instance |
At the end, the installation script displays the system user credentials.
These are saved in a file called credentials.txt as well.
|
The script installs the latest Develocity release (the most recent Helm chart), regardless of the documentation version you are following. The Develocity, Kubernetes (K3s), and Helm versions shown in the sample output below are illustrative and may differ from the versions you see. |
Example of running the script
ubuntu@ip-172-31-3-0:~$ ./ec2-install.sh --license develocity.license --hostname ec2-63-177-95-205.eu-central-1.compute.amazonaws.com

Develocity Platform Installation

This script will setup a Develocity instance which is customized for evaluating purpose only.
Press Enter to continue...
[INFO]  Validating system requirements
[INFO]  Installing K3s...
[INFO]  Finding release for channel stable
[INFO]  Using v1.36.2+k3s1 as release
[INFO]  Downloading hash https://github.com/k3s-io/k3s/releases/download/v1.36.2%2Bk3s1/sha256sum-amd64.txt
[INFO]  Downloading binary https://github.com/k3s-io/k3s/releases/download/v1.36.2%2Bk3s1/k3s
[INFO]  Verifying binary download
[INFO]  Installing k3s to /usr/local/bin/k3s
[INFO]  Skipping installation of SELinux RPM
[INFO]  Creating /usr/local/bin/kubectl symlink to k3s
[INFO]  Creating /usr/local/bin/crictl symlink to k3s
[INFO]  Creating /usr/local/bin/ctr symlink to k3s
[INFO]  Creating killall script /usr/local/bin/k3s-killall.sh
[INFO]  Creating uninstall script /usr/local/bin/k3s-uninstall.sh
[INFO]  env: Creating environment file /etc/systemd/system/k3s.service.env
[INFO]  systemd: Creating service file /etc/systemd/system/k3s.service
[INFO]  systemd: Enabling k3s unit
Created symlink '/etc/systemd/system/multi-user.target.wants/k3s.service' → '/etc/systemd/system/k3s.service'.
[INFO]  systemd: Starting k3s
k3s service is running.
[INFO]  Configuring K3s, this requires sudo access...
[INFO]  Installing Helm...
Downloading https://get.helm.sh/helm-v4.2.2-linux-amd64.tar.gz
Verifying checksum... Done.
Preparing to install helm into /usr/local/bin
helm installed into /usr/local/bin/helm
[INFO]  Installing/Upgrading DV Platform Helm chart using license path: develocity.license
"gradle" has been added to your repositories
Hang tight while we grab the latest from your chart repositories...
...Successfully got an update from the "gradle" chart repository
Update Complete. ⎈Happy Helming!⎈
NAME: ge-standalone
LAST DEPLOYED: Thu Mar  6 14:38:00 2025
NAMESPACE: develocity
STATUS: deployed
REVISION: 1
DESCRIPTION: Install complete
TEST SUITE: None
NOTES:
Develocity has been installed.
[INFO]  Checking installation status ...
[####################################################################################################] 100% (Ready: 10 / 10)
All pods are ready!
[INFO]  Checking Develocity connectivity
{"status":"UP"}

Your Develocity instance is deployed.
Access Develocity via the browser at: http://ec2-63-177-95-205.eu-central-1.compute.amazonaws.com

      Develocity user: system
      Develocity password: PASSWORD

      Credentials are also saved to credentials.txt file in the current directory.

      For more information, please visit:

      Develocity Administration Manual: https://gradle.com/help/helm-admin
      Helm Chart Documentation: https://gradle.com/help/helm-standalone-chart

      You can check the status of the Platform by running the following command:

      kubectl --namespace develocity get pods

      If you have any questions or need any assistance contact the Develocity support team or your customer success representative.

      The installation script created a pre-configured settings.gradle.kts file for you.
settings.gradle.kts file created successfully!
[INFO]  Removing get_helm.sh installation script
For more info about the script, run ./ec2-install.sh -h.
|
Develocity takes several minutes to deploy. |
After the installation is finished, open a web browser and navigate to the public DNS name of your EC2 instance.

Example Project
In the next part of this guide, you publish your first Build Scan to your Develocity instance using the Build Scan example from GitHub.
Run the clone, configure, and build steps on your local machine. The build publishes its Build Scan to your Develocity instance using the public DNS name you set in settings.gradle.kts.
Clone the Project
Clone the Build Scan example from GitHub:
git clone https://github.com/gradle/gradle-build-scan-quickstart.gitChange into the cloned repository:
cd gradle-build-scan-quickstartConfigure the Settings
Replace the content of the settings.gradle.kts file with the example below.
The only value you need to change is the hostname on the line marked <3>: replace it with the Public IPv4 DNS name of your EC2 instance.
The settings.gradle.kts generated during the Develocity deployment is this same template with the hostname already filled in.
Example
plugins {
    // Develocity Gradle Plugin
    id("com.gradle.develocity") version("4.5.0") (1)
    id("org.gradle.toolchains.foojay-resolver-convention") version "1.0.0" (2)
}
develocity {
    // The hostname of the Develocity instance
    server.set("http://ec2-63-177-95-205.eu-central-1.compute.amazonaws.com") (3)
    // Disable SSL
    allowUntrustedServer.set(true) (4)
}

rootProject.name = "gradle-build-scan-quickstart" (5)
| 1 | The version of the Develocity Gradle Plugin^ (it might use a different version) |
| 2 | The version of org.gradle.toolchains.foojay-resolver-convention (it might use a different version) |
| 3 | Replace ec2-63-177-95-205.eu-central-1.compute.amazonaws.com with the public DNS name of your EC2 instance |
| 4 | SSL is disabled |
| 5 | The name of the example project |
Create and Publish a Build Scan
The repository includes the Gradle wrapper (gradlew), so you don’t need to install Gradle separately.
Run your first Build Scan using the Gradle wrapper:
./gradlew build --scanThe build should end with something similar to:
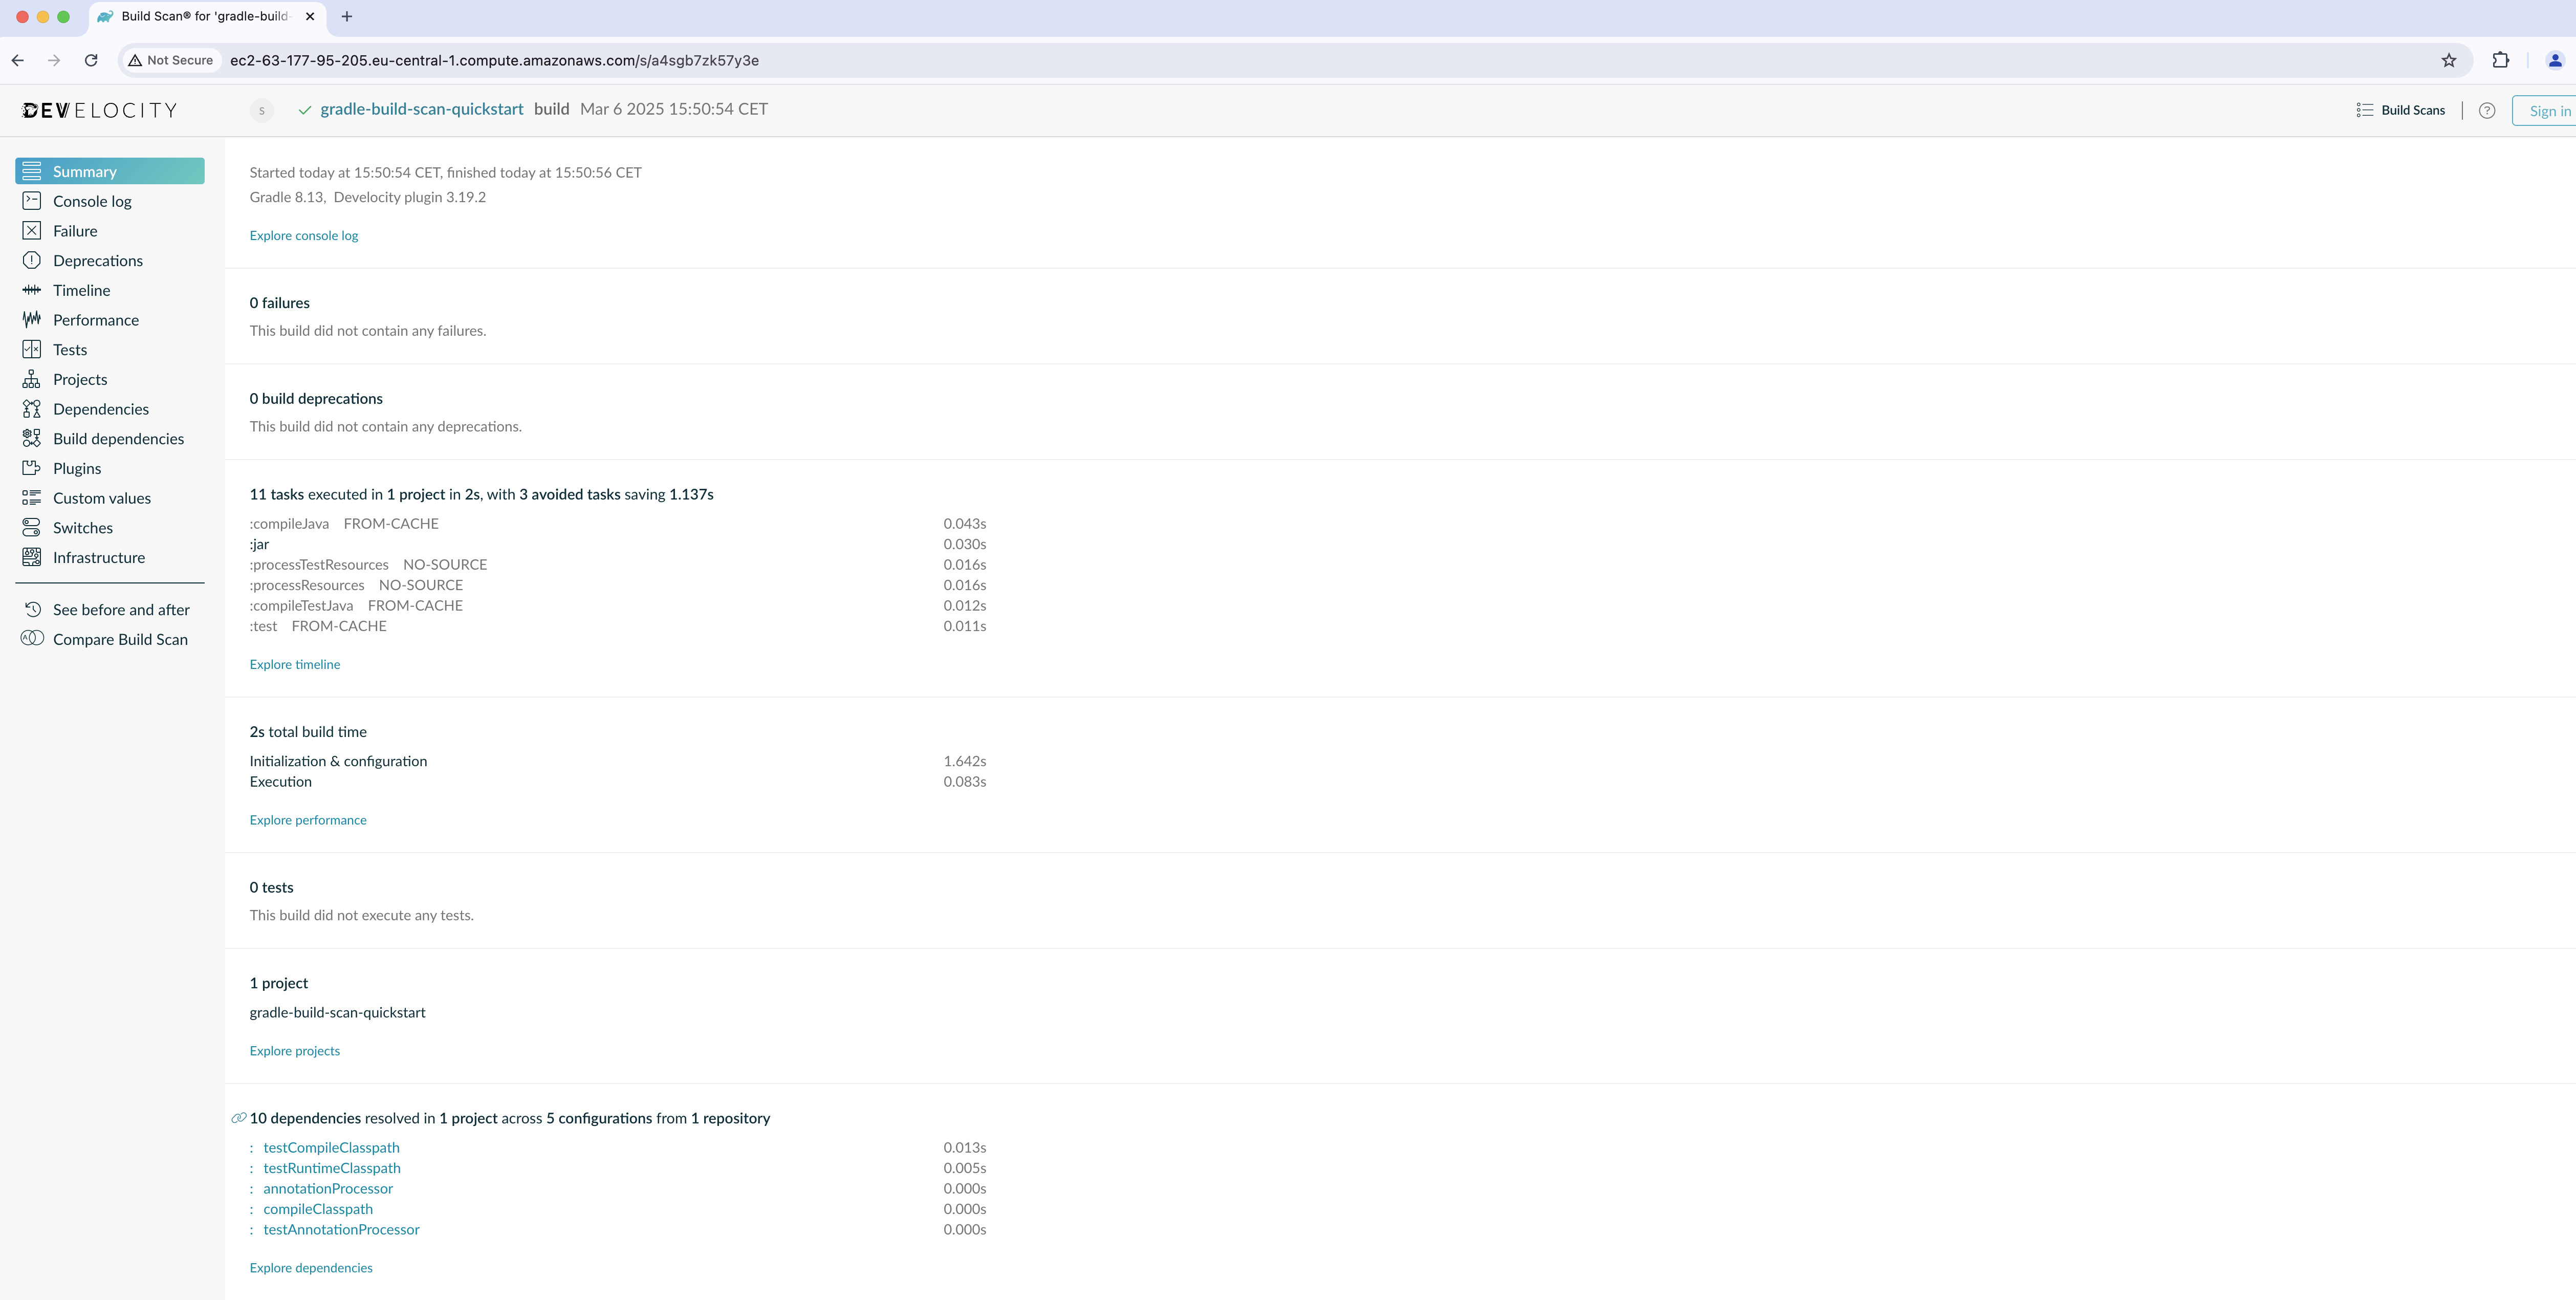
Calculating task graph as no cached configuration is available for tasks: build
> Task :processResources NO-SOURCE
> Task :processTestResources NO-SOURCE
> Task :compileJava
> Task :classes
> Task :jar
> Task :assemble
> Task :compileTestJava
> Task :testClasses
> Task :test
> Task :check
> Task :build

BUILD SUCCESSFUL in 19s
4 actionable tasks: 4 executed

Publishing Build Scan to Develocity...
https://ec2-63-177-95-205.eu-central-1.compute.amazonaws.com/s/a4sgb7zk57y3e

Configuration cache entry stored.
Follow the link shown at the end of the build to view your Build Scan on your Develocity instance.
|
The Build Scan link uses |

Clean Up
Follow these steps to avoid incurring charges to your AWS account for the resources used on this page:
-
In the AWS Management Console, go to the EC2 Instances page.
-
Select the Instance ID row containing the VM instance you created in this guide.
-
Select Instance state followed by Terminate (delete) instance.
Next Steps
Use these resources to get the most out of Develocity:
-
Develocity Administration Manual - Learn how to configure and administer Develocity.
-
DPE University - A free, self-paced training portal to get the most out of Develocity.
-
Develocity Self-Hosted Standalone Installation Guide - How to install Develocity into a single host.