Getting Started With Develocity for npm Users
This guide walks through installing the Develocity npm agent and publishing your first Build Scan.
Installation
This guide doesn’t cover installation of Develocity. Consult one of the following installation manuals for help with installation:
The examples in this guide use develocity.example.com as the Develocity hostname with HTTPS enabled.
Develocity npm Agent
To publish a Build Scan, you must apply the Develocity npm agent to your project.
Setup
Install the Agent
The Develocity npm agent is an npm package available on the npm registry. There are two ways to install the agent.
-
Installing the agent globally in a well-known folder. This approach makes it possible to use the agent in any npm project on a machine without adding it as a dependency to each one. A key advantage is the ability to capture a Build Scan even when a project’s dependencies haven’t yet been installed, such as when running
npm installon a fresh checkout. This is the most convenient and recommended way to install the agent. See Global installation in a well-known folder for details. -
Installing the agent as a local dependency. Unlike the global installation, this approach requires the agent to be installed in each project where you want to use it. It creates the inconvenience of having to set and unset the
NODE_OPTIONSenvironment variable depending on whether the agent is available in the project or not. The significant disadvantage of the local installation, that it doesn’t allow capturing a Build Scan until the project’s dependencies have been installed, such as when runningnpm installon a fresh checkout. See Local Installation for details.
Recommended: Global Installation in a Well-Known Folder
|
This approach won’t work if Node.js is run with the --no-global-search-paths option. |
Node.js loads packages from several well-known global folders. Placing the agent in one of these folders allows Node.js to find and load the agent for all Node.js processes on the machine, including npm invocations.
To install the agent into any of these folders, for example ~/.node_libraries, run the following command:
npm exec -y -- pacote extract @gradle-tech/develocity-agent@4.1.1 ~/.node_libraries/@gradle-tech/develocity-agent|
If the installation into one of the global folders isn’t possible, the agent can be installed into an arbitrary folder on the machine. To install the agent into a folder such as Then set the |
Local Installation
If the global installation doesn’t work with your setup, you can install the agent locally in your project by running the following command:
npm install --save-dev @gradle-tech/develocity-agent@4.1.1Prepare the Agent for Use
The agent is a regular Node.js module.
In order for it to instrument npm invocations, it needs to be preloaded,
using the -r option of Node.js.
In order for this flag to be passed to the npm process, it needs to be set in the
NODE_OPTIONS environment variable.
Agent Installed Globally
If you installed the agent globally, as described in the Global installation in a well-known folder section, you only need to set the NODE_OPTIONS environment variable using the following command:
export NODE_OPTIONS='-r @gradle-tech/develocity-agent/preload'Agent Installed Locally
If you installed the agent as a project dependency, as described in the Local Installation section, it requires the NODE_OPTIONS environment variable to be set and unset manually depending on the availability of the agent in the project (or in the system at large for that matter, since NODE_OPTIONS applies to any Node.js process).
As this can be tedious, error-prone, and lead to unexpected failures, we provide a separate Develocity agent loader package to simplify the process of loading the agent.
Develocity Agent Loader
The Develocity agent loader is a small package whose sole purpose is to load the agent if it’s currently available in the project, or silently ignore if it’s not.
To install it, use the command line below.
npm install --global @gradle-tech/develocity-agent-loaderTo ensure that the agent is preloaded, set the NODE_OPTIONS environment variable as follows:
export NODE_OPTIONS="-r $(npm root -g)/@gradle-tech/develocity-agent-loader"From now on, the Develocity npm agent will be automatically preloaded if it has been installed for the current project.
|
By default, the agent loader will simply ignore any error in loading the agent (which usually simply means that the agent itself isn’t installed for the current project).
If you expect the agent to be loaded, but it’s not, you can set the |
Managing NODE_OPTIONS Manually
There are situations, such as CI, where managing NODE_OPTIONS manually is just as convenient as depending on the agent loader as a global package.
In these cases, or if for other reasons you cannot use the agent loader, you can load the agent directly.
To ensure that the agent is preloaded, use the NODE_OPTIONS environment variable as such:
export NODE_OPTIONS='-r @gradle-tech/develocity-agent/preload'Note that the agent will be preloaded for all invocations of Node.js.
This can be inconvenient when working on local development environments, as NODE_OPTIONS needs to be set and unset depending on the availability of the agent in the project to avoid invocations of Node.js to fail.
If you are in a situation where using the agent loader is unfeasible and need to manage NODE_OPTIONS manually, you might want to consider tooling to do that for you, such as dotenvx or direnv.
Configuration
To configure the agent, create a file called develocity.config.js or develocity.config.cjs in the root of your project.
module.exports = {
  server: {
    url: 'https://develocity.example.com',
  },
}|
Configuration files using ESM or TypeScript aren’t supported. |
This is the minimum configuration required to publish a Build Scan. Publishing a Build Scan to Develocity at gradle.com isn’t supported.
Alternatively, you can use environment variables to configure the agent.
Use DEVELOCITY_URL to set the Develocity server URL:
export DEVELOCITY_URL=https://develocity.example.com|
You might encounter a warning about an untrusted certificate when connecting to Develocity over HTTPS.
Adding a valid SSL certificate to the Develocity instance is the preferred solution, but that may not always be possible.
In this case, set the Alternatively, you can set the This is a convenient workaround, but you shouldn’t use it as a long-term solution. |
See the Develocity npm agent user manual for full configuration details.
Build Scan
A Build Scan is a detailed, shareable record of every build. Centralizing these records across local and CI builds gives teams a shared view for collaborative debugging and optimization.
Quick Start
Build Scan publication is automatically enabled for all builds when you apply the Develocity npm agent. As the build completes, the last lines of output will be similar to:
Publishing Build Scan to Develocity...
https://develocity.example.com/s/3z475bz247h5g
Follow that link to view your Build Scan.
Build Scan publication is passive with regard to the build process: it doesn’t affect the outcome or outputs of your build. It’s safe to add the necessary configuration to your project and check it into version control, enabling Build Scan publication for all users of the build. The Develocity npm agent won’t cause build failures even when there is no connection to the Develocity server when trying to publish.
Build Scan Highlights
A published Build Scan provides several views for exploring what happened during your build.
Find and View any Build Scan
Search all captured Build Scan records by going to https://develocity.example.com/scans.
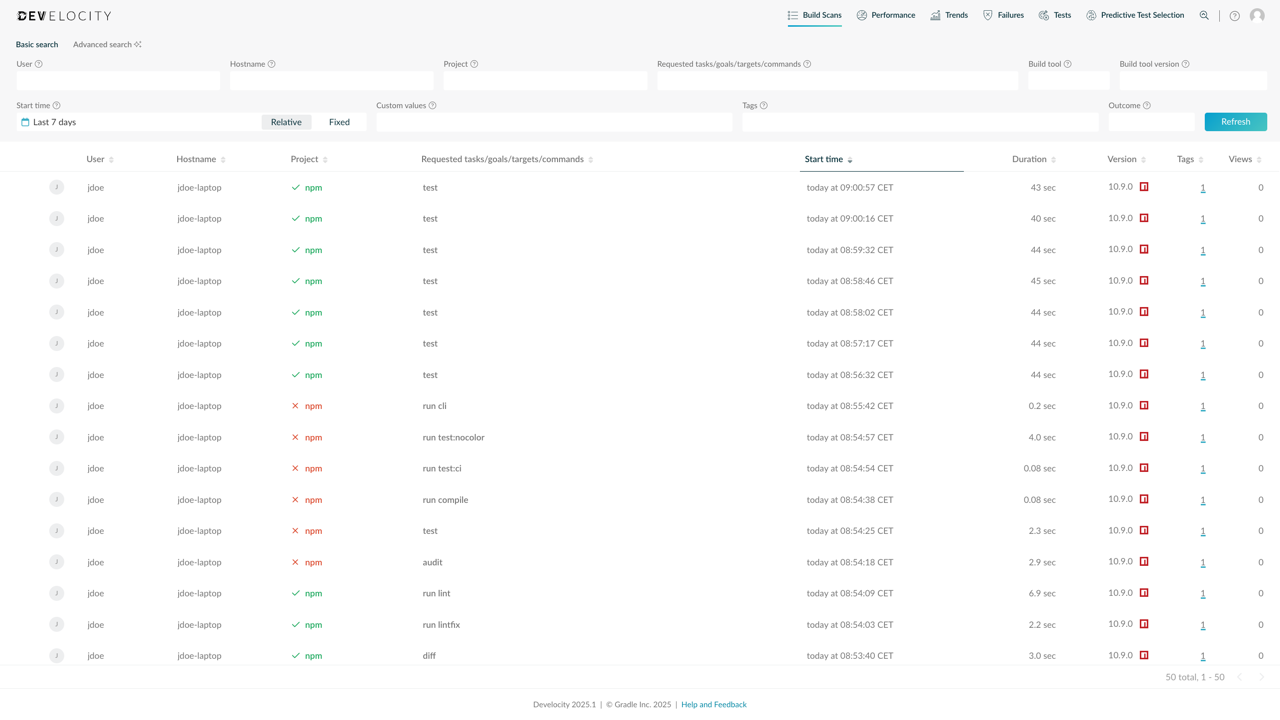
This view allows searching by various criteria, including top-level project name, username, build outcome, build start time, and more. By default, the list is sorted to show the most recent scans first.
The listing also surfaces patterns across your organization’s builds:
-
Previously unknown errors appearing across multiple builds
-
Builds running longer than expected in specific scenarios
-
Team members running more npm scripts than their workflow requires
Inspect Console Log
Your Build Scan includes the full console log.
Use the left navigation menu to visit the Console Log section.
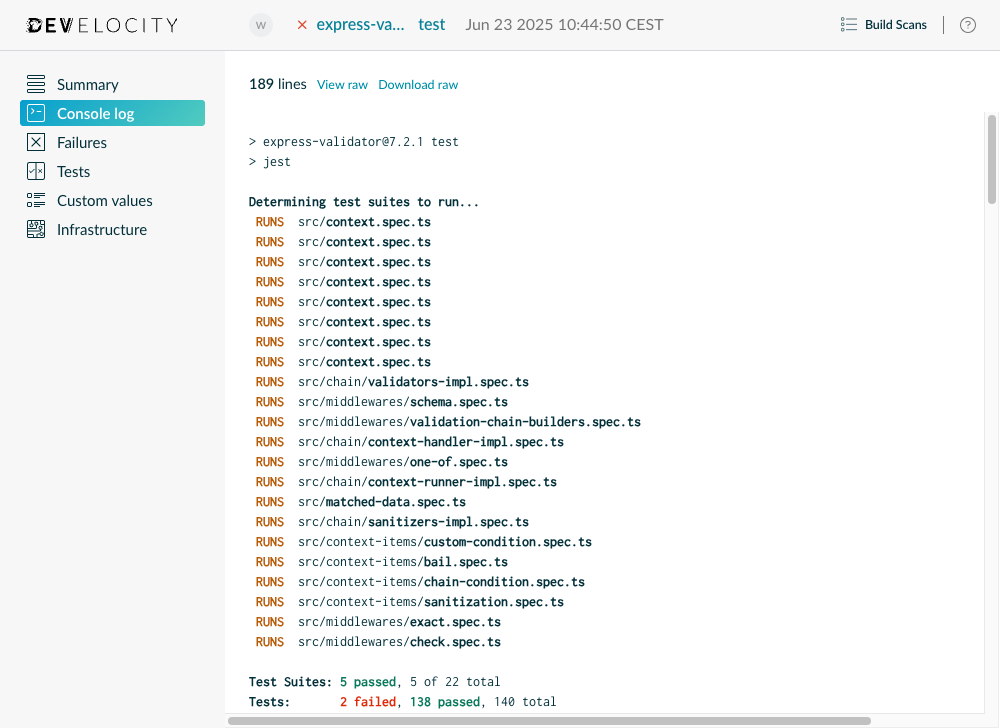
This section displays all the console log emitted by the instrumented npm process, as well as any process it spawned to perform some particular task (in the example above, npm test ran jest).
Inspect Test Results
If your build executed tests, your Build Scan includes their results.
Use the left navigation menu to visit the Tests section.

This section shows the results of all the tests that ran during your build, along with their outcome and durations. The results are broken down by process, test file and test. Select any test file or test to see details about each of their individual executions, in case of test retry. The total time is available for processes, test files and tests. Generally, it corresponds to the wall clock time that an execution lasted. See Viewing test results in the npm agent user manual for retry behavior and timing details.
Next Steps
Extend your Build Scan with custom metadata and connect it to your CI system.
Custom Tags, Values, and Links
Each Build Scan can be enriched with metadata particular to your environment by several means.
Extend your Build Scan with tags, values, and links. In particular:
-
VCS information such as commit identifiers, branch names, etc.
-
Tags for different types of builds (for example,
CIvs.local) -
Links to CI system record of build for CI builds
This adds useful context to your Build Scan.
Integrating With Gradle
If you run npm through a Gradle task, you might want to use the convenience API provided by the Gradle Develocity plugin.
See Gradle integration in the npm agent user manual.