Cloud services are frequently updated. This documentation may not reflect the latest changes. Always verify steps and interfaces with the current provider documentation.
This manual covers the installation of Develocity on an Azure virtual machine instance.
Develocity is a Kubernetes-based application distributed as a Helm chart that manages all Develocity components. Helm is a package manager for Kubernetes applications.
The installation of Develocity described in this manual involves installing the K3s lightweight Kubernetes distribution onto an Azure virtual machine host, then using Helm to install Develocity in the K3s instance on that host.
Prerequisites
1. An Azure Account
An Azure paid account is required. Note that a free account is not sufficient.
2. A Develocity License
If you have purchased Develocity or started a trial, you should already have a license file called develocity.license. Otherwise, you may request a Develocity trial license.
3. An Azure user
Your Azure user needs the necessary built-in role to execute Azure CLI commands based on your chosen method.
|
CLI Type |
Required Role/Permission |
|
Installed Azure CLI or Azure Portal |
|
|
Azure Cloud Shell |
|
Host Requirements
This section outlines the Azure host requirements for the installation.
|
Currently, Develocity only supports the |
1. Operating System
Develocity is expected to work on most modern Linux systems.
2. K3s
K3s needs several ports to be accessible from the host.
| Protocol | Port |
|---|---|
|
TCP |
6443 |
|
HTTP |
80 |
|
HTTPS |
443 |
| While these ports don’t need to be accessible from outside the host machine, K3s may access them using a different network interface or non-localhost IP. |
3. CPU & Memory
The minimum installation requirements are:
-
8 CPU units (
x86_64architecture) -
24 GB of RAM
The D8s_v3 instance size provides 8 vCPU / 32 GiB Memory.
4. Database
Develocity installations have two database options:
-
An embedded database that is highly dependent on disk performance.
-
A user-managed database that is compatible with PostgreSQL versions 14 through 17, such as Azure Database for PostgreSQL .
By default, Develocity stores its data in an embedded PostgreSQL database that is run as part of the application itself, with data being stored in a directory mounted on the host machine.
| See Appendix A for instructions on using Azure Database for PostgreSQL as a user-managed database. Using a cloud-based database can have a number of benefits, including easier resource scaling, backup management, and failover support. |
5. Storage
In addition to the database, Develocity needs some storage capacity for configuration files, logs, build cache artifacts, and database backups. These storage requirements apply regardless of which type of database you use, although the necessary size varies based on the database type. To simplify managing disk space, Gradle recommends mounting a persistent storage volume for Develocity data, logs, and backups. See Storage settings in the Standalone Helm Chart Configuration Guide for configuration details.
The recommended minimum capacities for the persistent volumes are:
| Description | Size in GB |
|---|---|
|
Data |
250 |
|
Backups |
250 |
|
Logs |
10 |
Capacity
The minimum capacity required for the installation directory for the embedded database case is 250 GB.
The minimum capacity required for the installation directory for the user-managed database case is 30 GB. It is recommended to create a specific volume for the installation directory to avoid consuming the space required for Develocity, and to ensure at least 10% of the volume’s space is free at all times. The following are additional disk capacity requirements:
| Location | Storage Size |
|---|---|
|
|
30 GB |
These are not particularly performance sensitive.
Performance
For production workloads, storage volumes should exhibit SSD-class disk performance of at least 3000 IOPS (input/output operations per second).
| Disk performance has a significant impact on Develocity performance. Network file systems are not compatible with Develocity due to their performance characteristics. |
Object storage
Develocity can also be configured to store Build Scans in Azure Blob Storage. This can help performance in high-traffic installations by reducing the load on the database and reducing storage costs. See Appendix B for details.
6. Network Connectivity
Develocity requires network connectivity for periodic license validation.
An installation of Develocity will not start if it cannot connect to both registry.gradle.com and harbor.gradle.com. |
It is strongly recommended that production installations of Develocity are configured to use HTTPS with a trusted certificate.
When installing Develocity, you will need to provide a hostname, such as develocity.example.com.
Pre-Installation
1. Set up your Shell
If you decide to use Azure Cloud Shell or the Azure portal, skip to 3. Generate a Key Pair. Otherwise, follow steps A and B below:
A. Install the Azure CLI
Follow the instructions in the Azure documentation.
B. Configure the Azure CLI
Follow the Get started with Azure CLI guide and Configure settings using az init or Configure settings with az configure. Choose the region in which you wish to install Develocity. Azure provides a list of all available Azure regions.
| Pick the region geographically closest to you or to any pre-existing compute resources, such as CI agents, to ensure the best performance. |
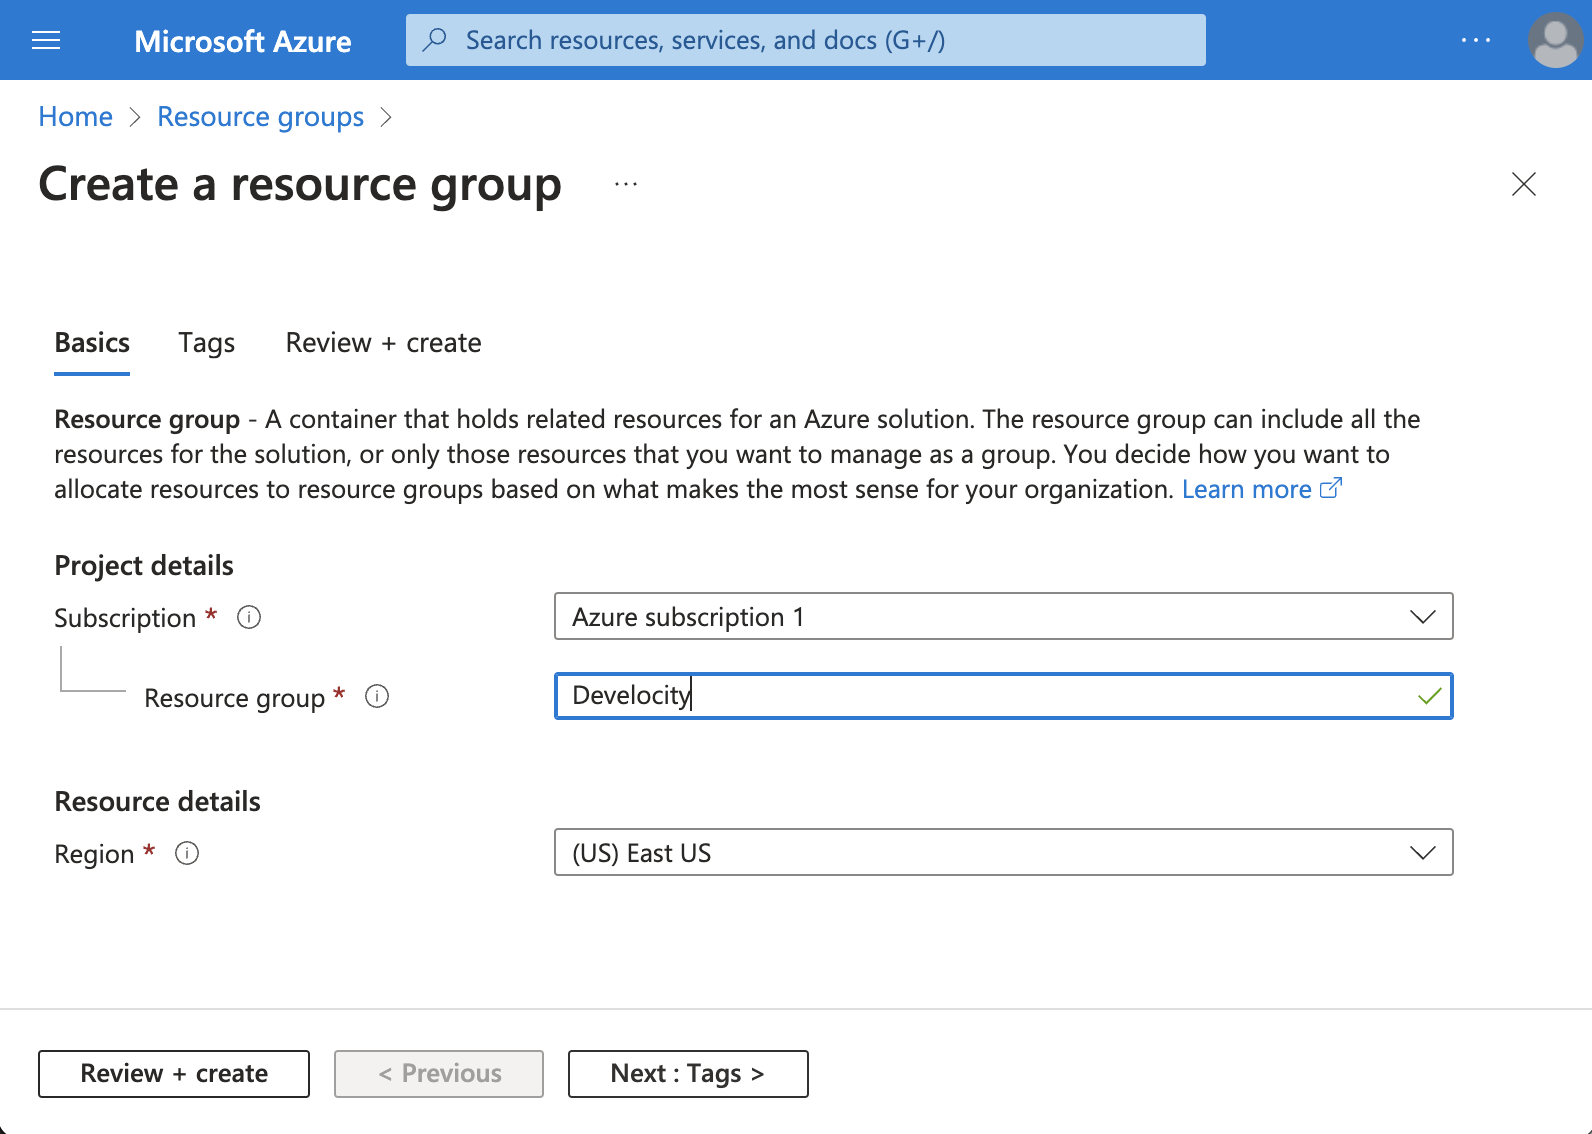
2. Create a Resource Group
Create an Azure resource group to contain all the resources you create for Develocity.
Create a resource group using the Azure CLI
Use the following commands to create a resource group:
AZ_SUBSCRIPTION=$(az account show -o json | jq -r '.id')
AZ_RESOURCE_GROUP=develocity
AZ_LOCATION=eastus (1)

az group create \
  --name $AZ_RESOURCE_GROUP \
--location $AZ_LOCATION| 1 | Replace eastus with a nearby Azure region of your choice that fulfills your requirements regarding compliance, data residency, service availability and pricing. |
Create a resource group using the Azure portal
To create a resource group in the Azure portal:
-
Navigate to the Resource groups service and click Create.
-
In Resource group, enter a name for the resource group.
-
In Region, enter the Azure region where the resource group will reside.
-
Click Review + Create.
-
Click Create.
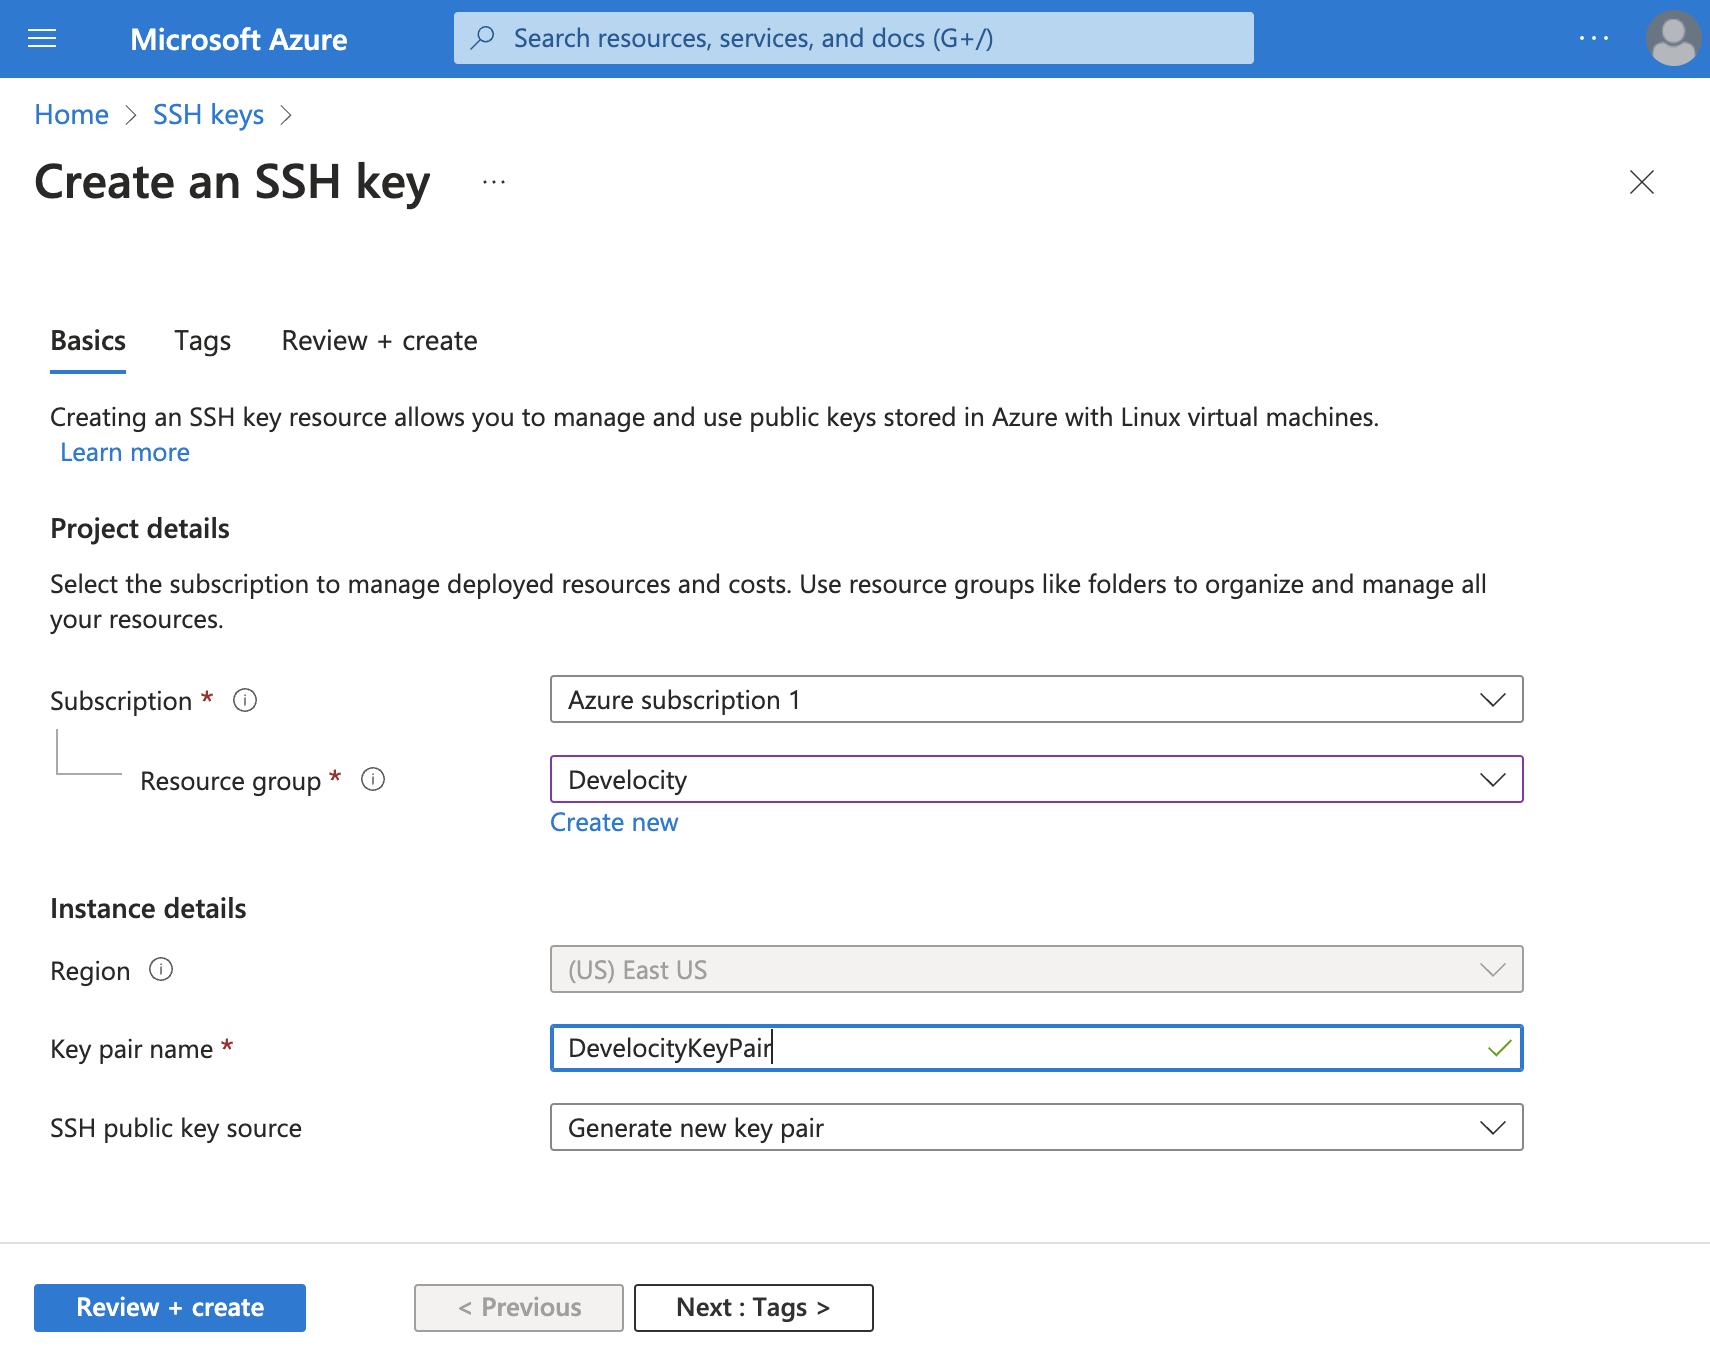
3. Generate a Key Pair
You need an SSH key to access Azure resources. To create the SSH key in the Azure portal, see Generate and store SSH keys in the Azure portal. To create the SSH key with the Azure CLI, see Generate and store SSH keys with the Azure CLI. Although you can save the generated keys file with any name, this manual uses the name DevelocityKeyPair. If you choose another name, you’ll need to edit the shell commands in this section.
Generate a key pair using the Azure CLI
Enter the command:
AZ_SSH_KEY_NAME=DevelocityKeyPair
az sshkey create \
  --name $AZ_SSH_KEY_NAME \
  --resource-group $AZ_RESOURCE_GROUP
You should see output similar to the following:
Private key is saved to "/Users/myname/.ssh/1698431396_112492". (1)
Public key is saved to "/Users/myname/.ssh/1698431396_112492.pub".| 1 | Save the path to the private key file, displayed in the output. |
Generate a key pair using the Azure portal
To create an SSH key in the Azure portal:
-
Navigate to the SSH keys service and click Create.
-
In Resource group, enter the name of your Azure resource group.
-
In Name, enter a name for the SSH key.
-
Click Review + Create.
-
Click Create.
-
Click Download private key and create resource and save the file to your local machine.
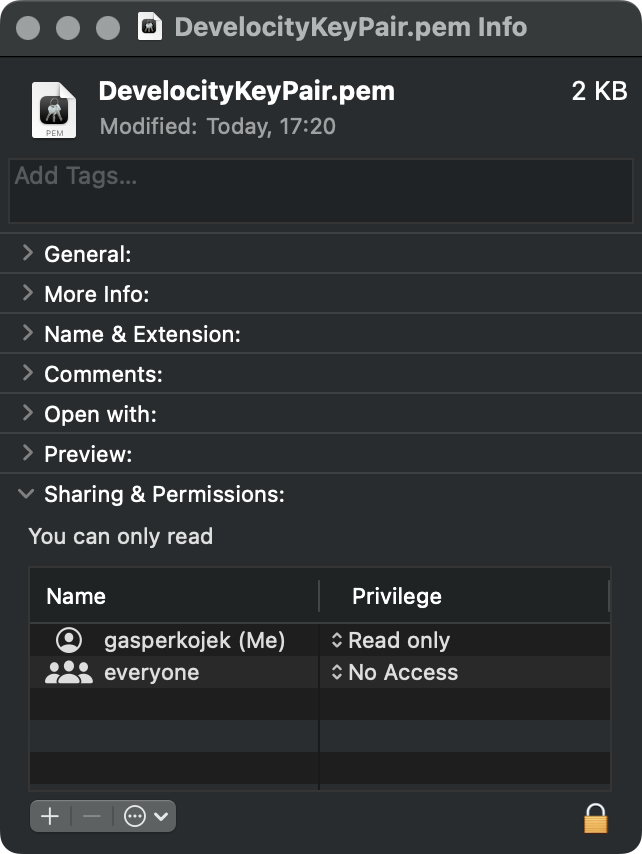
4. Change Key Pair Permissions
SSH requires that only your user has permission to read SSH key files.
Change permission using the terminal
Use the following command to change the permissions of the private key file.
chmod 400 /Users/myname/.ssh/<<key_name>>Change permission using the OS file settings
Change the PEM file permissions so the current user has Read-Only permissions and everyone else has No Access. You can do that by using the terminal and running the following command:
chmod 400 path/to/DevelocityKeyPair.pemOr by using the OS file settings. Here is an example in MacOS Finder:
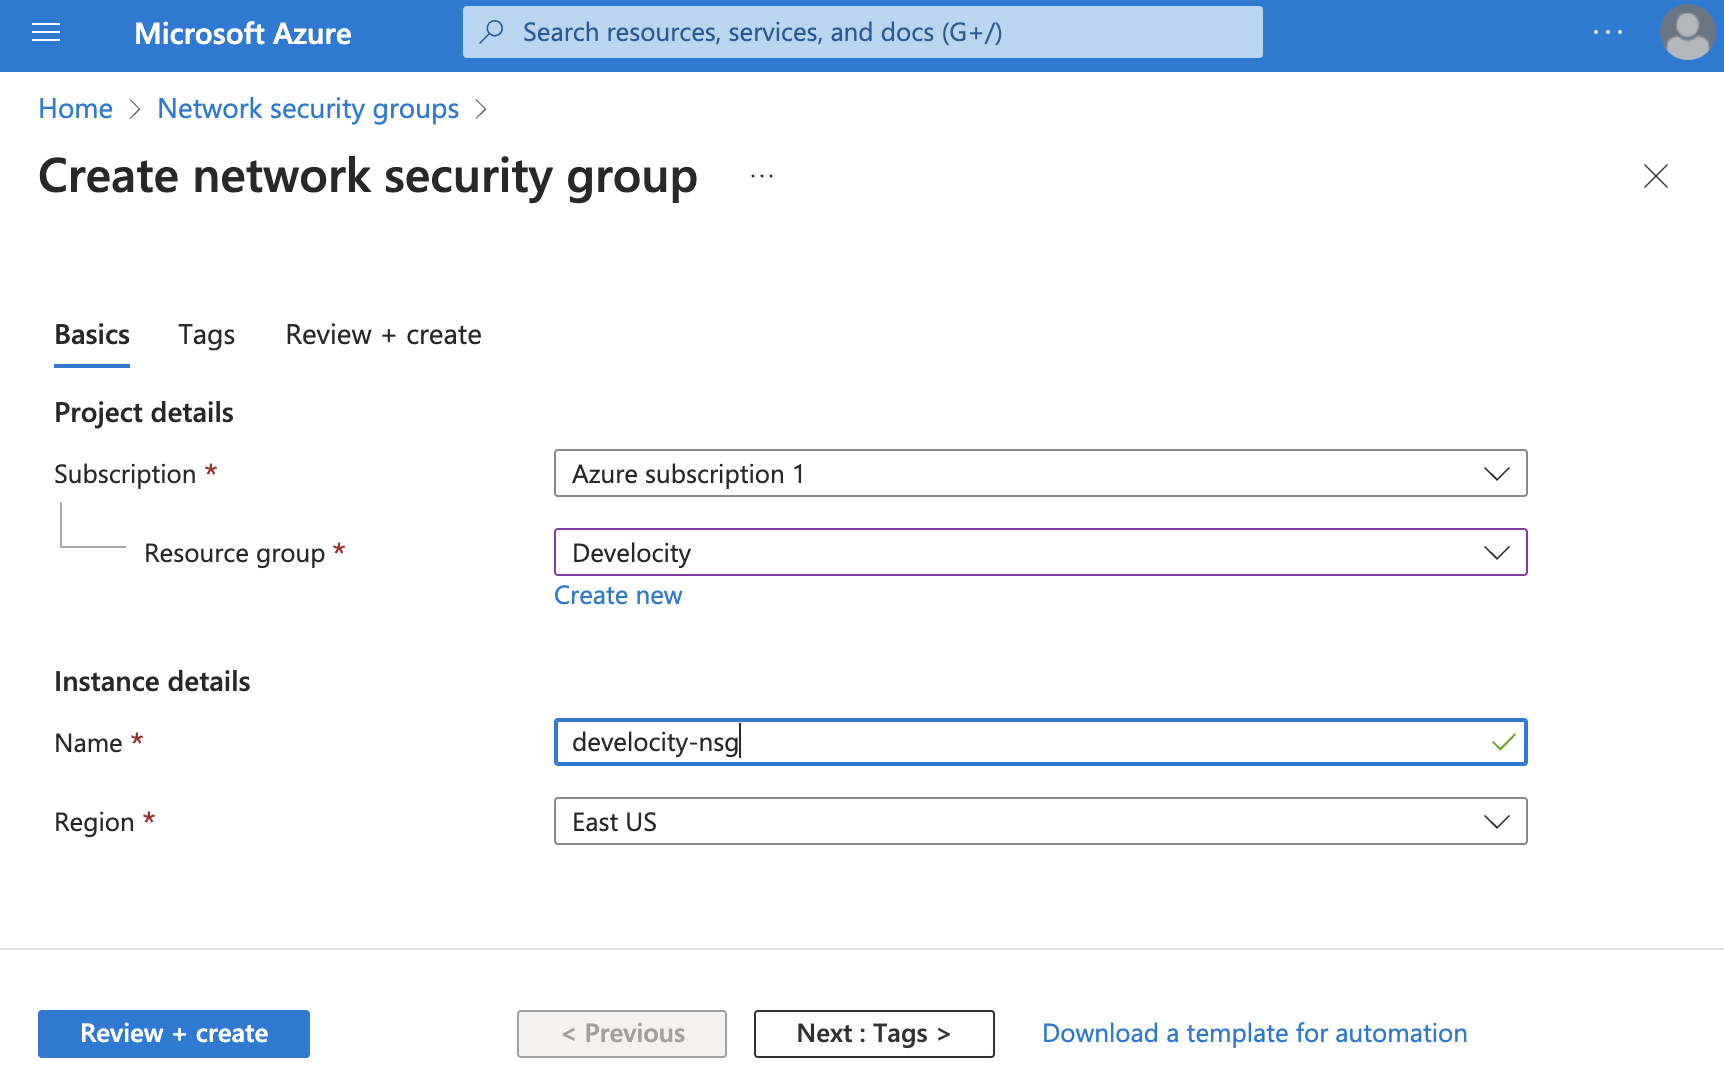
5. Create a Security Group
Create a security group called develocity-nsg.
Create a security group using the Azure CLI
Use the following commands to create the security group:
AZ_NSG_NAME=develocity-nsg
az network nsg create \
  --resource-group $AZ_RESOURCE_GROUP \
  --name $AZ_NSG_NAME \
  --location $AZ_LOCATION
Develocity requires port 443 for HTTPS access and port 80 for HTTP access. To expose ports 443 and 80, execute the following Azure CLI command from the shell:
az network nsg rule create \
  --resource-group $AZ_RESOURCE_GROUP \
  --nsg-name $AZ_NSG_NAME \
  --name Allow-Web-All \
  --access Allow \
  --protocol Tcp \
  --direction Inbound \
  --priority 1010 \
  --source-port-range "*" \
  --destination-port-range 80 443
To be able to connect to the virtual machine, you need to open port 22 for SSH access. To open port 22, execute the following Azure CLI command from the shell:
az network nsg rule create \
  --resource-group $AZ_RESOURCE_GROUP \
  --nsg-name $AZ_NSG_NAME \
  --name Allow-SSH-All \
  --access Allow \
  --protocol Tcp \
  --direction Inbound \
  --priority 1000 \
  --source-port-range "*" \
  --destination-port-range 22
Create a security group using the Azure portal
To create a network security group:
-
Navigate to the Network security groups service and click Create.
-
In Resource Group, enter the name of your Azure resource group.
-
In Name, enter a name for the network security group.
-
In Region, enter the Azure region where the network security group will reside (defaults to the resource group’s region).
-
Click Review + Create.
-
Click Create.
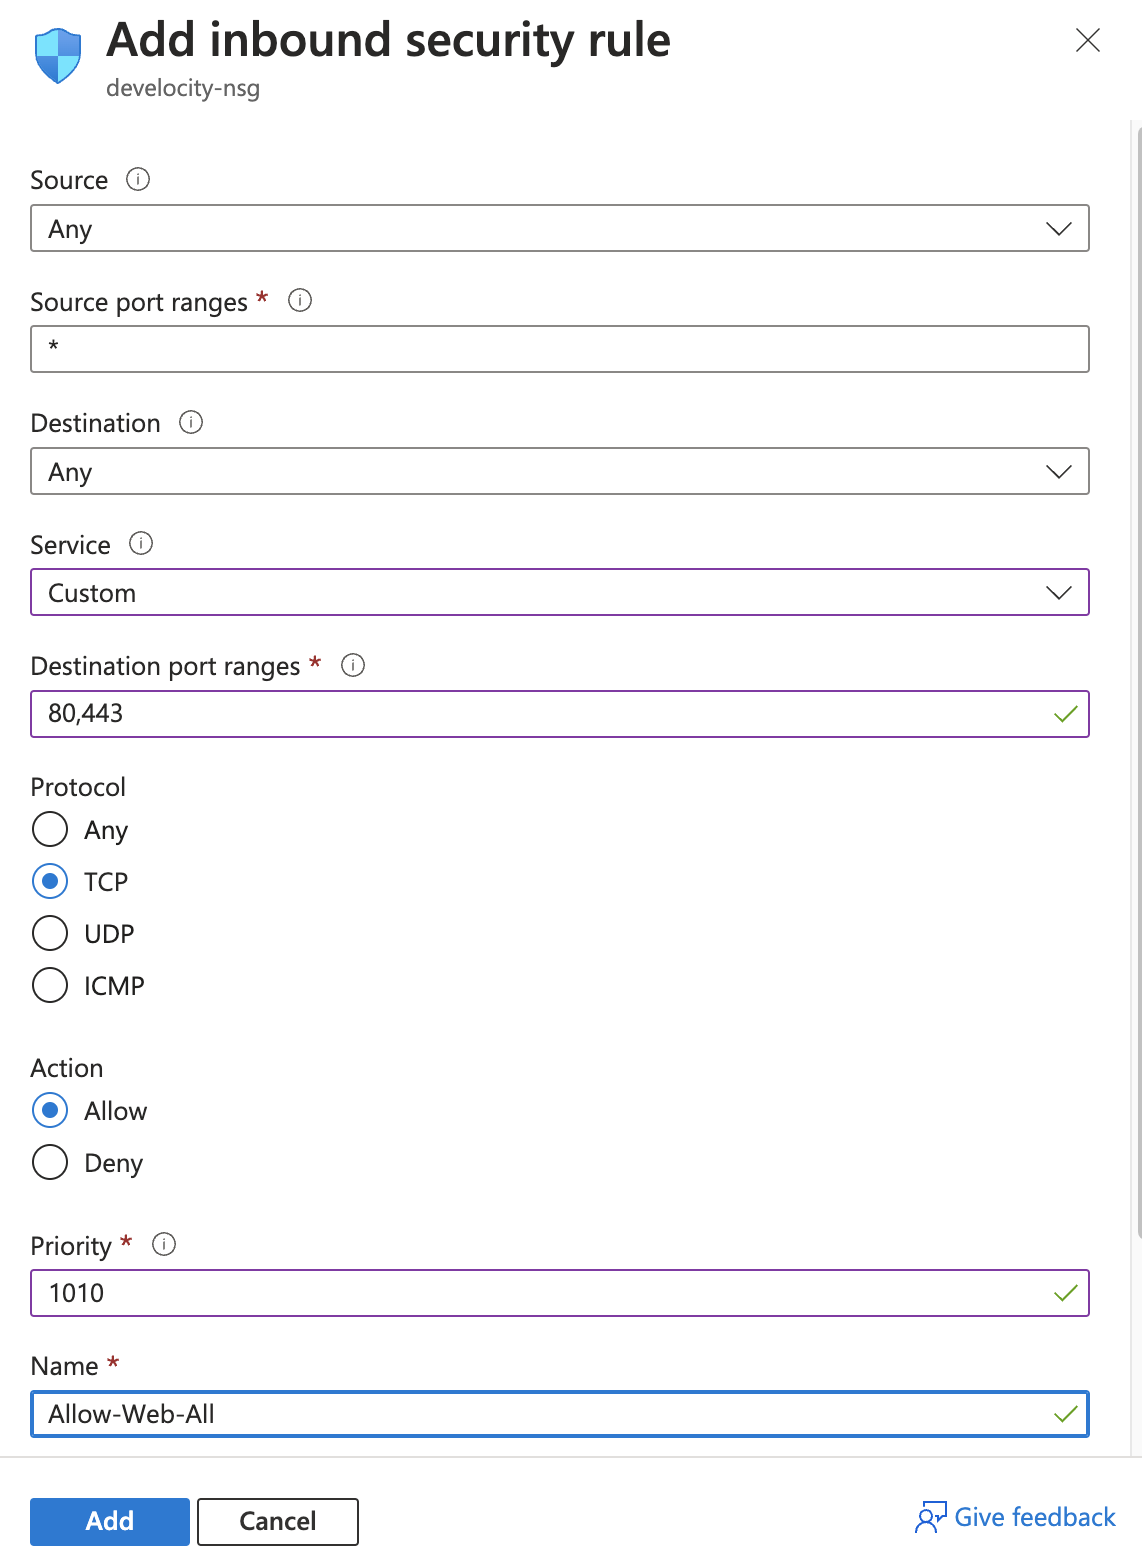
Develocity requires port 443 for HTTPS access and port 80 for HTTP access.
To open ports 80 and 443:
-
Double-click the new network security group.
-
Click Inbound security rules.
-
Click Add.
-
In Destination port ranges, enter '80,443'.
-
In Protocol, select TCP.
-
In Action, select Allow.
-
Click Add.
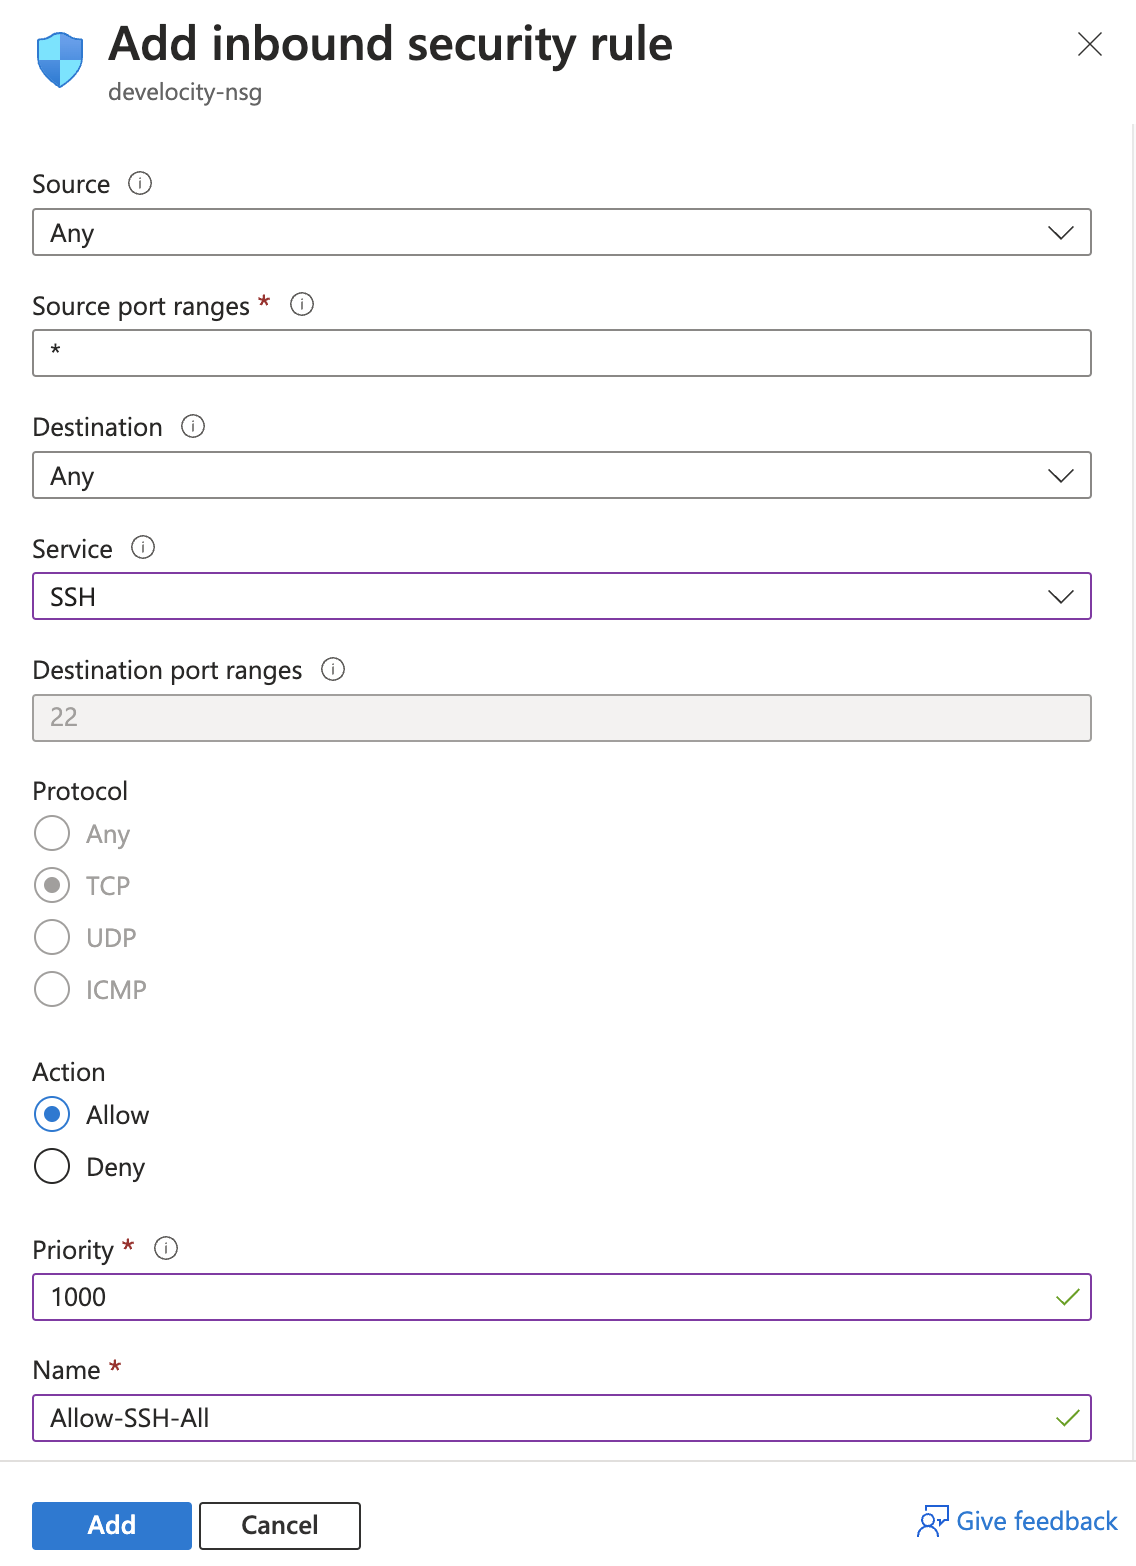
Installation of Develocity requires port 22 for SSH access.
To open port 22:
-
Double-click the new network security group.
-
Click Inbound security rules.
-
Click Add.
-
In Service, select SSH.
-
In Action, select Allow.
-
Click Add.
Creating an Azure virtual machine
The next step is to create an Azure virtual machine with a supported configuration.
1. Choose a Machine Image
Choose a server image appropriate for your environment. We focus our support efforts on Ubuntu 18.04/20.04/22.04/24.04, RHEL 8/9, and Debian 11/12. Develocity is expected to work on most modern Linux systems.
View the latest virtual machine images using the Azure CLI
You can use the Azure CLI to see the latest virtual machine images available in your region. The following command returns a list of all available machine images in the eastus region in a table:
az vm image list -f Ubuntu \
  --location $AZ_LOCATION \
  --all \
  --output table
See Find Azure Marketplace image information using the Azure CLI for more information.
View the latest virtual machine images using the Azure portal
To view the latest virtual machine images available in your region:
-
In the Azure portal, navigate to Virtual machines.
-
Click Create and select Azure Virtual Machine.
-
Click the Image list to see the available machine images.
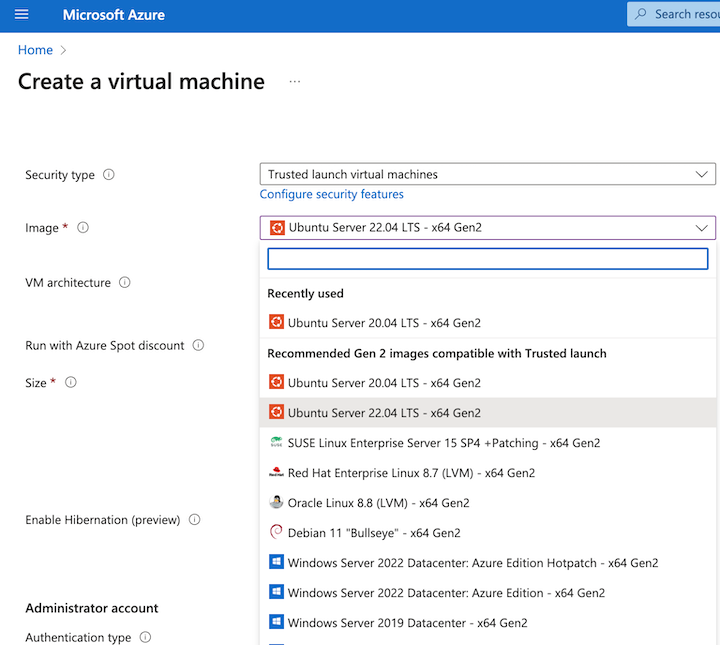
2. Specify virtual machine details
To specify virtual machine details:
-
Continuing in Azure portal, enter a name for the virtual machine in Name.
-
Enter previously created resource group name in Resource Group.
-
Select a region from Region.
-
Select an image from Image.
-
Select an image size from Size.
Develocity’s minimum requirement for an Azure instance isD8s_v3with 8 vCPUs and 32 GB of memory. -
Select Use existing key stored in Azure from SSH public key source and select your key from Stored Keys.
Alternatively, select Generate new key pair from SSH public key source and enter a name for the new key in Key pair name.
See General purpose virtual machine sizes for more information.
| If you are using the Azure CLI, you will specify these details from the command line in 5. Create your instance. |
3. Choose the Storage
For simplicity, we expand the OS disk volume to a minimum of 300 GB rather than mounting individual volumes. This is not advisable in a production instance. We recommend adding separate data volumes so that you can control their size, performance, and cost separately from the root volume.
To specify storage options:
-
Click Next: Disks> in the Azure Create a virtual machine wizard.
-
Specify a minimum of 300 GiB in OS disk size.
The Build Scan® service of Develocity can be configured to store the data in a Azure Blob Storage. This can help performance in high-traffic installations by taking the load off the database. See Appendix B for details.
| If you are using the Azure CLI, you will specify these details from the command line in 5. Create your instance. |
| Instructions for using Azure Database for PostgreSQL as a user-managed database can be found in appendix A. |
4. Configure the Network
We need to configure the network settings for the virtual machine to use the security group we created in the Pre-Installation step 5. Create a Security Group.
To configure the network settings:
-
Click Next: Networking> in the Azure Create a virtual machine wizard.
-
In NIC network security group, select Advanced.
-
In Configure network security group, select the security group you created in the Pre-Installation step 5. Create a Security Group.
| If you are using the Azure CLI, you will specify these details from the command line in 5. Create your instance. |
5. Create your instance
Now, you are ready to create your Azure virtual machine.
Create your virtual machine using the Azure CLI
To create your instance with the Azure CLI, run the following commands:
AZ_VM_NAME=develocity
az vm create -n $AZ_VM_NAME \(1)
  -g $AZ_RESOURCE_GROUP \(2)
  --nsg $AZ_NSG_NAME \(3)
  --image Ubuntu2204 \(4)
  --size Standard_D4s_v3 \(5)
  --data-disk-sizes-gb 300 \
  --ssh-key-name $AZ_SSH_KEY_NAME  \(6)
  --admin-username azureuser \
--location $AZ_LOCATION| 1 | The name of the virtual machine instance. |
| 2 | The resource group you created in the Pre-Installation step 2. Create a Resource Group |
| 3 | The network security group you created in the Pre-Installation step 5. Create a Security Group |
| 4 | The instance image from section 1. Choose a Machine Image. |
| 5 | The instance size from section 2. Specify virtual machine details. |
| 6 | The name of the key pair you created in the Pre-Installation step 3. Generate a Key Pair. |
If you are using a user-managed database, consider reducing the size of the data disk to 50 GB.
Create your virtual machine using the Azure portal
To create your virtual machine using the Azure portal:
-
Click Review + create in the Azure Create a virtual machine wizard.
-
Review your selections.
-
Click Create.
6. Configure the Hostname
Azure virtual machines are provisioned with an external IP address, but no hostname. Develocity cannot use an IP address as a hostname, but there are services like nip.io that automatically map hostnames to IPs. You can start with a public DNS name based on the IP address and later reconfigure it to use a custom hostname if desired.
If you do not wish to set up a permanent DNS record at this time, you can instead use a service like nip.io to provide one based on the IP address. Any of the dash-based naming schemes on the nip.io web page should work, but the following commands generate a useful short name tied to that IP address:
DV_IP_ADDR=$(az vm show -d \
  -g $AZ_RESOURCE_GROUP \
  -n $AZ_VM_NAME \
  --query publicIps \
  -o tsv)

DV_HOSTNAME="develocity-$(printf '%02x' $(echo ${DV_IP_ADDR//./ })).nip.io"
echo $DV_HOSTNAME
develocity-14732a69.nip.io
Use develocity-14732a69.nip.io as the hostname.
If you intend to use a custom hostname to access your Develocity instance, such as develocity.example.com, you must create the appropriate DNS record to route this name to the IP address of the Azure virtual machine instance. Add an A record for your hostname that points to your static IP address. For example:
develocity.example.com A 34.110.226.160You should verify that your DNS record works correctly before installing Develocity, such as by using dig develocity.example.com.
View the IP address using the Azure CLI
You can find the generated IP address with the following Azure CLI command:
az vm show -d \
  -g $AZ_RESOURCE_GROUP \
  -n $AZ_VM_NAME \
  --query publicIps \
  -o tsv
View the IP address using the Azure portal
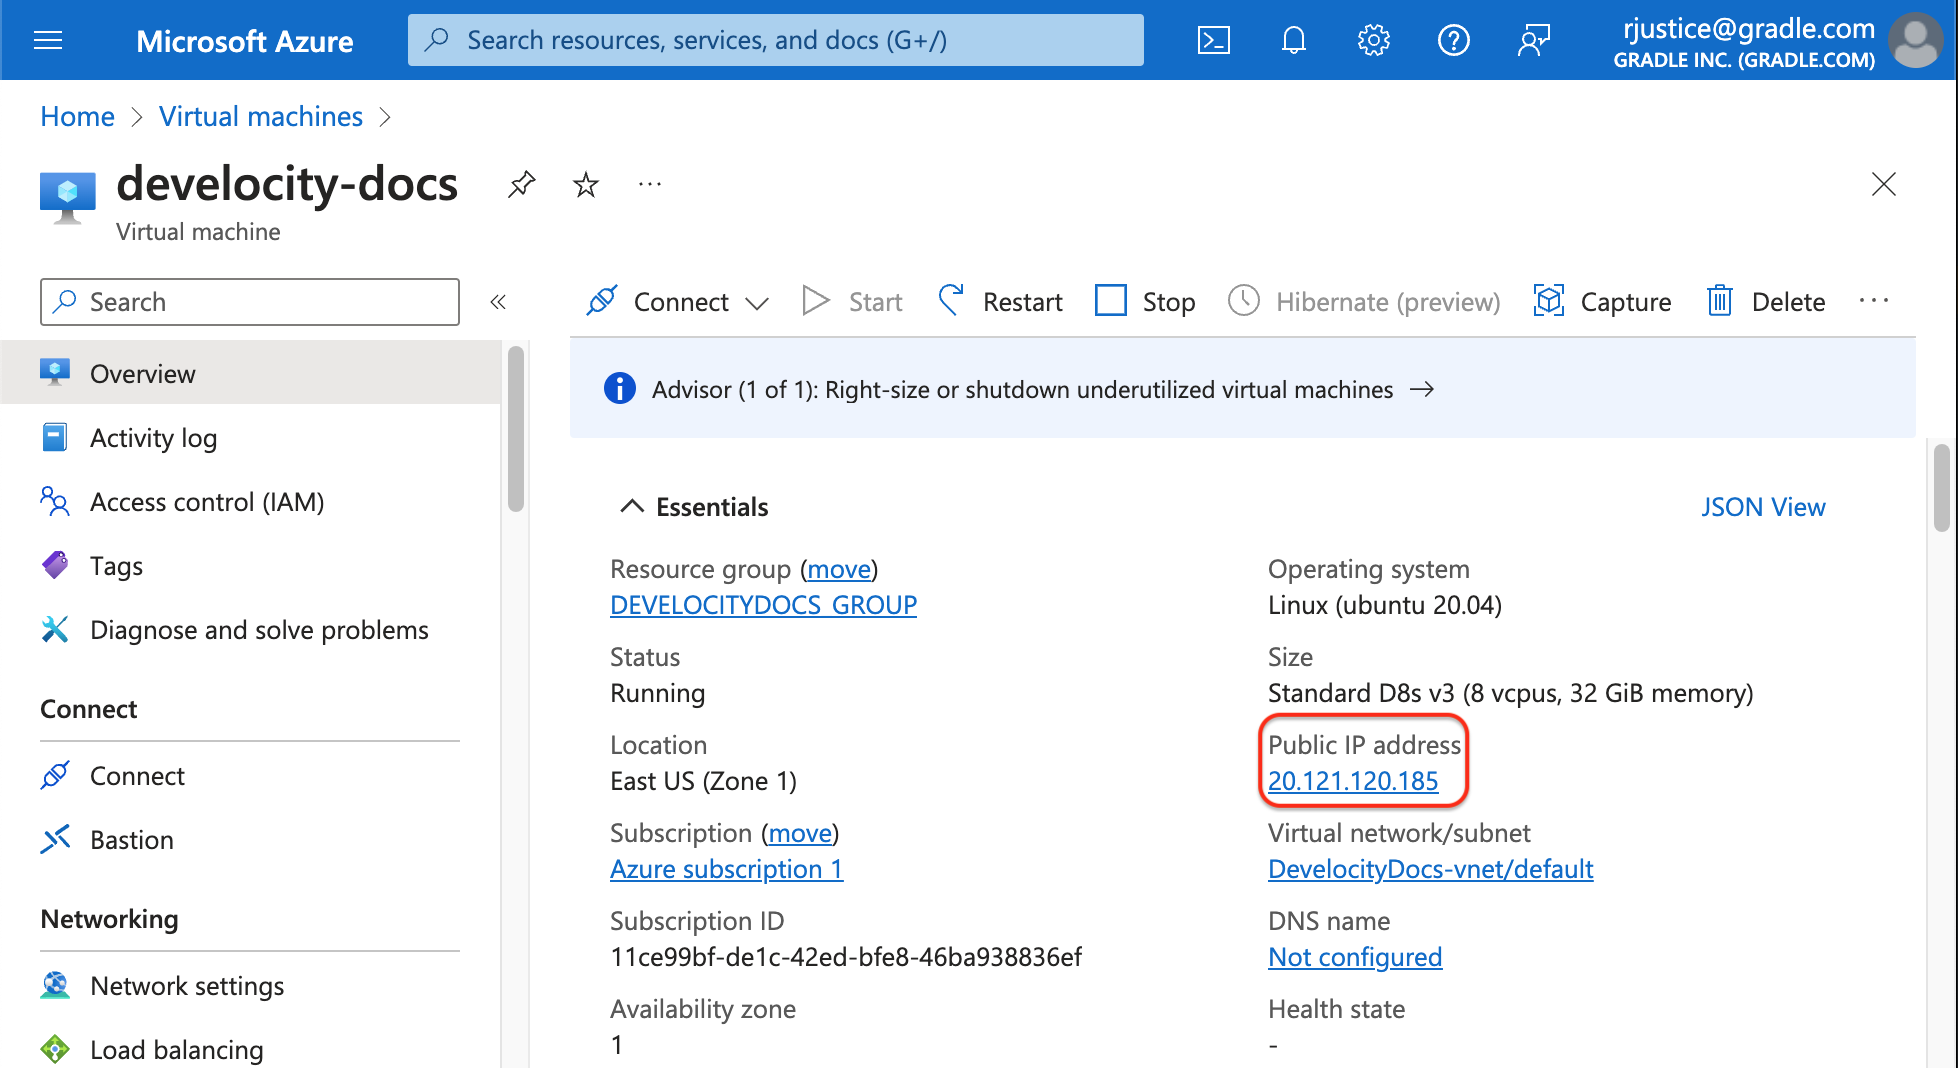
To view the IP address in the Azure portal:
-
In the Azure portal, go to Virtual machines.
-
Click your virtual machine.
-
Azure displays the IP address at Public IP address on the Networking pane of the Properties tab.
You can run Develocity behind a cloud load balancer such as Azure Load Balancer. If you do this, you should generally use /ping to check the load balancer’s health. It will respond as healthy when Develocity is capable of handling requests, even if limited to the interactive starting page while the instance is starting.
This may be unwanted for highly available installations using the load balancer to manage fail-over. If you are installing Develocity in a highly available setup, we recommend submitting a ticket at support.gradle.com for assistance.
7. Set Up your Connection
Once your instance starts, SSH into your instance with the following command:
ssh -i path/to/DevelocityKeyPair azureuser@$DV_HOSTNAME (1)| 1 | The path to where you saved the private key that you created in the Pre-Installation step 3. Generate a Key Pair. |
If you can’t find the IP address for your vm host, retrieve it with the following command:
az vm show -d \
  -g $AZ_RESOURCE_GROUP \
  -n $AZ_VM_NAME \
  --query publicIps \
  -o tsv
A successful response looks like the following:
52.170.239.155
Installing Develocity
In this section, you will install Develocity on your newly created instance.
1. Prepare a Helm values file
Use the values.yaml configuration file to configure Develocity during installation and for later configuration changes. You can find configuration details in the Helm configuration section of the Standalone Helm Chart Configuration Guide. To download an example configuration file, see Appendix A of the Standalone Helm Chart Configuration Guide. Then, create a copy named values.yaml and edit it as shown below:
cat << EOF >> values.yaml
global:
  hostname: $DV_HOSTNAME (1)
EOF| 1 | Use the hostname you decided on in 6. Configure the Hostname. |
When adding things to your Helm values file, merge any duplicate blocks. Alternatively, you can use separate files and pass all of them with --values «file» when running Helm commands. |
| If you want to provide an SSL certificate instead of having Develocity generate a self-signed one, see HTTPS SSL Certificate in the Standalone Helm Chart Configuration Guide. |
| If you want to use Azure Database for PostgreSQL as your database instead of the embedded database, follow Appendix A. |
| If you want to use Azure Blob Storage for Build Scans, see Appendix B. |
You can validate your unattended configuration against the schema by using the Develocity command line tool (develocityctl):
$ develocityctl config-file validate unattended-configuration.yamlIf your unattended configuration is embedded in the values.yaml file, you can validate it with the following command:
$ cat values.yaml | yq '.global.unattended.configuration' | develocityctl config-file validate -2. Copy Files
Copy the Helm values file you created to the instance.
To copy the values.yaml file from your local machine to your instance, run the following command:
scp -i path/to/DevelocityKeyPair values.yaml azureuser@${DV_HOSTNAME}:~Optionally copy the develocity.license file to your instance if you did not include it in your values.yaml file:
scp -i path/to/DevelocityKeyPair path/to/develocity.license azureuser@${DV_HOSTNAME}:~If you are using a custom SSL certificate, copy the certificate and key files to the instance as well.
3. Install K3s
SSH into the instance by running the following command:
ssh -i path/to/DevelocityKeyPair azureuser@$DV_HOSTNAME (1)K3s is a fully compliant Kubernetes distribution and must be installed on the instance.
Once you’re on the machine, install K3s and make it available to the current user:
curl -sfL https://get.k3s.io | sh -

sudo chown ${UID} /etc/rancher/k3s/k3s.yaml

mkdir -p "${HOME}/.kube"

ln -s /etc/rancher/k3s/k3s.yaml "${HOME}/.kube/config"
4. Install Helm
Then install Helm:
curl -qs https://raw.githubusercontent.com/helm/helm/main/scripts/get-helm-3 | bash5. Install the Helm Chart
First, add the https://helm.gradle.com/ helm repository and then update it:
helm repo add gradle https://helm.gradle.com/
helm repo update gradle
6. Install Develocity
Then run helm install with the following command:
helm install \
  --create-namespace \
  --namespace develocity \
  develocity-standalone \
  gradle/gradle-enterprise-standalone \
  --values ./values.yaml \(1)
--set-file global.license.file=./develocity.license (2)| 1 | The Helm values file you created in 1. Prepare a Helm values file and uploaded in 2. Copy Files. |
| 2 | The license you obtained in 2. A Develocity License and uploaded in 2. Copy Files. |
The output should be similar to this:
NAME: develocity-standalone
LAST DEPLOYED: Thu Apr 18 11:22:10 2024
NAMESPACE: develocity
STATUS: deployed
REVISION: 1
TEST SUITE: None
NOTES:
Develocity has been installed.
7. Wait for Develocity to start
You can see the status of Develocity starting up by examining its pods.
kubectl --namespace develocity get podsNAME READY STATUS RESTARTS AGE gradle-database-58f97cc888-sscxn 2/2 Running 0 71s gradle-embedded-object-storage-68d8956f98-c7gs9 1/1 Running 0 71s gradle-enterprise-app-7fc5966df8-dw55g 0/1 Init:2/5 2 71s gradle-enterprise-operator-dc7dbf46d-pp5hf 1/1 Running 0 71s gradle-keycloak-5b975c469f-vw7ts 0/1 Init:0/2 3 (29s ago) 71s gradle-metrics-d8f8f4557-fxdwj 2/2 Running 0 71s gradle-monitoring-5f97675474-dszqv 3/3 Running 0 70s gradle-node-monitoring-7c4744dd6c-jmxkx 1/1 Running 0 71s gradle-proxy-5c49c559ff-96w4q 1/1 Running 1 (55s ago) 71s gradle-test-distribution-broker-77957b5988-5x5ph 0/1 Init:1/2 0 71s
Eventually, the pods should all report as Running:
kubectl --namespace develocity get podsNAME READY STATUS RESTARTS AGE gradle-database-58f97cc888-sscxn 2/2 Running 0 3m39s gradle-embedded-object-storage-68d8956f98-c7gs9 1/1 Running 0 3m39s gradle-enterprise-app-7fc5966df8-dw55g 1/1 Running 0 3m39s gradle-enterprise-operator-dc7dbf46d-pp5hf 1/1 Running 0 3m39s gradle-keycloak-5b975c469f-vw7ts 1/1 Running 0 3m39s gradle-metrics-d8f8f4557-fxdwj 2/2 Running 0 3m39s gradle-monitoring-5f97675474-dszqv 3/3 Running 0 3m38s gradle-node-monitoring-7c4744dd6c-jmxkx 1/1 Running 0 3m39s gradle-proxy-5c49c559ff-96w4q 1/1 Running 0 3m39s gradle-test-distribution-broker-77957b5988-5x5ph 1/1 Running 0 3m39s
Develocity has a /ping endpoint, which can be used to verify network connectivity with Develocity.
Connectivity to Develocity installation can be tested by running the following command on machines that need to connect to Develocity:
curl -sw \\n --fail-with-body --show-error https://«develocity-host»/pingIt should return SUCCESS.
Once all pods have a status of Running and the system is up and connected, you can interact with it by visiting its URL and hostname in a web browser.
Develocity is installed and running.
Post-Installation
Many features of Develocity, including access control, database backups, and Build Scan retention, can be configured in Develocity once it is running. Consult the Develocity Administration guide to learn more.
For instructions on how to start using Develocity in your builds, consult the Getting Started with Develocity guide.
Appendix
Appendix A: Using Azure Database for PostgreSQL
This appendix will walk you through using an Azure Database for PostgreSQL flexible server as your user-managed database.
1. Obtain the Required Permissions
You need permission to create and manage an Azure Database for PostgreSQL.
The Contributor Azure built-in role granted earlier contains the necessary permissions.
2. Create and set up an Azure Database for PostgreSQL Instance
Develocity is compatible with PostgreSQL versions 14 through 17. The minimum storage space required is 250 GB with 3,000 or more IOPS.
A. Create a root username and password
Create a root username and password for the database instance, referred to below as «db-root-username» and «db-root-password», respectively. These are the credentials you will use for your database connection; save them somewhere secure.
B. Create the instance
Create the Azure Database for PostgreSQL instance:
AZ_POSTGRES=develocity-managed-db
AZ_POSTGRES_ADMIN="«db-root-username»"
AZ_POSTGRES_ADMIN_PASSWORD="«db-root-password»"
DV_DATABASE_NAME=develocity

az postgres flexible-server create --name $AZ_POSTGRES \
  --resource-group $AZ_RESOURCE_GROUP \
  --admin-user $AZ_POSTGRES_ADMIN \
  --admin-password $AZ_POSTGRES_ADMIN_PASSWORD \
  --location $AZ_LOCATION \
  --version 14 \
  --tier Burstable \
  --sku-name Standard_B4ms \(1)
  --storage-type PremiumV2_LRS \
  --throughput 125 \
  --iops 3000 \(2)
  --public-access 0.0.0.0 \(3)
  --storage-size 256 \(4)
  --database-name $DV_DATABASE_NAME \
-o json| 1 | Use a SKU that fulfills your requirements regarding performance and pricing. Standard_B4ms is a good starting point for this tutorial and provides enough client connections, but most probably is not sufficient for a production instance. See Compute and storage options for Azure Database for PostgreSQL for more information. |
| 2 | Use premium storage type and 3000 IOPS for optimal performance. |
| 3 | The 0.0.0.0 parameter allows access to this database from any resource deployed in Azure. |
| 4 | Develocity should be installed with 250GB of database storage. |
AZ_POSTGRES_HOSTNAME=$(az postgres flexible-server show \
  --name $AZ_POSTGRES \
  --resource-group $AZ_RESOURCE_GROUP \
  --query 'fullyQualifiedDomainName' \
  -o tsv)
C. Set required server parameters
Develocity requires the following Azure database server extensions:
-
amcheck
-
intarray
-
pg_trgm
-
pgcrypto
-
pgstattuple
To install the extensions, run the following command:
az postgres flexible-server parameter set \
  --resource-group $AZ_RESOURCE_GROUP \
  --server-name $AZ_POSTGRES \
  --subscription $AZ_SUBSCRIPTION \
  --name azure.extensions \
  --value amcheck,intarray,pg_trgm,pgcrypto,pgstattuple
You can view the status of your instance with:
az postgres flexible-server db show \
  --resource-group $AZ_RESOURCE_GROUP \
  --server-name $AZ_POSTGRES \
  --database-name $DV_DATABASE_NAME
3. Configure Develocity with Azure Database for PostgreSQL
Add the following configuration snippet to your Helm values file:
cat << EOF >> values.yaml
database:
  location: user-managed
  connection:
    host: $AZ_POSTGRES_HOSTNAME
    databaseName: $DV_DATABASE_NAME
  credentials:
    superuser:
      username: $AZ_POSTGRES_ADMIN
      password: $AZ_POSTGRES_ADMIN_PASSWORD
EOF| The superuser is only used to set up the database and create migrator and application users. You can avoid using the superuser by setting up the database yourself, as described in the Database options section of Kubernetes Helm Chart Configuration Guide. Please contact Gradle support for help with this. |
This action embeds your database superuser credentials in your Helm values file. It must be kept secure. If you prefer to provide the credentials as a Kubernetes secret, consult the Database options section of the Kubernetes Helm Chart Configuration Guide.
4. Upgrade Develocity with your updated configuration file
If you created the Azure Database for PostgreSQL instance as part of the initial installation, you can continue with the installation process in 6. Install Develocity.
If you’re changing an already running Develocity instance, see Changing configuration values in the Develocity Upgrade Guide for instructions on how to upgrade your Develocity instance with updated configuration values.
Appendix B: Using Azure Blob Storage as user-managed Object Storage
Develocity can use a user-managed Object Storage instead of using its own embedded version. This has several benefits, from scalable storage, to reduced operation burden and better backup and failover management. It allows you to store Build Scans in the Object Storage. This appendix will walk you through using Azure Blob Storage as user-managed Object Storage.
By setting up Azure Blob Storage, you will store Build Cache artifacts in Azure Blob Storage instead of the default storage location. See Build Scan Object Storage in the Develocity Administration Manual for a description of the benefits and limitations.
1. Obtain the required permissions
You need permission to create and manage an Azure storage account and container.
The Storage Blob Data Contributor Azure built-in role granted earlier contains the necessary permissions.
2. Create an Azure storage account
To create an Azure storage account, run the following command:
AZ_STORAGE_ACCOUNT=develocitystorageacc (1)
az storage account create --name $AZ_STORAGE_ACCOUNT --resource-group $AZ_RESOURCE_GROUP -l $AZ_LOCATION| 1 | The name of the storage account you want to create. The name must be unique across all existing account name in Azure. It must be 3 to 24 characters long and can contain only numbers and lowercase letters. |
See az storage account create Azure CLI documentation for more information about this command.
3. Create the Azure Blob Storage container
Create two containers for your storage account. You will need the connection string to your storage container. To find your connection string using the Azure CLI, run the following command:
AZ_STORAGE_CONNECTION_STRING=$(az storage account show-connection-string \
  --name $AZ_STORAGE_ACCOUNT \
  --resource-group $AZ_RESOURCE_GROUP \
  --query connectionString \
  -o tsv)
To create Azure containers, run the following commands:
AZ_STORAGE_CONTAINER_FOR_APPLICATION_DATA=develocity-application-data (1)
$AZ_STORAGE_CONTAINER_FOR_MONITORING_DATA=develocity-monitoring-data (2)

az storage container create \
  --name $AZ_STORAGE_CONTAINER_FOR_APPLICATION_DATA \
  --connection-string $AZ_STORAGE_CONNECTION_STRING

az storage container create \
  --name $$AZ_STORAGE_CONTAINER_FOR_MONITORING_DATA \
--connection-string $AZ_STORAGE_CONNECTION_STRING| 1 | The name of the container meant to store application data, like Build Scans or Build Cache entries |
| 2 | The name of the container meant to store monitoring data, like logs and metrics collected during application lifetime |
| You can use only one bucket for both application and monitoring data; this is an operation’s decision based on your practices. |
See az storage container create in the Azure CLI documentation for more information about this command.
4. Configure Develocity to use your Azure Blob Storage container
Update your values.yaml file to configure Develocity to store Build Cache artifacts and monitoring data into Azure Blob Storage.
cat << EOF >> values.yaml
objectStorage:
  type: azureBlobStorage (1)
  azureBlobStorage:
    container: $AZ_STORAGE_CONTAINER_FOR_APPLICATION_DATA (2)
    credentials:
      type: "accountInformation" (3)
      accountInformation:
        accountName: $AZ_STORAGE_ACCOUNT (4)
        connectionString: $AZ_STORAGE_CONNECTION_STRING (5)
    monitoring: (6)
      container: $$AZ_STORAGE_CONTAINER_FOR_MONITORING_DATA (7)
      credentials:
        type: "accountInformation" (3)
        accountInformation:
          accountName: $AZ_STORAGE_ACCOUNT (4)
          connectionString: $AZ_STORAGE_CONNECTION_STRING (5)
EOF| 1 | Object Storage type used in this installation, here set to azureBlobStorage |
| 2 | Container created in 3. Create the Azure Blob Storage container, used for application data storage (Build Cache, Build Scan), |
| 3 | Authentication mechanism configured for this installation. |
| 4 | The storage account created in 2. Create an Azure storage account |
| 5 | The connection string you obtained earlier in step 3. Create the Azure Blob Storage container. |
| 6 | Configuration block dedicated to monitoring data storage (metrics, logs). Its structure is identical to the one in objectStorage.azureBlobStorage |
| 7 | Container created in 3. Create the Azure Blob Storage container, used for monitoring data |
5. Configure Develocity to use store Build Scans in Azure Blob Storage
Update your values.yaml file to configure Develocity to store Build Scans in Azure Blob Storage.
To do this, you must use the unattended configuration mechanism. Develocity can store Build Scan data in either the configured database or in the configured Object Store. The unattended configuration mechanism lets you configure which of these is used to store Build Scans as part of a configuration file, which can be embedded in your Helm values file as described in the unattended configuration guide.
First we need to create a minimal unattended configuration file. This requires you to choose a password for the system user and hash it. To do this, install Develocityctl.
The following command will prompt you to enter a password and hash it:
develocityctl config-file hash -o secret.txt
HASHED_SYSTEM_PASSWORD=$(cat secret.txt)
Update your Helm values file with the following configuration:
cat << EOF >> values.yaml
global:
  unattended:
    configuration:
      version: 13 (1)
      systemPassword: $HASHED_SYSTEM_PASSWORD (2)
      buildScans:
        incomingStorageType: objectStorage

enterprise:
  resources:
    requests:
      memory: 8Gi (3)
    limits:
      memory: 8Gi (3)
EOF| 1 | The version of the unattended configuration. |
| 2 | Your hashed system password. |
| 3 | If you have already set a custom value here, instead increase it by 2Gi. |
When adding things to your Helm values file, merge any duplicate blocks. Alternatively, you can use separate files and pass all of them with --values «file» when running Helm commands. |
6. Verify Azure Blob Storage is used
Once Develocity has started, you can verify that the Azure configuration is correct by examining the contents of your Azure container.
| Develocity will start even if your Object Storage configuration is incorrect. |
First, publish a Build Scan to ingest some data into Develocity, eg. by following Create a Build Scan® in 60 seconds.
Run the following Azure CLI command to view the number of Build Scans and Build Cache artifacts stored in your Azure container:
az storage blob list \
  --account-name $AZ_STORAGE_ACCOUNT \(1)
  --container-name $AZ_STORAGE_CONTAINER_FOR_APPLICATION_DATA \(2)
  --connection-string $AZ_STORAGE_CONNECTION_STRING \(3)
  --prefix build-scans \(4)
  --query "length(@)" -o tsv

az storage blob list \
  --account-name $AZ_STORAGE_ACCOUNT \(1)
  --container-name $AZ_STORAGE_CONTAINER_FOR_APPLICATION_DATA \(2)
  --connection-string $AZ_STORAGE_CONNECTION_STRING \(3)
  --prefix build-cache \(4)
--query "length(@)" -o tsv| 1 | The name of the storage account you created earlier in step 2. Create an Azure storage account. |
| 2 | The name of the container you created earlier in step 3. Create the Azure Blob Storage container. |
| 3 | The connection string you obtained earlier in step 3. Create the Azure Blob Storage container. |
| 4 | Prefix for the Develocity subsystem. |
The following successful response indicates that there are currently 204125 Build Scans and 15960 cache artifacts in the container (this may vary depending on your build):
4
123