Cloud services are frequently updated. This documentation may not reflect the latest changes. Always verify steps and interfaces with the current provider documentation.
This manual covers the installation of Develocity on an Amazon EC2 instance.
Develocity is a Kubernetes-based application, distributed as a Helm chart. Helm is a package manager for Kubernetes applications. The installation of Develocity described in this manual involves installing the K3s lightweight Kubernetes distribution onto an AWS host, then using Helm to install Develocity in the K3s instance on that host. Helm manages all Develocity components.
Prerequisites
1. An AWS Account
An AWS paid account is required. Note that a free tier account is not sufficient.
This tutorial will not work on GovCloud accounts (us-gov regions). |
2. A Develocity License
If you have purchased Develocity or started a trial, you should already have a license file called develocity.license. Otherwise, you may request a Develocity trial license.
3. An AWS IAM user
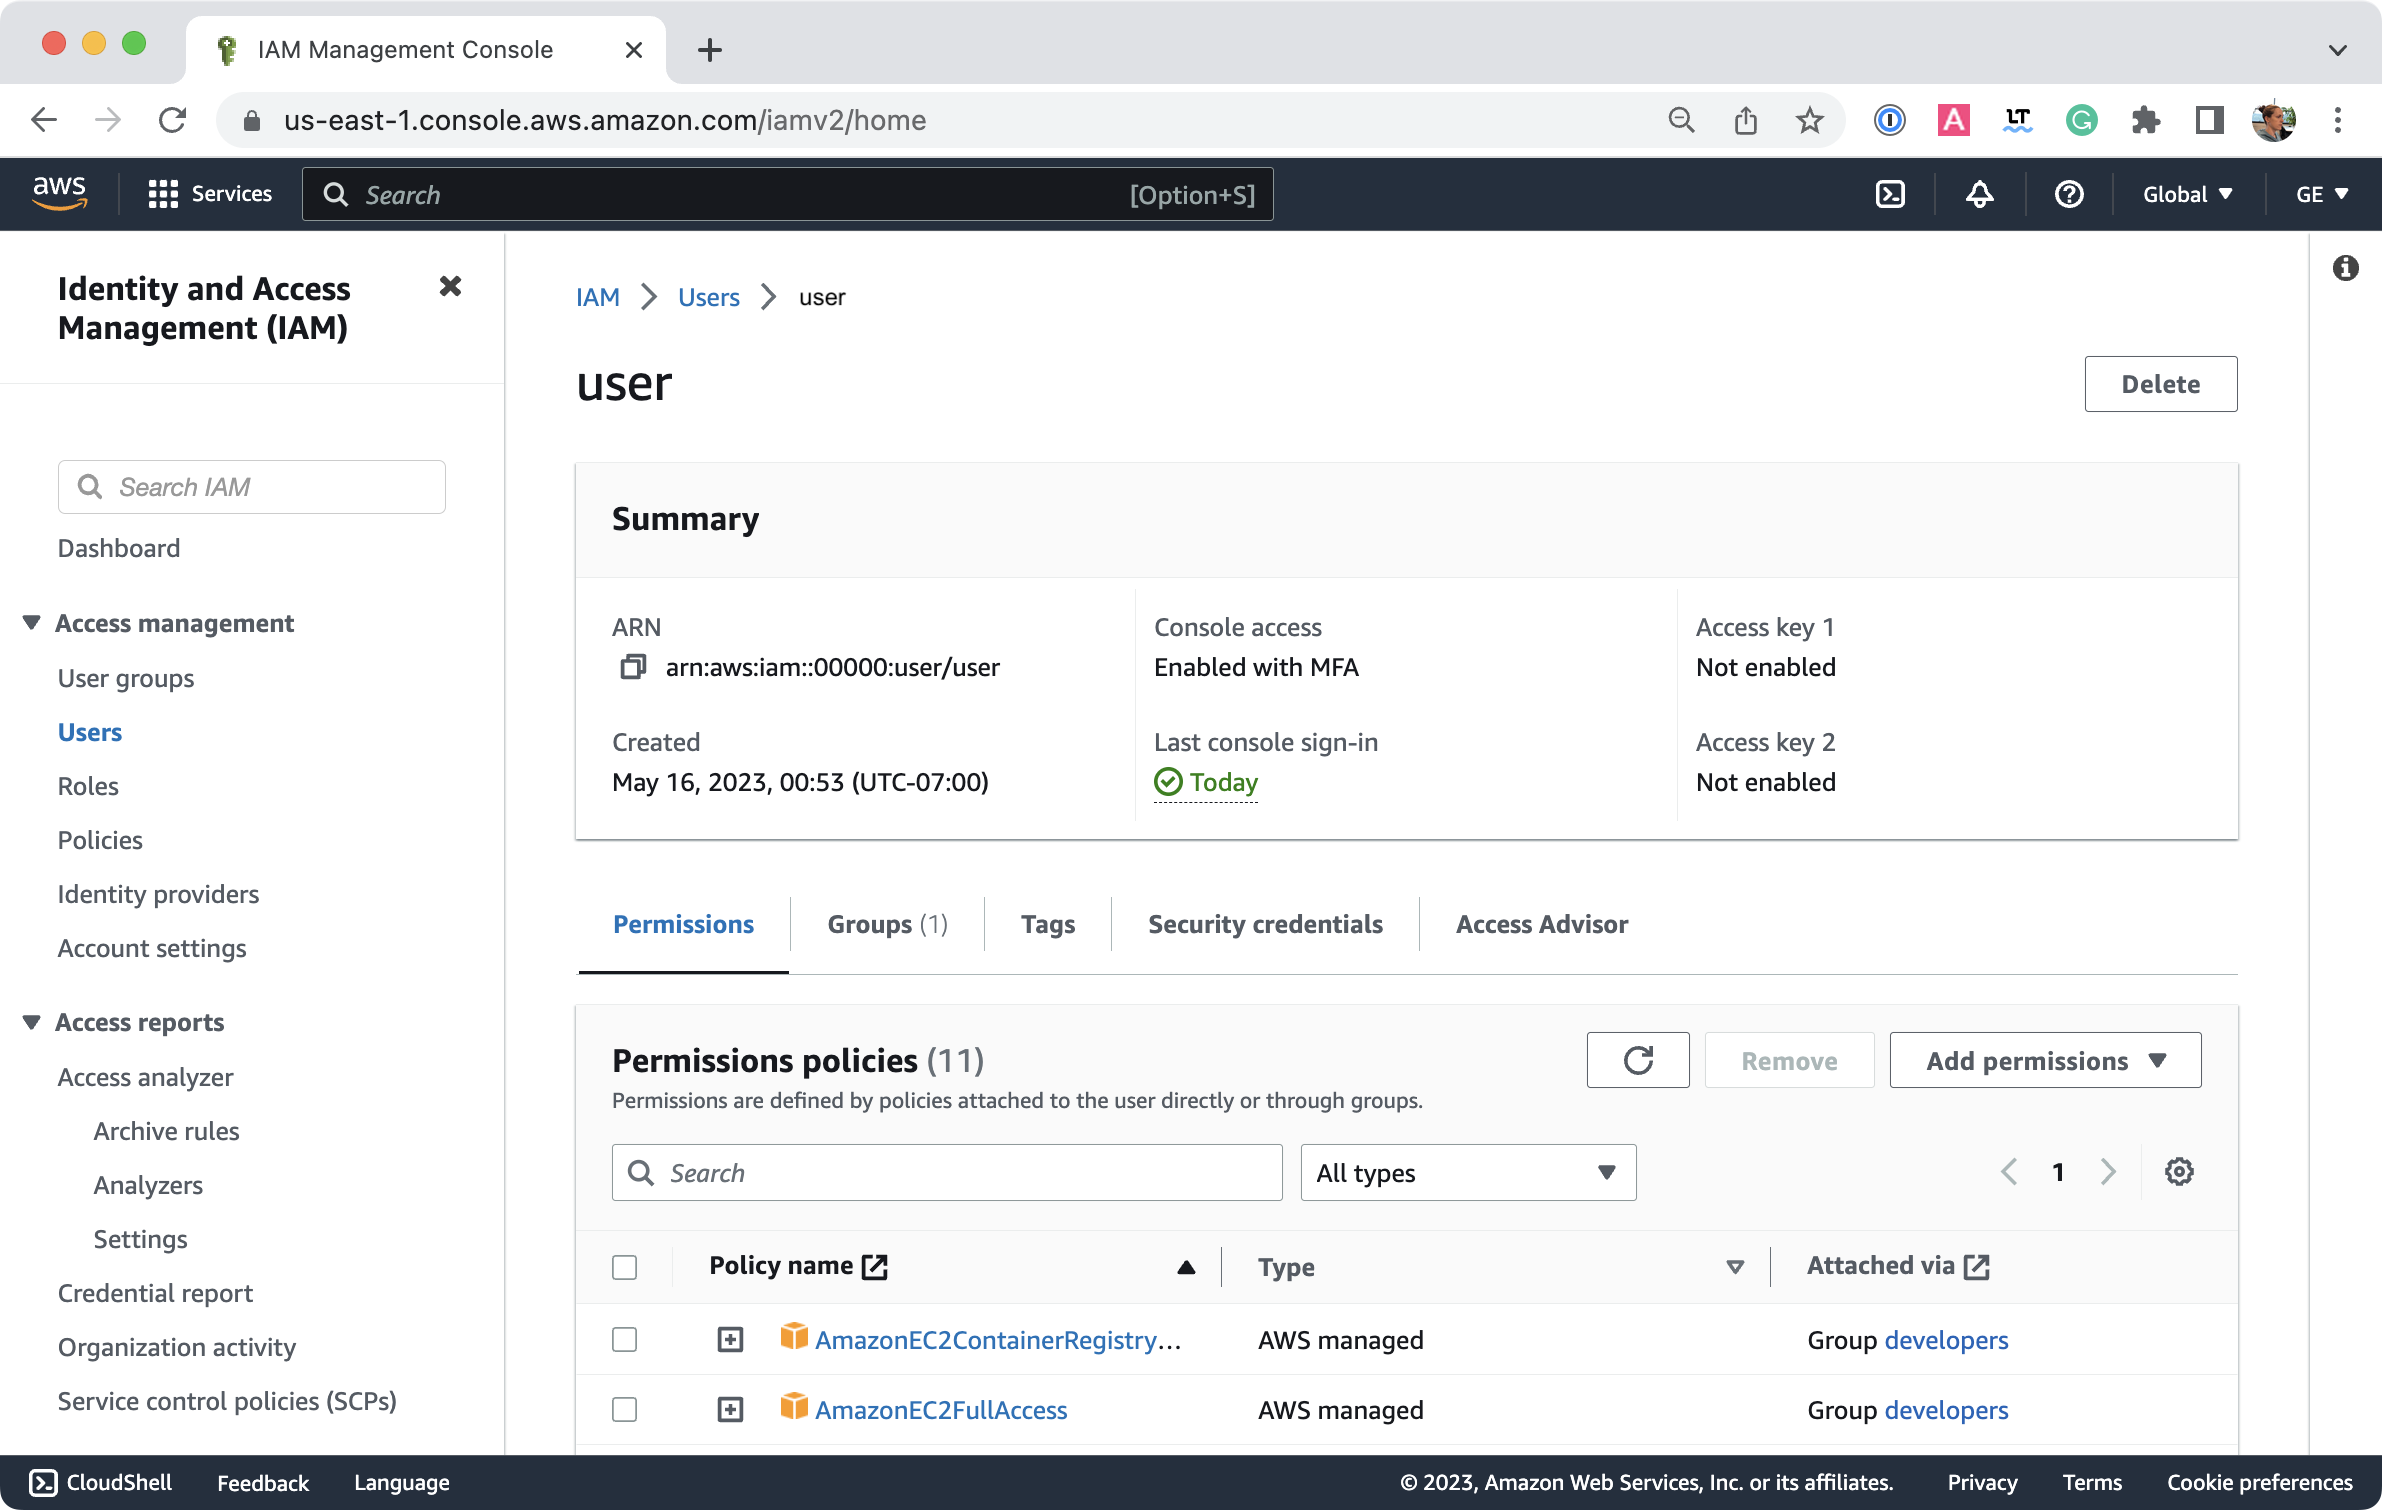
Grant the user that will manage the instance the AmazonEC2FullAccess AWS managed policy.
If you are using AWS’s Cloud Shell (see section 1. Set up your Shell), grant the user Cloud Shell permissions using the AWSCloudShellFullAccess AWS managed policy.
| If you choose to use Amazon RDS as your database or S3 to store your Build Scan data, you will need the additional permissions described in the appendices. |
You can check your user permissions in the AWS console by heading over to IAM > Users > user:
Host Requirements
This section outlines AWS host requirements for the installation.
1. Operating System
Develocity is expected to work on most modern Linux systems.
|
Currently, Develocity only supports the |
2. K3s
K3s needs several ports to be accessible from the host.
| Protocol | Port |
|---|---|
|
TCP |
6443 |
|
TCP |
10250 |
|
UDP |
8472 |
| While these ports don’t need to be accessible from outside the host machine, K3s may access them using a different network interface or non-localhost IP. |
3. CPU & Memory
The minimum installation requirements are:
-
8 CPU units (
x86_64architecture) -
24 GB of RAM
The t2.2xlarge instance size provides 8 vCPU / 32 GiB Memory.
4. Database
Develocity installations have two database options:
-
An embedded database that is highly dependent on disk performance.
-
A user-managed database can be any PostgreSQL database compatible with versions 14 through 17, including Amazon RDS and Aurora.
By default, Develocity stores its data in a PostgreSQL database that is run as part of the application itself, with data being stored in a directory mounted on its host machine.
RDS Database
There are instructions for using Amazon RDS as a user-managed database in the RDS appendix. This can have several benefits, including easier resource scaling, backup management, and failover support.
5. Storage
In addition to the database, Develocity needs some storage capacity for configuration files, logs, build cache artifacts, and database backups. These storage requirements apply regardless of which type of database you use, although the necessary size varies based on the database type. To simplify managing disk space, Gradle recommends mounting a persistent storage volume for Develocity data, logs, and backups. See Storage settings in the Standalone Helm Chart Configuration Guide for configuration details.
The recommended minimum capacities for the persistent volumes are:
| Description | Size in GB |
|---|---|
|
Data |
250 |
|
Backups |
250 |
|
Logs |
10 |
Capacity
The minimum capacity required for the installation directory for the embedded database case is 250 GB.
The minimum capacity required for the installation directory for the user-managed database case is 30 GB. It is recommended to create a specific volume for the installation directory to avoid consuming the space required for Develocity, and to ensure at least 10% of the volume’s space is free at all times. The following are additional disk capacity requirements:
| Location | Storage Size |
|---|---|
|
|
30 GB |
These are not particularly performance sensitive.
Performance
For production workloads, storage volumes should exhibit SSD-class disk performance of at least 3000 IOPS (input/output operations per second).
| Disk performance has a significant impact on Develocity performance. Network file systems (such as Amazon EFS) are not compatible with Develocity due to their performance characteristics. |
Object storage
Develocity administrators can store Build Scan data in an object storage service, such as Amazon S3. This can help performance in high-traffic installations by reducing the load on the database. Object storage services offer performance and cost advantages compared to database storage. See Build Scan object storage in the Develocity Administration Manual for a description of the benefits and limitations. See the S3 appendix for instructions.
6. Network Connectivity
Develocity requires network connectivity for periodic license validation.
An installation of Develocity will not start if it cannot connect to both registry.gradle.com and harbor.gradle.com. |
It is strongly recommended that production installations of Develocity are configured to use HTTPS with a trusted certificate.
When installing Develocity, you will need to provide a hostname, such as ge.example.com.
Pre-Installation
1. Set up your Shell
If you decide to use Cloud Shell or the AWS console, skip to Instance Configuration. Otherwise follow step A and B below:
A. Install the AWS CLI
Follow the instructions in the AWS documentation.
B. Configure the AWS CLI
If you have an AWS access key already, but have not configured the aws CLI, follow the AWS CLI quick setup guide. Choose the region you wish to install Develocity in. AWS provides a list of all available AWS regions.
| Pick the region geographically closest to you or to any pre-existing compute resources, such as CI agents, to ensure the best performance. |
If you do not have an AWS access key, follow the AWS CLI Prerequisites guide, and then the quick setup guide.
2. Generate a Key Pair
If you do not already have a key pair for accessing AWS EC2 resources, you need to create one and call it DevelocityKeyPair.
Generate a key pair using the AWS CLI
Enter the command:
$ aws ec2 create-key-pair \
    --key-name DevelocityKeyPair \
    --query 'KeyMaterial' \
    --output text > DevelocityKeyPair.pem
If you are using Powershell, its default UTF-8 encoding for file redirections can cause issues, so you should use this instead:
PS C:\> aws ec2 create-key-pair --key-name DevelocityKeyPair --query 'KeyMaterial' --output text |
    out-file -encoding ascii -filepath DevelocityKeyPair.pem
Generate a key pair using the AWS Management Console
Head over to EC2 > Key pairs > Create key pair:
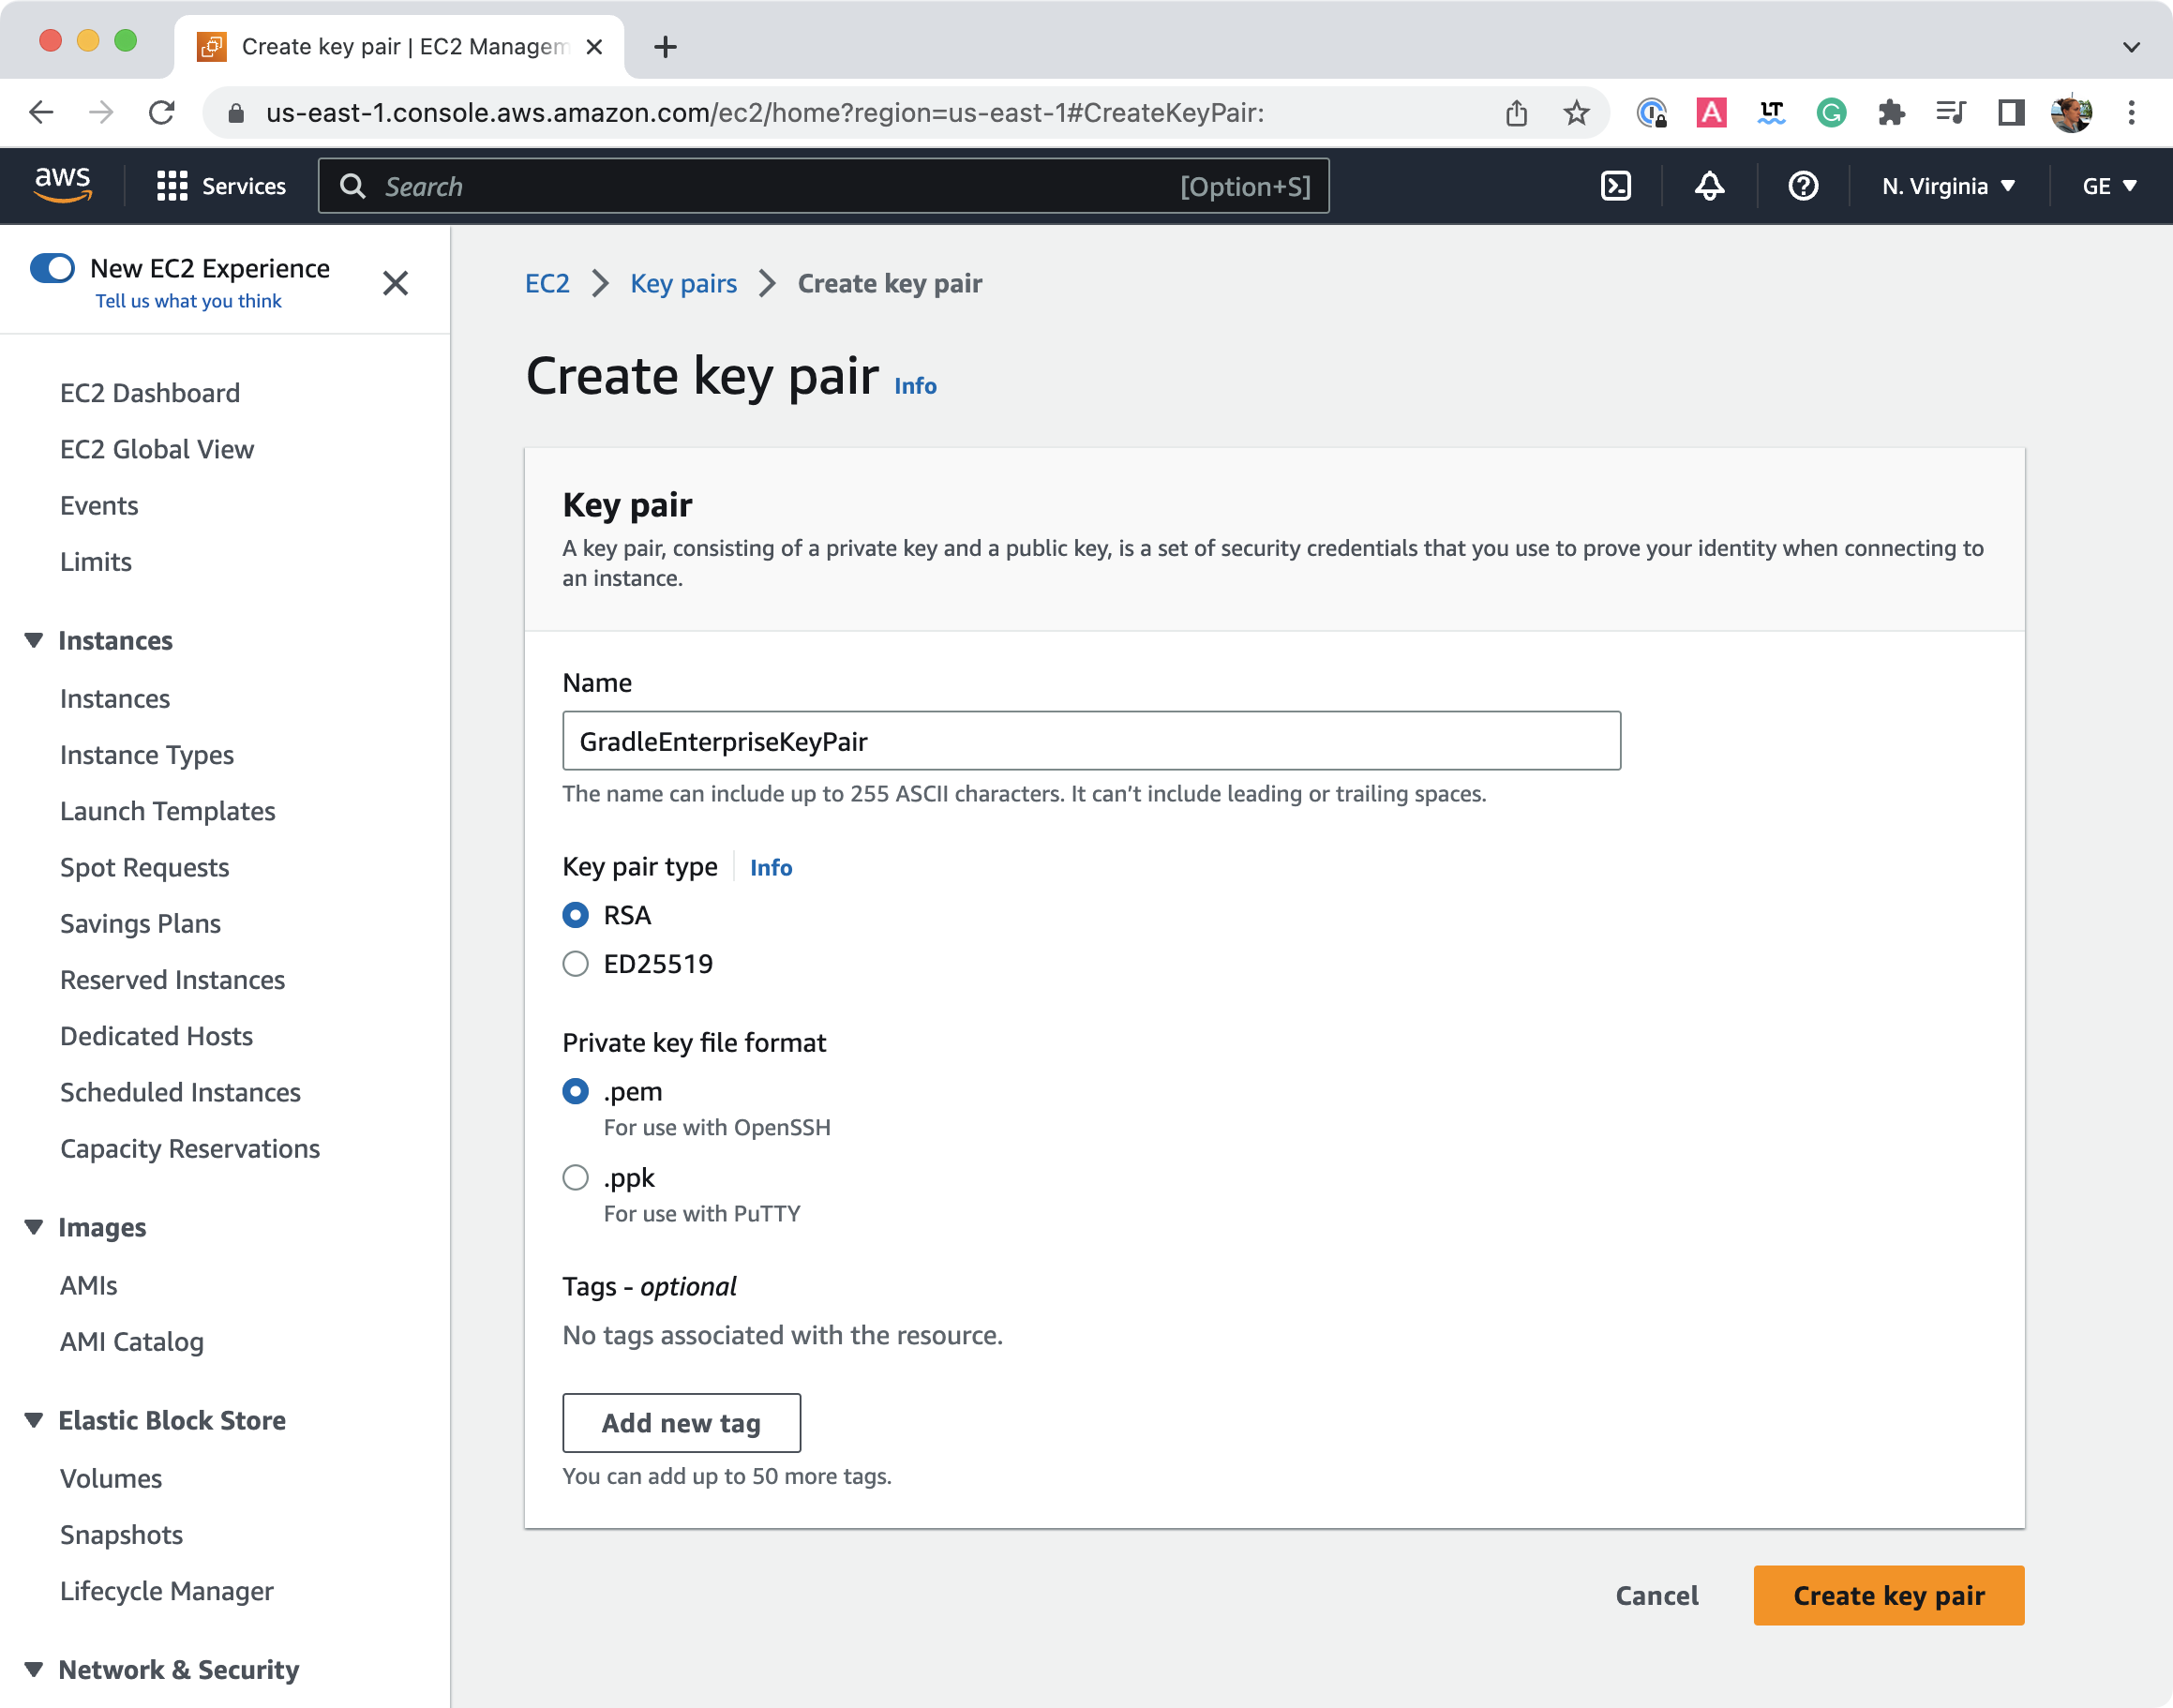
| Don’t lose the generated private key (PEM file). |
3. Change Key Pair Permissions
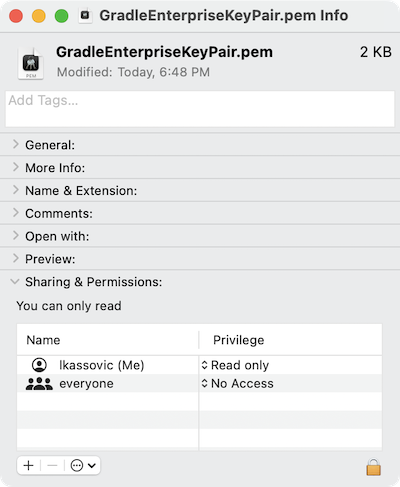
SSH requires that only your user has permissions to read PEM files.
Change permission using a console window
$ chmod 400 path/to/DevelocityKeyPair.pemChange permission using the GUI
Change the PEM file permissions so the current user has Read Only permissions and everyone else has No Access.
Here is an example in MacOS Finder:
4. Create a Security Group
Create a security group called develocity.
Create a security group using the AWS CLI
Use the following command to create the security group:
$ aws ec2 create-security-group --group-name develocity \
    --description "Develocity security group" \
--vpc-id $(aws ec2 describe-vpcs --filters Name=is-default,Values=true --query 'Vpcs[0].VpcId' --output text) (1)| 1 | The ID of the default VPC. |
For HTTPS, expose port 443.
For HTTP, expose port 80.
To expose port 443, run:
$ SECURITY_GROUP_ID=$(
    aws ec2 describe-security-groups \
    --filters Name=group-name,Values=develocity \
    --query 'SecurityGroups[0].GroupId' --output text
  )
$ aws ec2 authorize-security-group-ingress \
--protocol tcp --port 443 \
--cidr 0.0.0.0/0 \
--group-id ${SECURITY_GROUP_ID} (1)| 1 | The ID of the security group you just created. |
If you want port 80 instead, modify the command above.
You need to expose port 22 for SSH access, but you should do it only for select IPs (such as the IP of your current machine). To do this for «target-ip», run:
$ SECURITY_GROUP_ID=$(
    aws ec2 describe-security-groups \
    --filters Name=group-name,Values=develocity \
    --query 'SecurityGroups[0].GroupId' --output text
  )
$ aws ec2 authorize-security-group-ingress \
--protocol tcp --port 22 \
--group-id ${SECURITY_GROUP_ID} \(1)
--cidr «target-ip»/32| 1 | The ID of the security group you just created. |
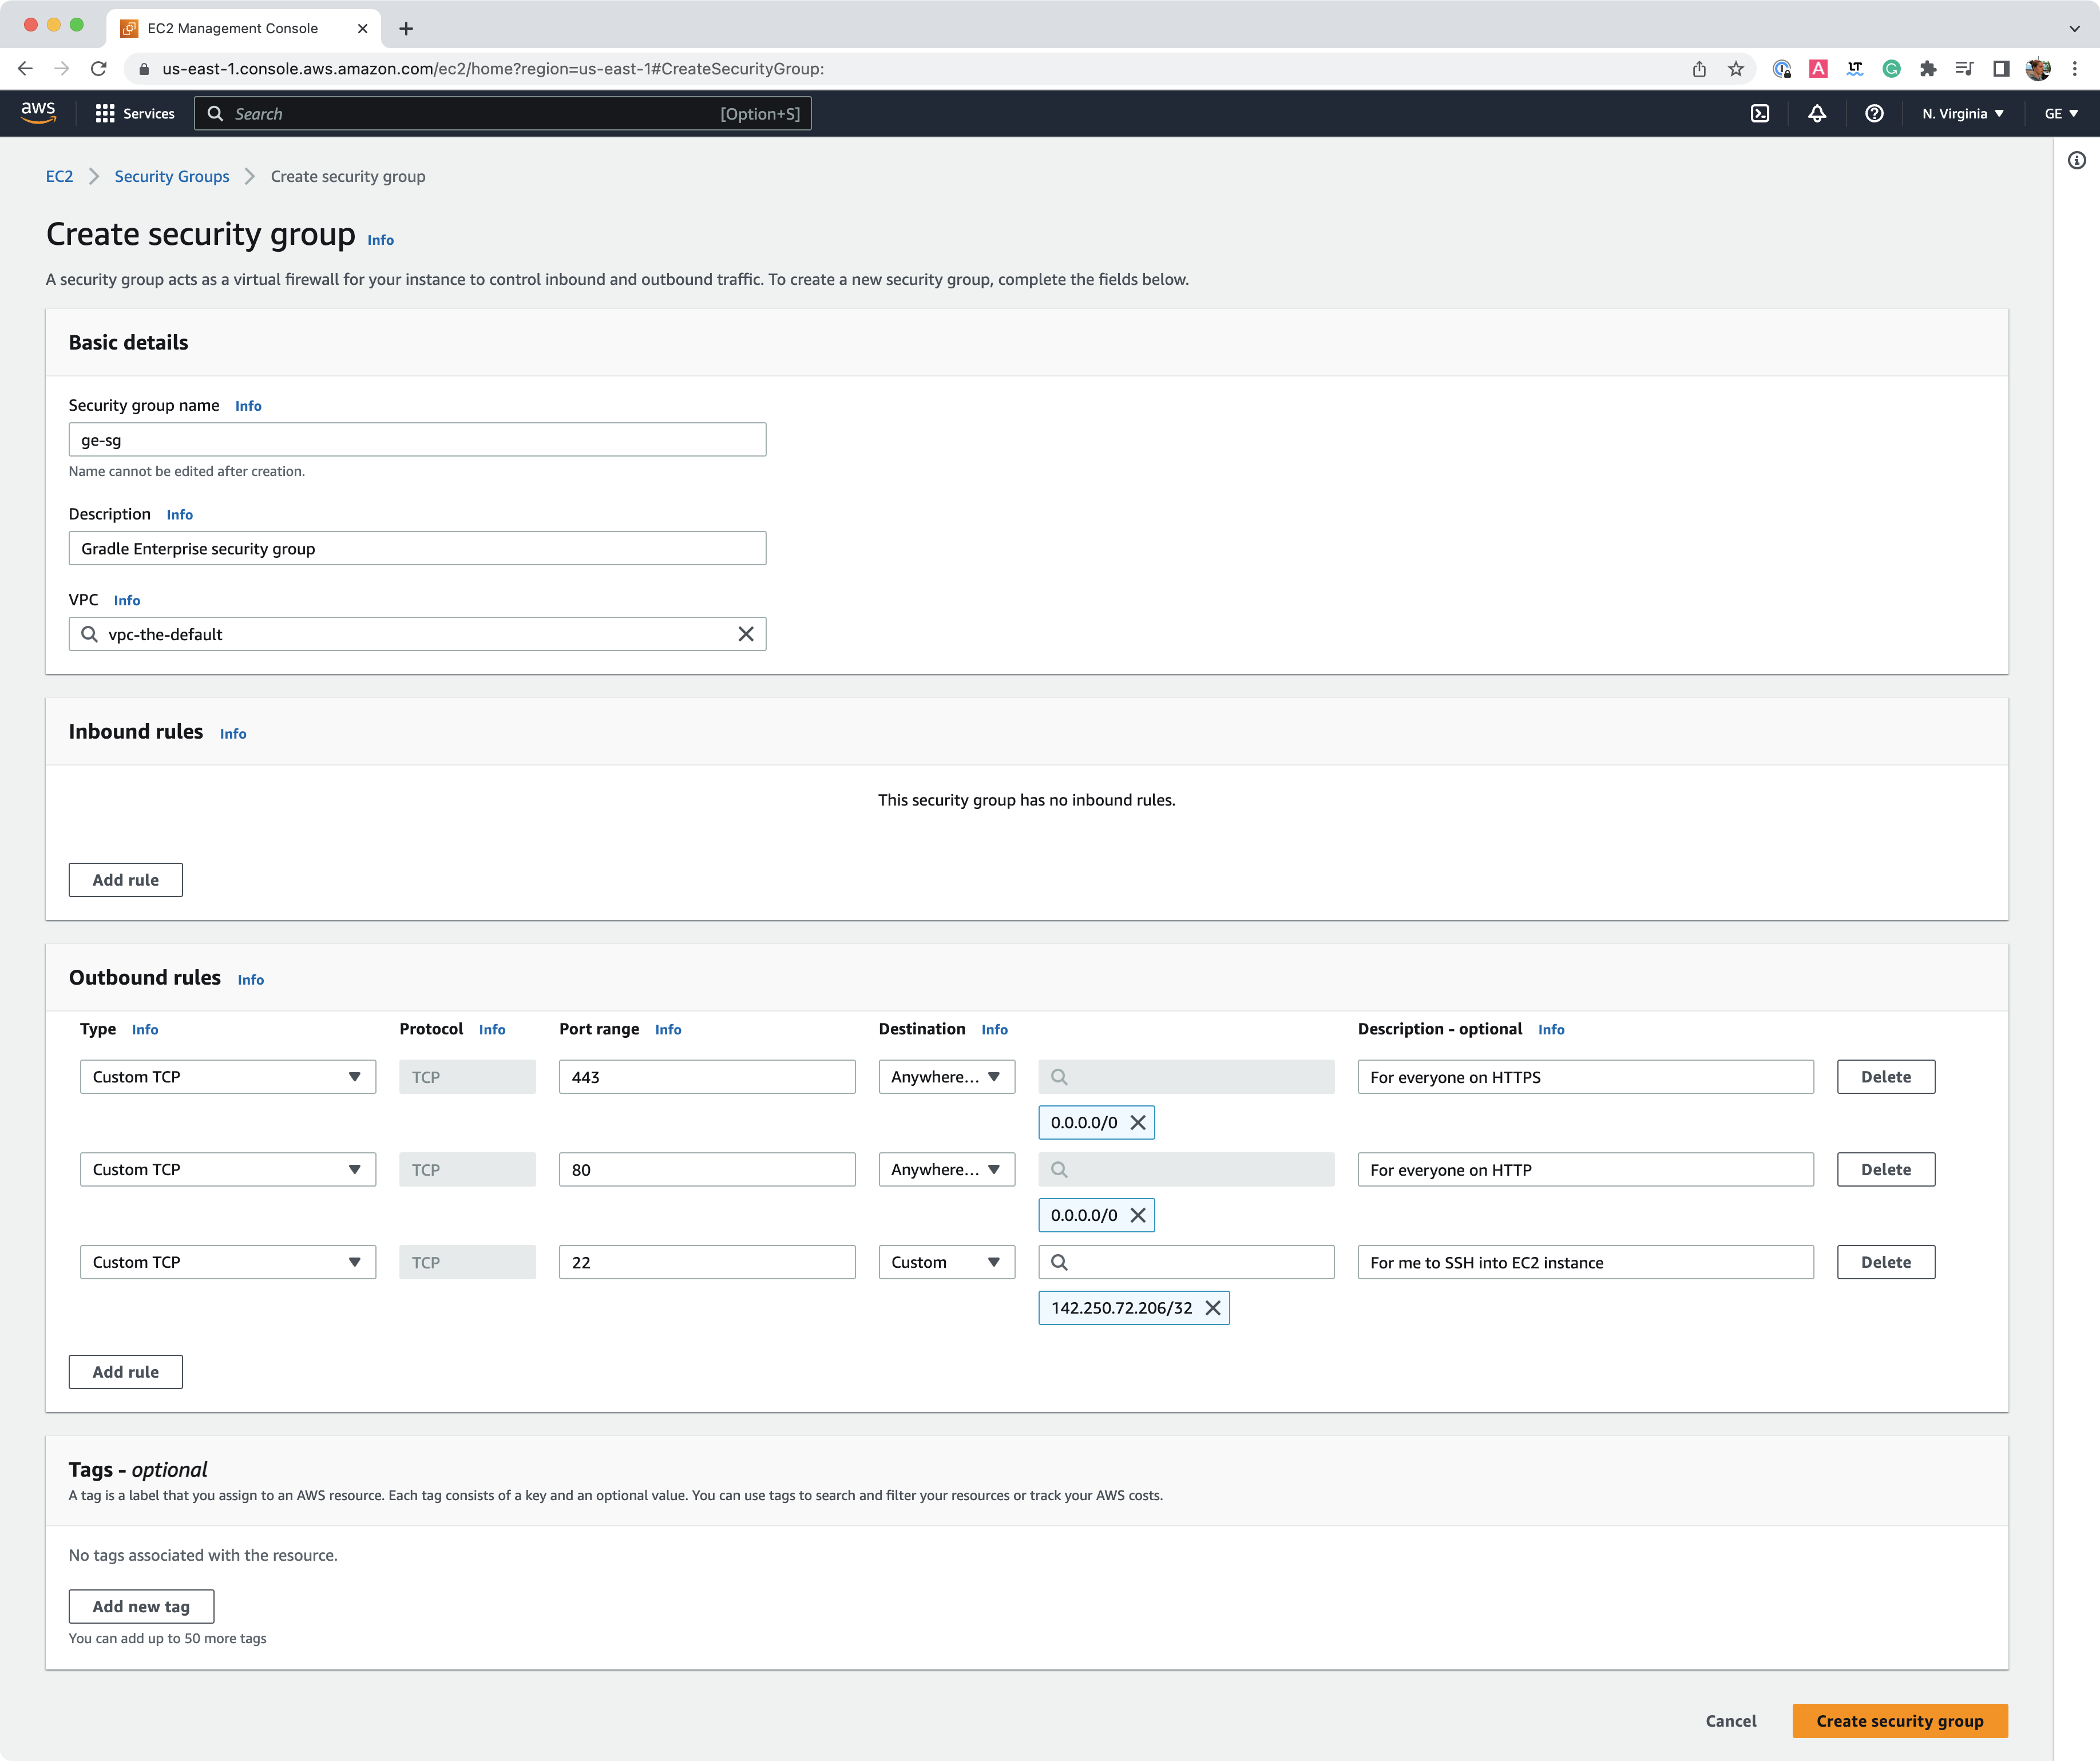
Create a security group using the AWS Management Console
Head over to EC2 > Security Groups > Create security group and make sure to select the default VPC.
Then, in the Outbound rules, make sure you add either:
-
Port range 443 for HTTPS with 0.0.0.0/0 added as the entry.
-
Port range 80 for HTTP with 0.0.0.0/0 added as the entry.
For SSH connectivity, find your IP address and add it to port 22 with a /32 added to the entry.
Instance Configuration
1. Choose a Virtual Server Image
Choose a server image appropriate for your environment.
View the latest AMIs using the AWS CLI
You can use the AWS CLI to see the latest EBS-backed Amazon Linux 2 AMIs available in your region by running a command like:
$ aws ec2 describe-images \
    --owners self amazon \
    --filters Name=architecture,Values=x86_64 \
    Name=image-type,Values=machine \
    'Name=description,Values=*Amazon Linux 2 AMI*' \
    Name=root-device-type,Values=ebs
Images are sorted by descending creation date, so you should choose the first one that meets your needs.
If you do not have a preference, choose the most recent minimal HVM “Amazon Linux 2 AMI” version.
The image name for these images looks something like amzn2-ami-minimal-hvm-2.*-x86_64-ebs.
View the latest AMIs using the AWS Management Console
To view the latest EBS-backed Amazon Linux 2 AMIs available in your region, go to EC2 > AMI Catalog.
Search for Amazon Linux 2 AMI and make sure to select the 64-bit (x86) architecture and EBS root device:
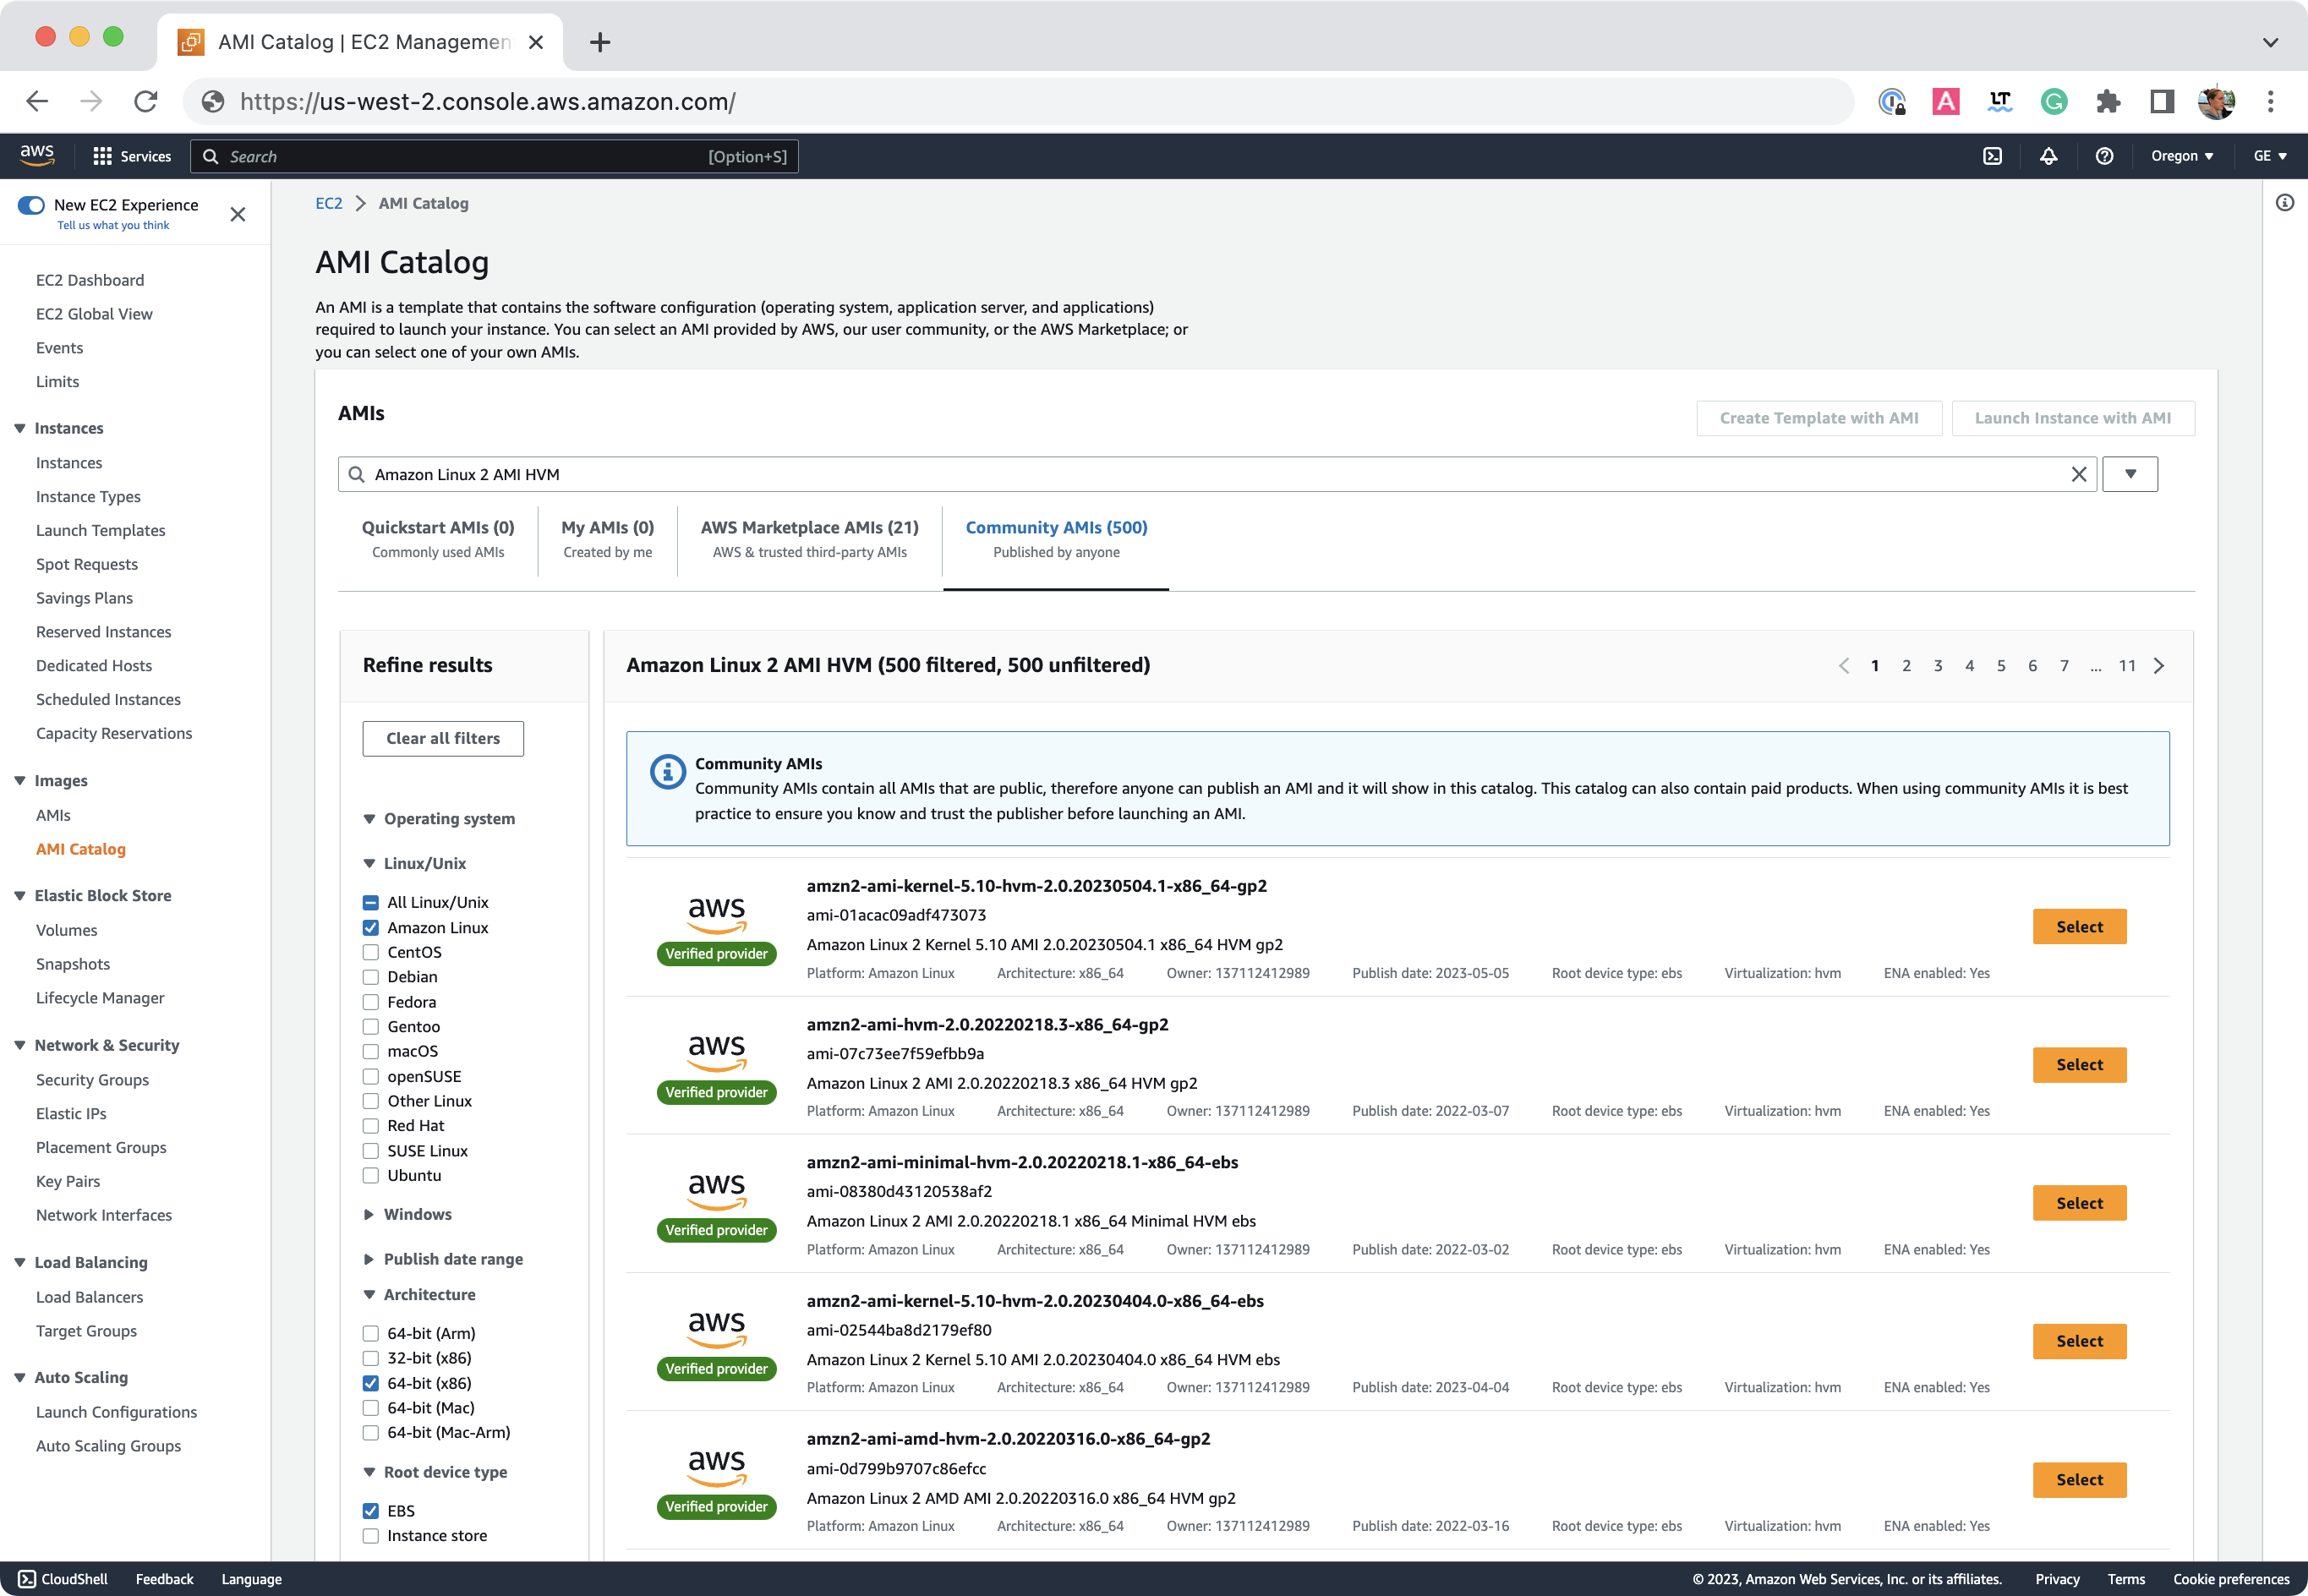
| For more details, consult the AWS guide for finding suitable images. |
We will refer to the chosen image id as the «image-id». An example id is ami-0a115fc69aa3ffd69.
Note the image’s RootDeviceName, which we will refer to this as «root-device-name». An example root device name is /dev/xvda.
2. Choose an Instance Type
Develocity’s minimum requirement for an EC2 instance is t2.2xlarge.
This instance type is adequate for most installations, unless the instance is very heavily used.
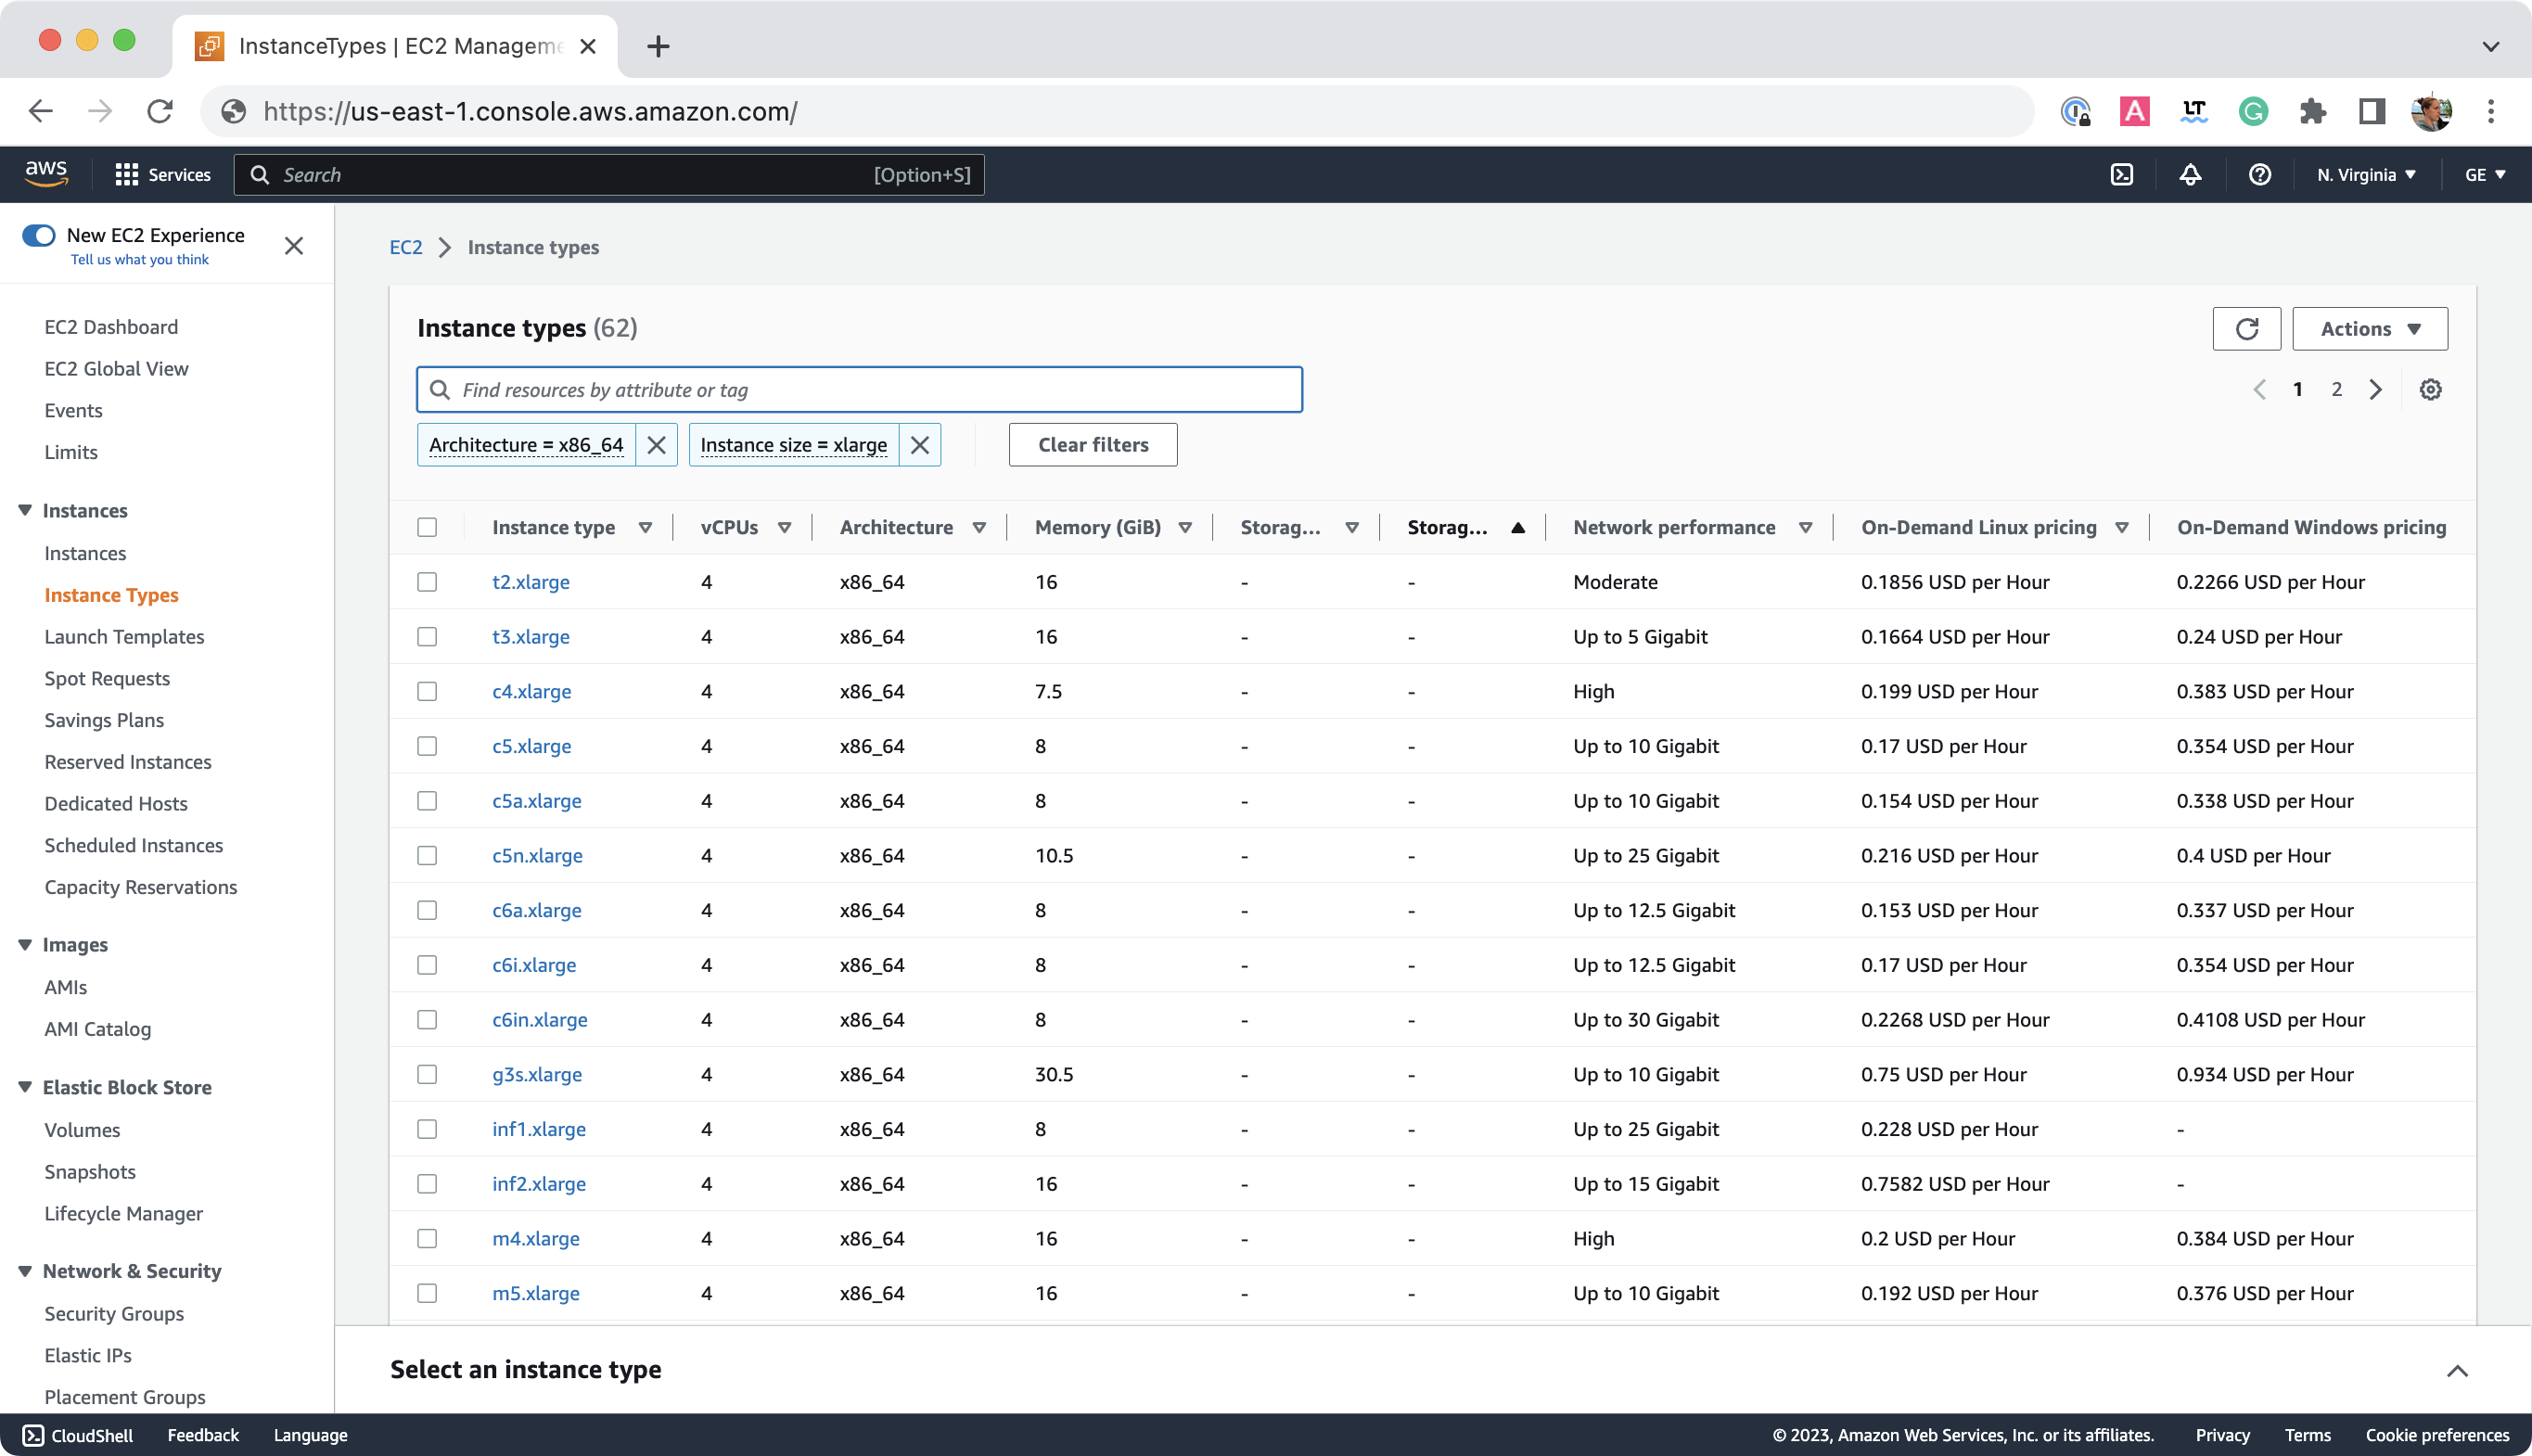
To refer to more instance types and features, head over to Amazon EC2.
3. Choose the Storage and Database
This guide uses the embedded database. You may have a different setup depending on your Helm values file.
| Instructions for using Amazon RDS as a user-managed database in the appendix. |
In this guide we expand the root volume to 300 GB and change the type to gp3, rather than mounting individual volumes for simplicity. This is not advisable on a production instance. We recommend adding separate data volumes so that you can control their size, performance, and cost separately from the root volume.
The Build Scan® service of Develocity can be configured to store the data in an Amazon S3 bucket. This can help performance in high-traffic installations by taking load off the database. See the appendix for details.
4. Create your Instance
Now it is time to put it all together and create your EC2 instance.
Create your instance using the AWS CLI
To create your instance, run:
$ SECURITY_GROUP_ID=$(
    aws ec2 describe-security-groups \
    --filters Name=group-name,Values=develocity \
    --query 'SecurityGroups[0].GroupId' --output text
  )
$ aws ec2 run-instances \
--count 1 \
--instance-type t2.2xlarge \(1)
--key-name DevelocityKeyPair \(2)
--security-group-ids ${SECURITY_GROUP_ID} \(3)
--associate-public-ip-address \(4)
--tag-specifications 'ResourceType=instance,Tags=[{Key=develocity,Value=true},{Key=Name,Value=Develocity}]' \(5)
--image-id «image-id» \(6)
--block-device-mappings \
'[{"DeviceName":"«root-device-name»","Ebs":{"VolumeSize":300,"VolumeType":"gp3","DeleteOnTermination":true}}]' (7)| 1 | The instance type from section 2. Choose an Instance Type. |
| 2 | The name of the key pair you want to use to access your EC2 instance. |
| 3 | The security group ID from section 4. Create a Security Group. |
| 4 | If you are using a load balancer, you probably do not want the instance’s IP to be public. This depends on your networking setup. |
| 5 | Name and tag your instance to easily identify it later. |
| 6 | The «image-id» from section 1. Choose a Virtual Server Image. |
| 7 | The «root-device-name» from section 1. Choose a Virtual Server Image (usually /dev/xvda). Note that if you are using a user-managed database, the volume size may be decreased to 50 GB. |
When using an embedded database, you may want to use the --ebs-optimized argument. It will result in better disk performance, but will add additional costs and is only supported by some instance types. See AWS’s documentation for details. |
You can view your instance’s details by running:
$ aws ec2 describe-instances --filters Name=tag-key,Values=develocityIf you have multiple instances created by following this tutorial, or multiple instances with the develocity tag, the commands in this tutorial that look up your instance’s hostname or instance ID using aws ec2 describe-instances will not work out of the box. Alter the Reservations index in these commands to select the correct instance. |
To view the hostname, run:
$ aws ec2 describe-instances \
    --filters Name=tag-key,Values=develocity Name=instance-state-name,Values=running \
    --query 'Reservations[0].Instances[0].PublicDnsName' \
    --output text
This will be blank until your instance has started.
| For more details, consult the AWS CLI EC2 instances guide. |
Create your instance using the AWS Management Console
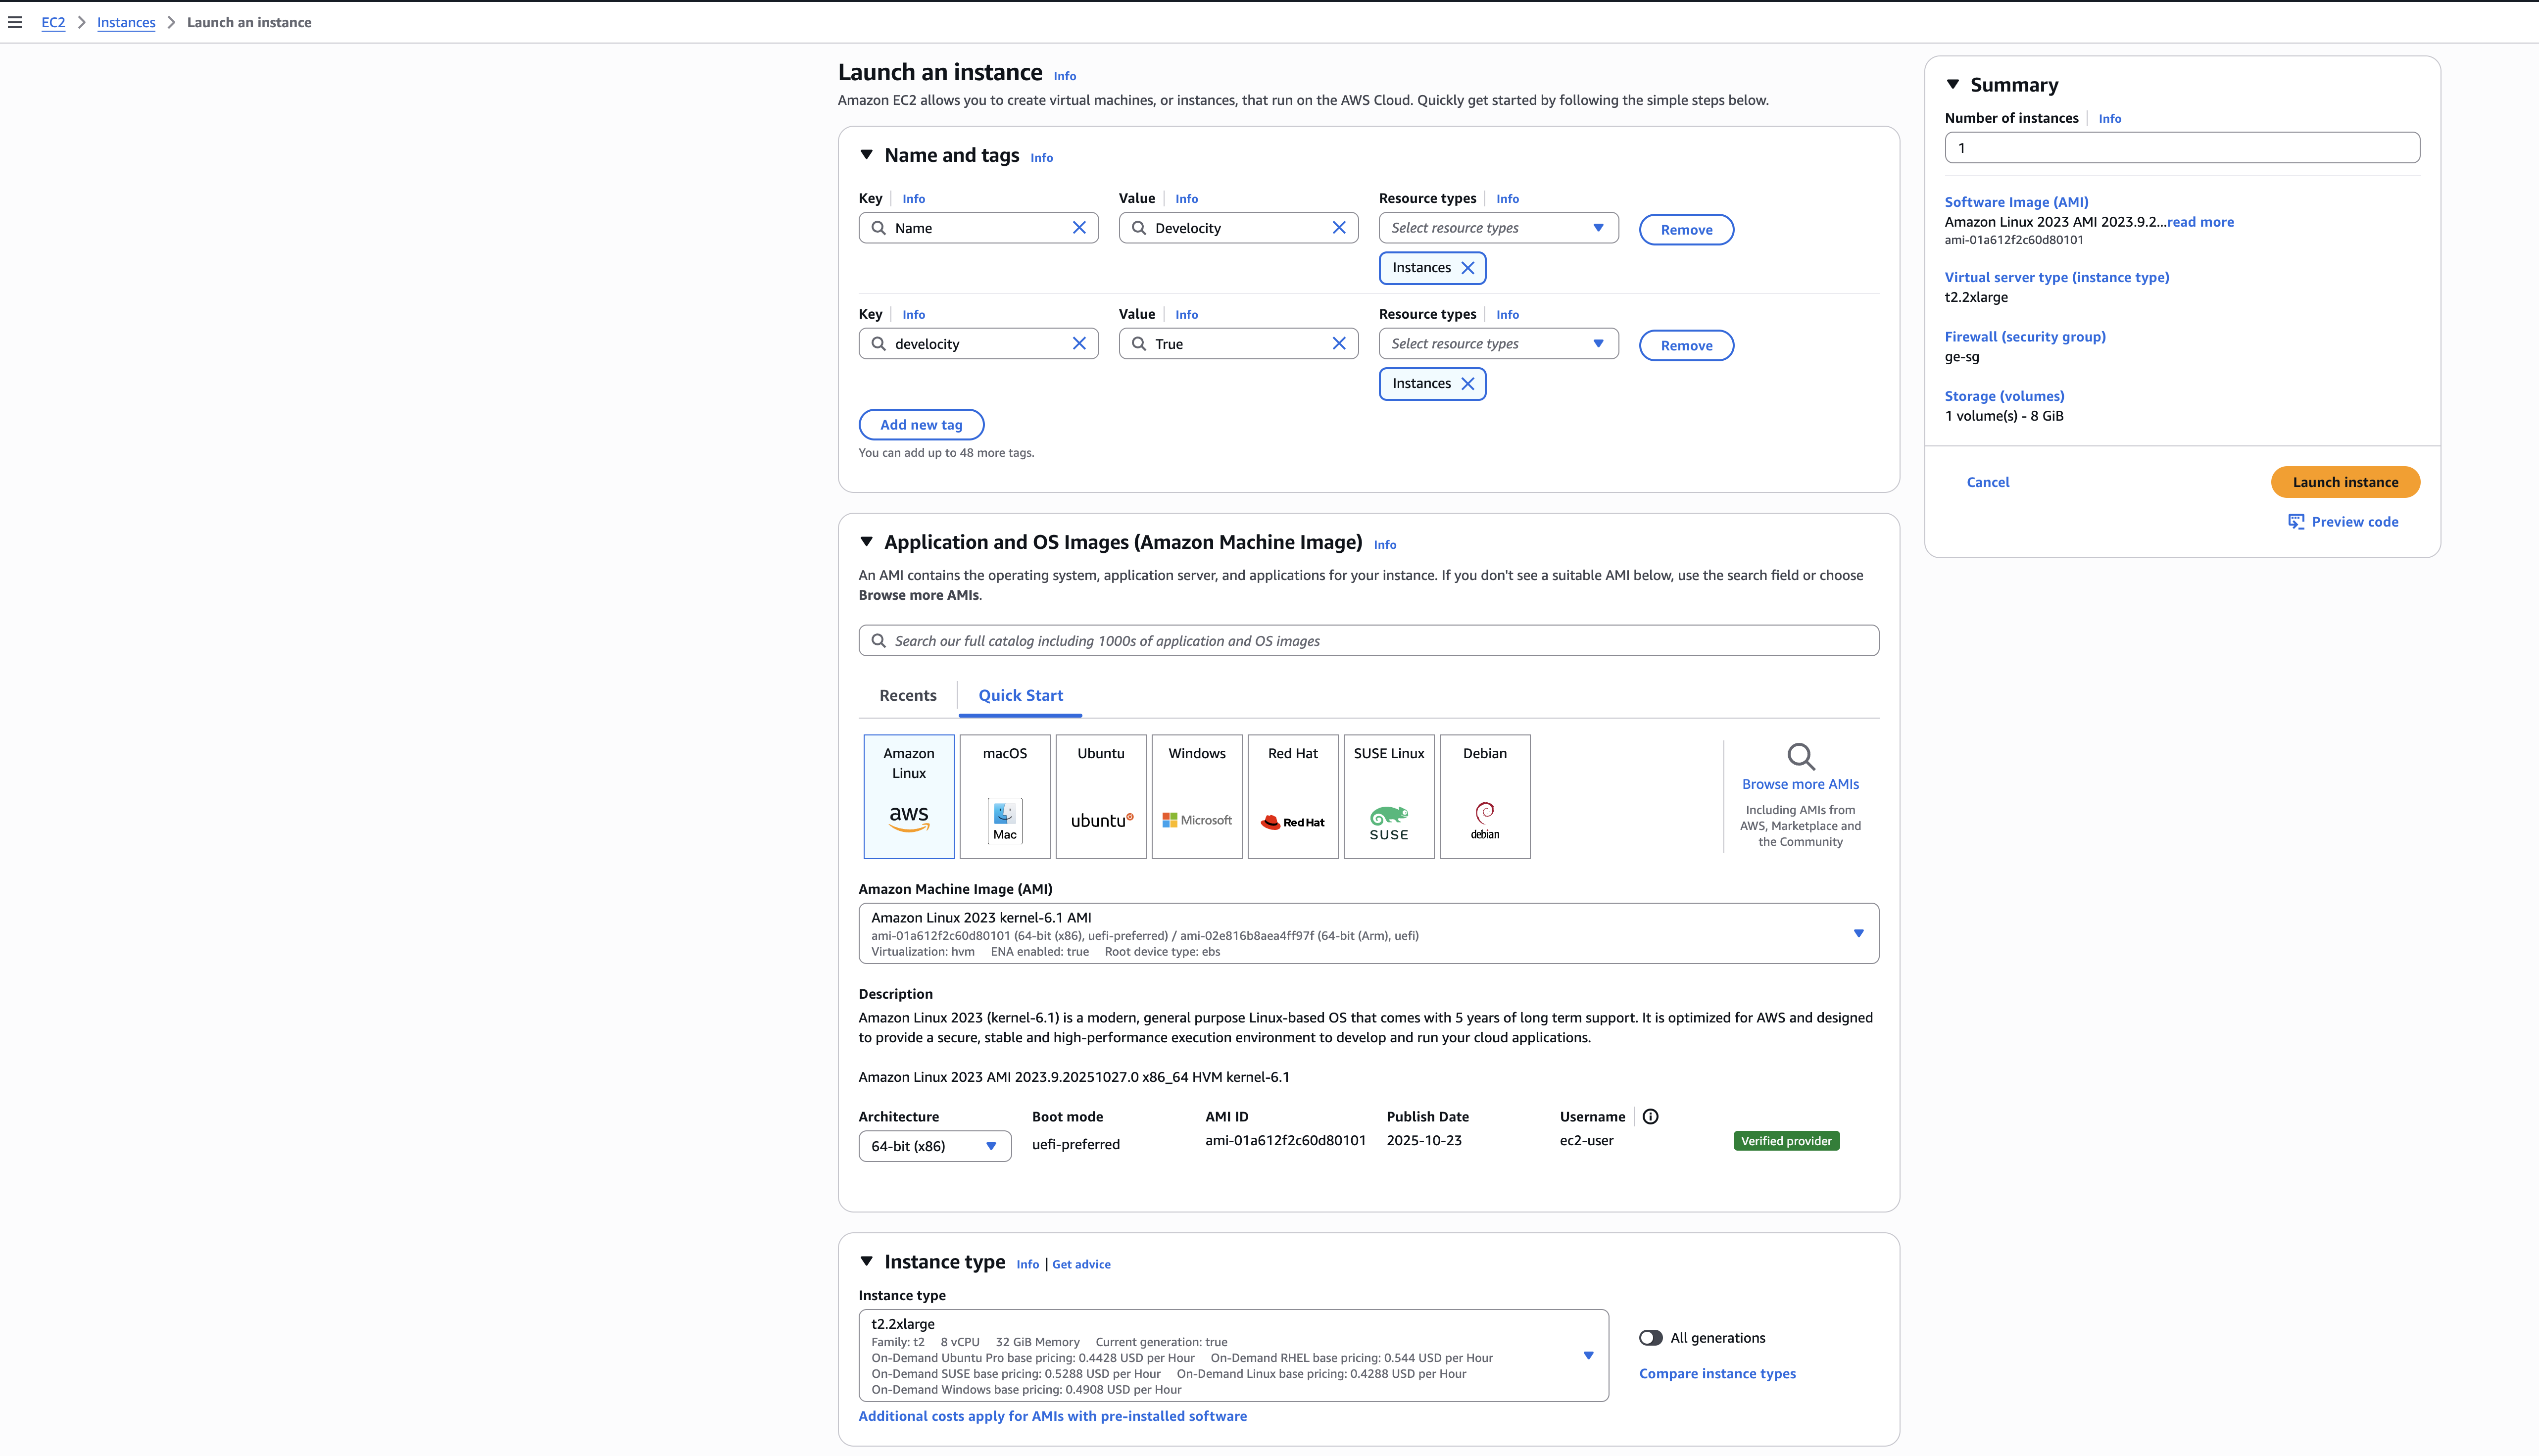
Head over to EC2 > Instances > Launch an instance.
Under Name and tags:
-
Enter the name
Develocityfor the instance. -
Enter the additional tag
develocitywith valuetrue.
Under Application and OS Images (Amazon Machine Image):
-
Make sure to select the
«image-id»from section 1. Choose a Virtual Server Image.
Under Instance type:
-
Select
t2.2xlargeor the instance type you chose in section 2. Choose an Instance Type.
Under Key pair (login):
-
Select
DevelocityKeyPairwhich you created in the pre-installation section 2. Generate a Key Pair.
Under Network settings:
-
Select
develocitywhich you created in the pre-installation section 4. Create a Security Group.
Under Configure storage:
-
Select
300 GiB gp3or50 GiBif you are using a user-managed database.
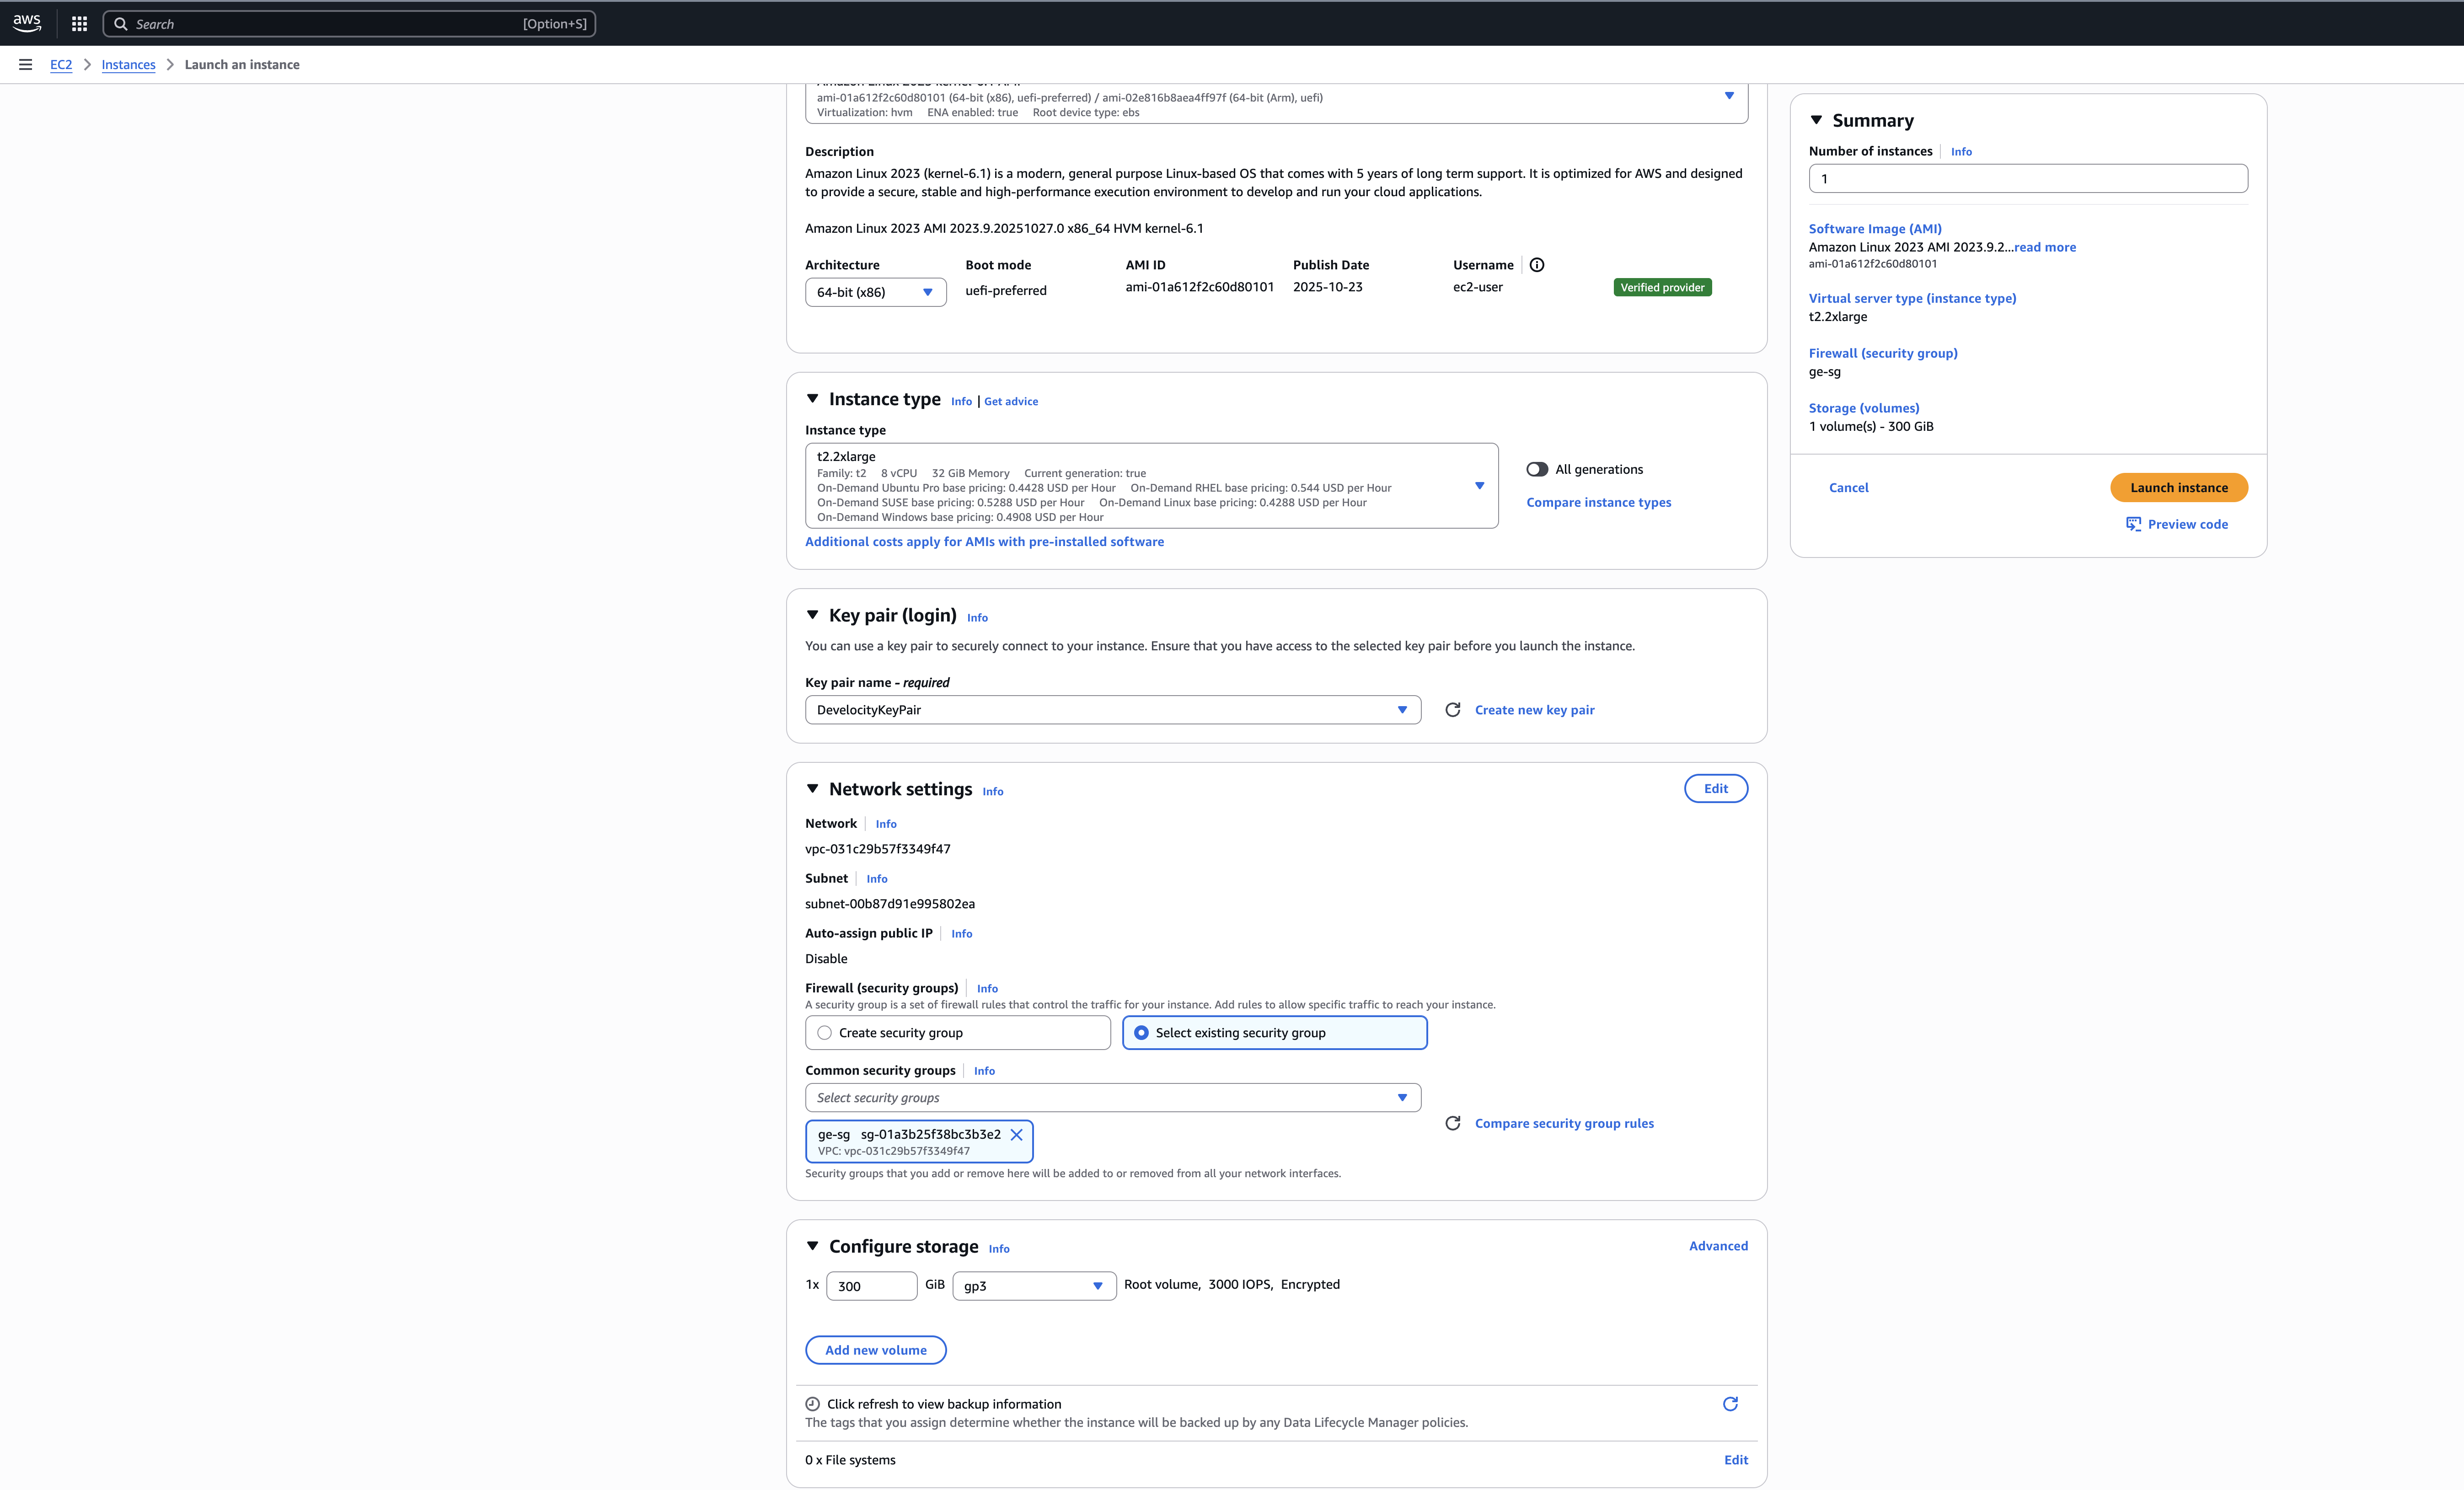
Click Launch instance to finish.

5. Configure the Hostname
You can use the hostname generated by AWS such as ec2-1-123-123-123.compute-1.amazonaws.com.
View the hostname using the AWS CLI
You can find the generated hostname by describing the instance as shown in the previous step and looking for the PublicDnsName field(s):
$ aws ec2 describe-instances \
    --filters Name=tag-key,Values=develocity Name=instance-state-name,Values=running \
    --query 'Reservations[0].Instances[0].PublicDnsName' \
    --output text
View the hostname using the AWS Management Console
Head over to EC2 > Instances and select your new instance:
Select the instance in the table or use the search function.
In the popup frame, the hostname is available under Public IPv4 DNS.
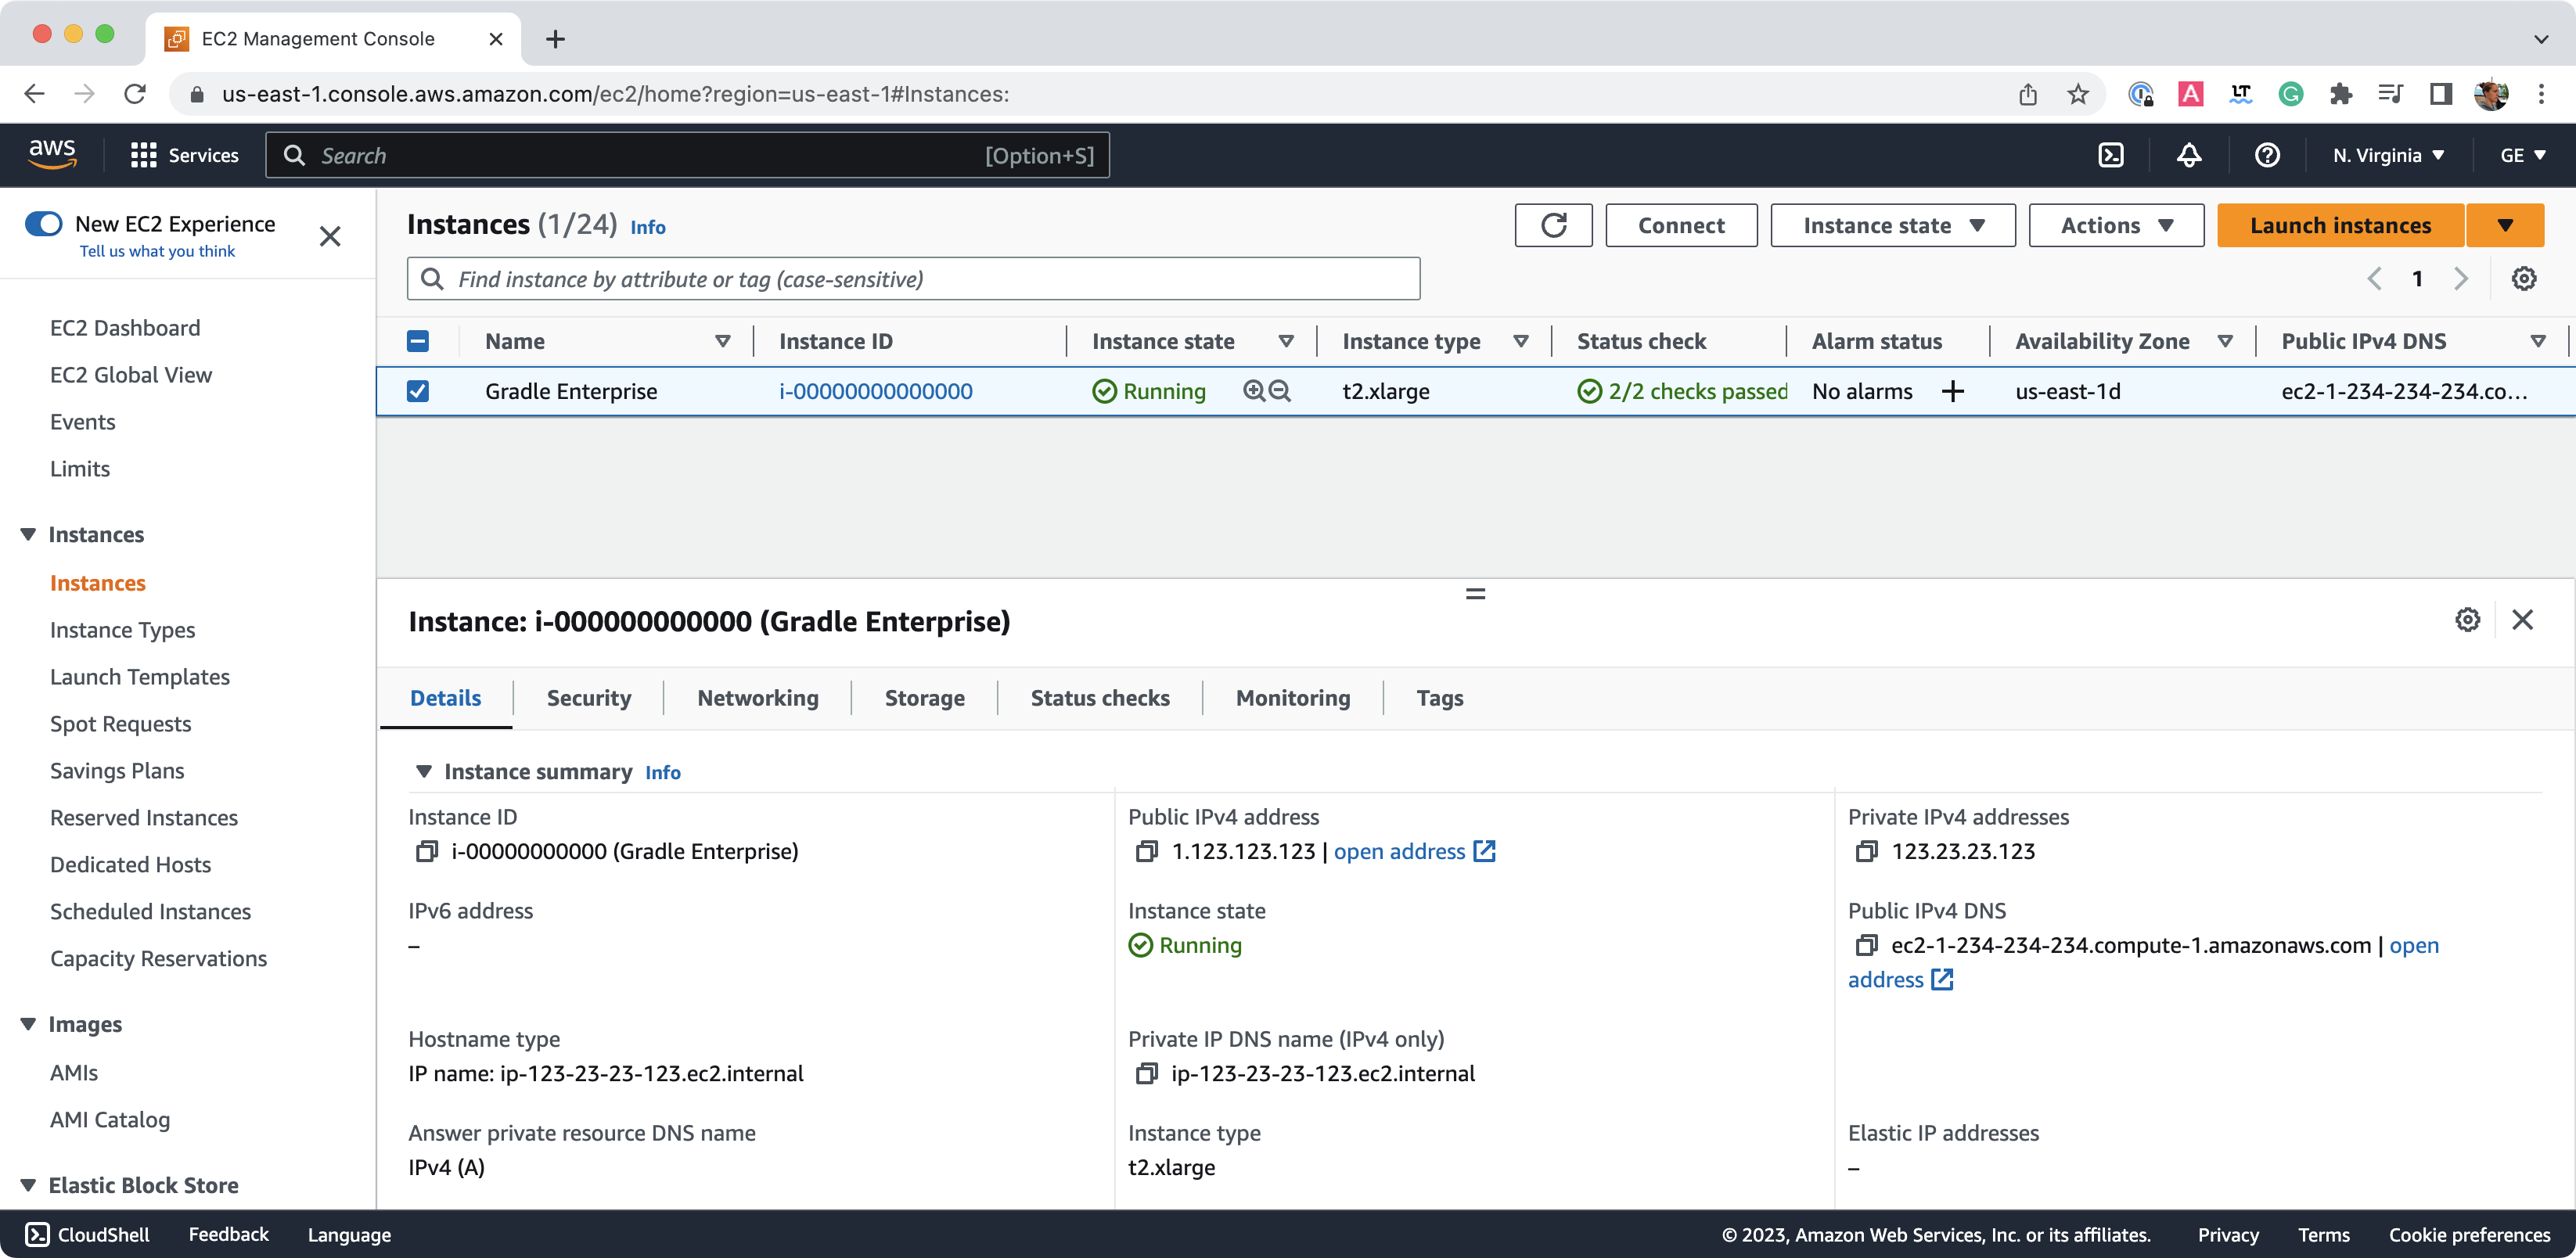
If you want to use a custom hostname such as develocity.example.com to access your Develocity instance, you need to add the appropriate DNS records.
Add an A record for your hostname that points to the public IP address of your EC2 instance. You can find this IP address by describing the instance as shown in the previous step and looking for the PublicIp field(s).
develocity.example.com A 12.34.56.78You should verify that your DNS record works correctly before installing Develocity by running dig develocity.example.com or ping develocity.example.com within a console window.
If running Develocity behind a cloud load balancer, use /ping for the load balancer’s health check. It will respond as healthy when Develocity is capable of handling requests, even if limited to the interactive starting page while the instance is starting. Using the load balancer to manage fail-over may be undesirable for highly available installations. |
If you are installing Develocity in a highly available setup, we recommend submitting a ticket at support.gradle.com for assistance.
6. Set Up your Connection
Although there are various ways to connect to an EC2 instance, this guide uses SSH.
Once your instance starts, SSH into your instance with the following command:
$ ssh -i path/to/DevelocityKeyPair.pem ec2-user@HOSTNAME (1)| 1 | The path is where you saved the PEM file from section 2. Generate a Key Pair.
For Amazon Linux 2 or the Amazon Linux AMI, the default username is ec2-user.
The HOSTNAME is from the previous step. |
If you can’t find your HOSTNAME, try the following command:
$ DEVELOCITY_HOSTNAME=$(
    aws ec2 describe-instances \
    --filters Name=tag-key,Values=develocity Name=instance-state-name,Values=running  \
    --query 'Reservations[0].Instances[0].PublicDnsName' \
    --output text
  )
$ ssh -i path/to/DevelocityKeyPair.pem ec2-user@${DEVELOCITY_HOSTNAME}The username (ec2-user) differs depending on which virtual server image you chose. For Amazon Linux 2 AMI it is ec2-user. If you chose a different AMI, you must consult the documentation for that image (for example: ubuntu). |
Installation
In this section you will install Develocity on your newly created instance.
Before you start the installation, make sure that your instance software is up to date. Run the yum update command to update the system.
sudo yum updateReview the packages listed, enter y, and press Enter to accept the updates. Updating all the packages on a system can take several minutes. The yum output shows the status of the update while it is running.
(Optional) Reboot your instance to ensure that you are using the latest packages and libraries from your update.
| The example demonstrates how to update the Amazon Linux 2 system. If you are using a different operating system, you may need to adjust the commands accordingly. Please refer to the relevant documentation for your specific operating system |
1. Prepare a Helm values file
Installation options for Develocity are depicted in a Helm values file.
Follow the instructions in the Standalone Helm Configuration Guide and return to this document with a complete values.yaml file.
2. Retrieve Hostname
To retrieve the hostname for your instance, run the following AWS CLI command:
$ DEVELOCITY_HOSTNAME=$(
    aws ec2 describe-instances \
    --filters Name=tag-key,Values=develocity Name=instance-state-name,Values=running  \
    --query 'Reservations[0].Instances[0].PublicDnsName' \
    --output text
  )
3. Copy Files
Copy the Helm values file you created to the instance.
To copy the values.yaml file from your local machine to your instance, run the following command:
$ scp -i path/to/DevelocityKeyPair.pem path/to/values.yaml ec2-user@${DEVELOCITY_HOSTNAME}:~Optionally copy the develocity.license (Develocity License) file to your instance if you did not include it in your values.yaml file:
$ scp -i path/to/DevelocityKeyPair.pem path/to/develocity.license ec2-user@${DEVELOCITY_HOSTNAME}:~If you are using a custom SSL certificate, copy the certificate and key files to the instance as well.
If using Cloud Shell, use the Upload File action as explained in the AWS guide.
4. Install K3s
SSH into the instance by running the following command:
$ ssh -i path/to/DevelocityKeyPair.pem ec2-user@${DEVELOCITY_HOSTNAME}K3s is a fully compliant Kubernetes distribution and must be installed on the instance.
Once you’re on the machine, install K3s and make it available to the current user:
$ curl -sfL https://get.k3s.io | sh -If the above command failed with the same or similar error as the following:
Error: Package: k3s-selinux-1.6-1.el7.noarch (rancher-k3s-common-stable)
            Requires: container-selinux >= 2:2.107-3
...
you can try the following commands and repeat to install K3s:
$ sudo amazon-linux-extras enable selinux-ng && \
  sudo yum clean metadata && \
  sudo yum install -y selinux-policy-targeted
Please check also the official documentation for more details.
$ sudo chown ${UID} /etc/rancher/k3s/k3s.yaml$ mkdir -p "${HOME}/.kube"$ ln -s /etc/rancher/k3s/k3s.yaml "${HOME}/.kube/config"5. Install Helm
Then install Helm:
$ curl -qs https://raw.githubusercontent.com/helm/helm/main/scripts/get-helm-3 | bash6. Install the Helm Chart
First, add the https://helm.gradle.com/ helm repository and update it:
$ helm repo add gradle https://helm.gradle.com/$ helm repo update gradle7. Install Develocity
Then run helm install with the following command:
$ helm install \
    --create-namespace --namespace develocity \
    develocity-standalone \
    gradle/gradle-enterprise-standalone \
    --values ./values.yaml \(1)
--set-file global.license.file=./develocity.license (2)| 1 | The Helm values file you created and uploaded in section 3. Copy Files. |
| 2 | The license you obtained in section 2. A Develocity License and uploaded in section 3. Copy Files. |
The output should be similar to this:
NAME: develocity-standalone
LAST DEPLOYED: Tue Apr  1 07:07:37 2025
NAMESPACE: develocity
STATUS: deployed
REVISION: 1
TEST SUITE: None
NOTES:
Develocity has been installed.
8. Start Develocity
You can see the status of Develocity starting up by examining its pods.
$ kubectl --namespace develocity get podsNAME READY STATUS RESTARTS AGE gradle-database-58f97cc888-sscxn 2/2 Running 0 71s gradle-embedded-object-storage-68d8956f98-c7gs9 1/1 Running 0 71s gradle-enterprise-app-7fc5966df8-dw55g 0/1 Init:2/5 2 71s gradle-enterprise-operator-dc7dbf46d-pp5hf 1/1 Running 0 71s gradle-keycloak-5b975c469f-vw7ts 0/1 Init:0/2 3 (29s ago) 71s gradle-metrics-d8f8f4557-fxdwj 2/2 Running 0 71s gradle-monitoring-5f97675474-dszqv 3/3 Running 0 70s gradle-node-monitoring-7c4744dd6c-jmxkx 1/1 Running 0 71s gradle-proxy-5c49c559ff-96w4q 1/1 Running 1 (55s ago) 71s gradle-test-distribution-broker-77957b5988-5x5ph 0/1 Init:1/2 0 71s
Eventually the pods should all report as Running:
$ kubectl --namespace develocity get podsNAME READY STATUS RESTARTS AGE gradle-database-58f97cc888-sscxn 2/2 Running 0 3m39s gradle-embedded-object-storage-68d8956f98-c7gs9 1/1 Running 0 3m39s gradle-enterprise-app-7fc5966df8-dw55g 1/1 Running 0 3m39s gradle-enterprise-operator-dc7dbf46d-pp5hf 1/1 Running 0 3m39s gradle-keycloak-5b975c469f-vw7ts 1/1 Running 0 3m39s gradle-metrics-d8f8f4557-fxdwj 2/2 Running 0 3m39s gradle-monitoring-5f97675474-dszqv 3/3 Running 0 3m38s gradle-node-monitoring-7c4744dd6c-jmxkx 1/1 Running 0 3m39s gradle-proxy-5c49c559ff-96w4q 1/1 Running 0 3m39s gradle-test-distribution-broker-77957b5988-5x5ph 1/1 Running 0 3m39s
Develocity has a /ping endpoint, which can be used to verify network connectivity with Develocity.
Connectivity to Develocity installation can be tested by running the following command on machines which need to connect to Develocity:
$ curl -sw \\n --fail-with-body --show-error https://«develocity-host»/pingIt should return SUCCESS.
Once all pods have a status of Running and the system is up and connected, you can interact with it by visiting its URL in a web browser (i.e. the hostname).
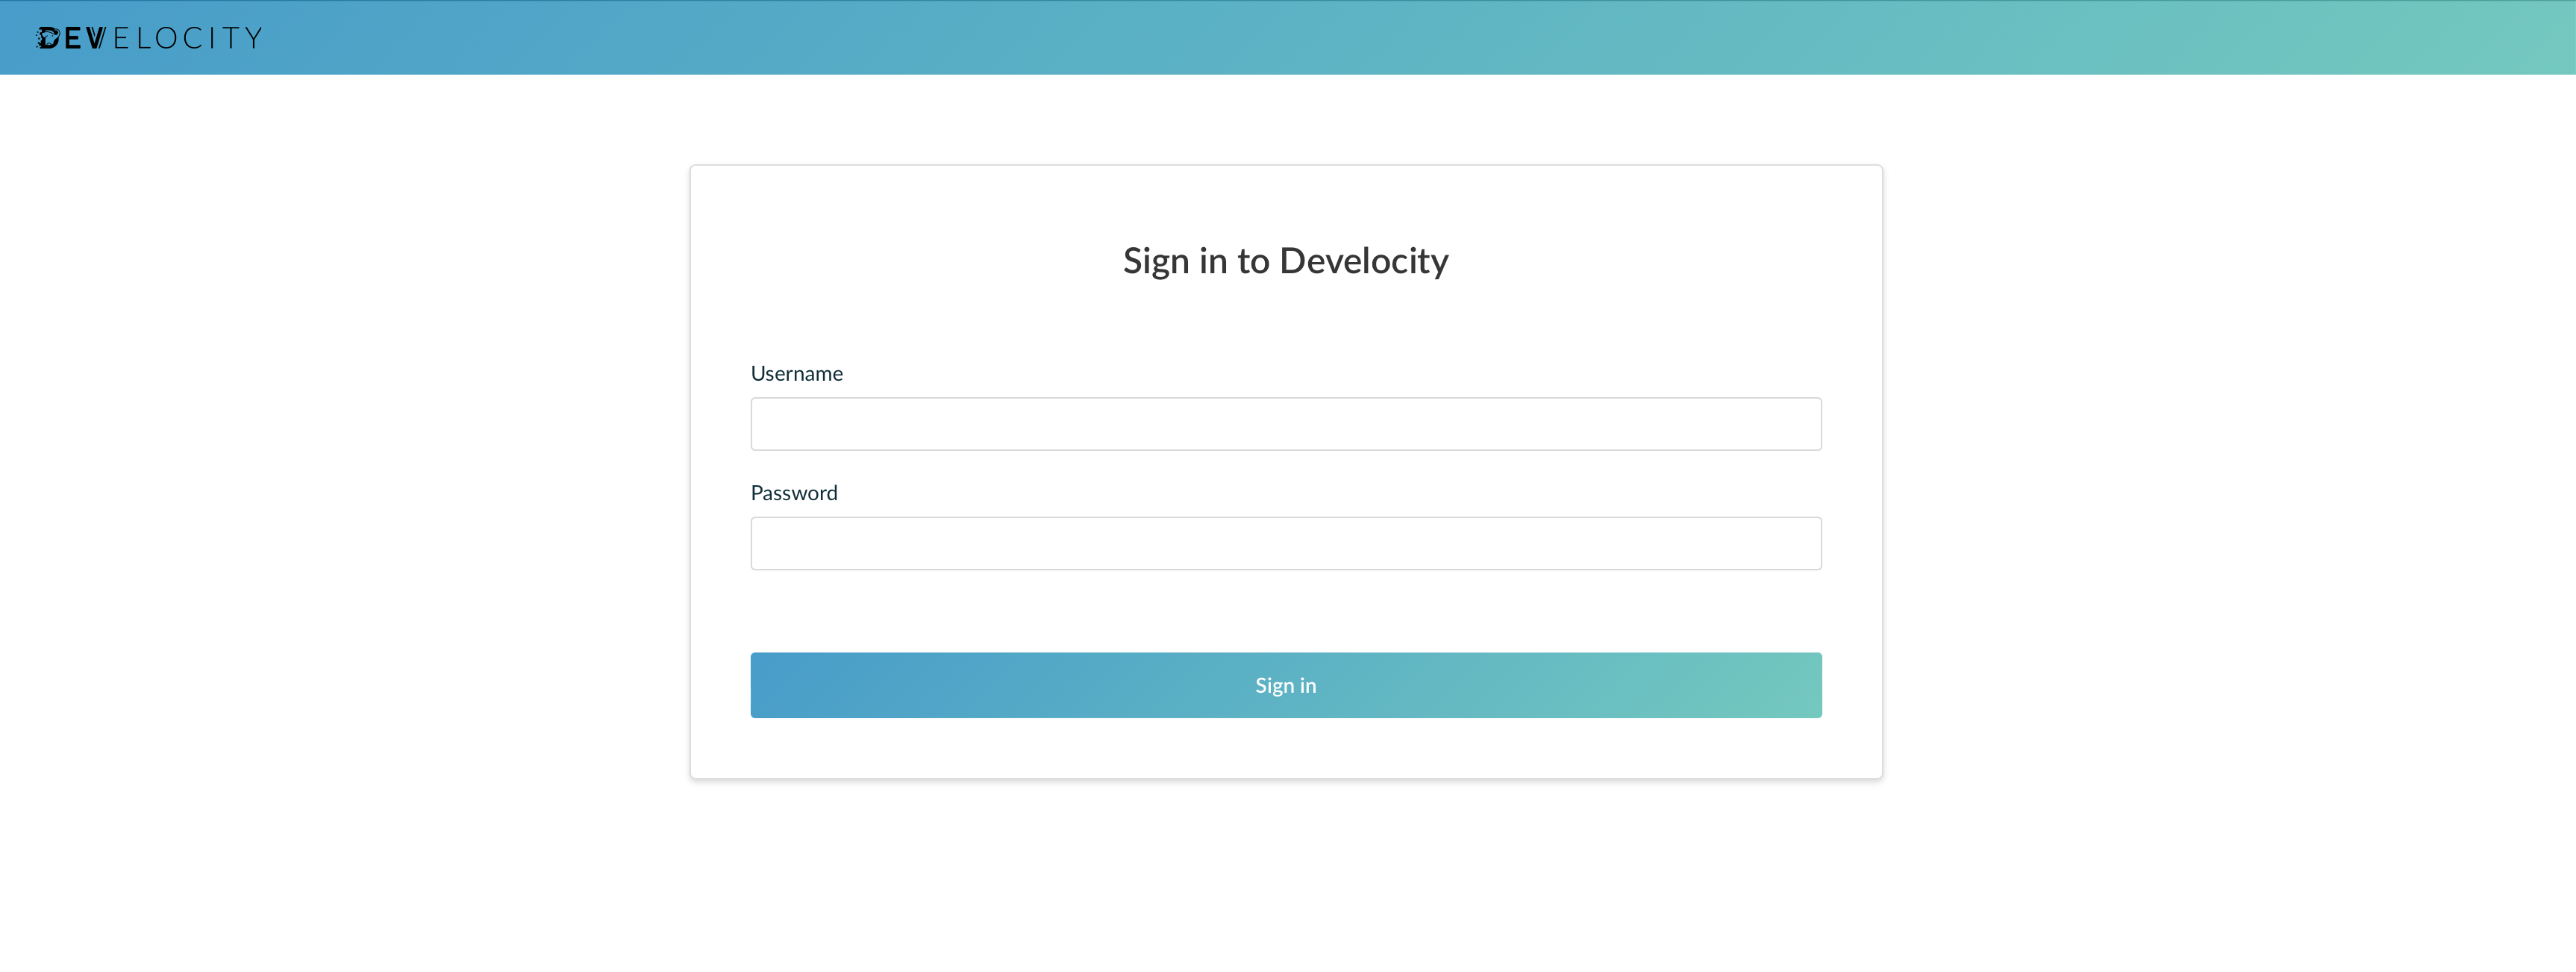
Develocity is installed and running.
Post-Installation
Many features of Develocity, including access control, database backups, and Build Scan retention can be configured in Develocity, once it is running. Consult the Develocity Administration guide to learn more.
For instructions on how to start using Develocity in your builds, consult the Getting Started with Develocity guide.
Appendix
Appendix A: Using Amazon RDS
This appendix will walk you through using an Amazon RDS PostgreSQL instance as your database.
1. Obtain the Required Permissions
You need permission to create and manage Amazon RDS instances and security groups.
The necessary permissions are granted using the AmazonRDSFullAccess AWS managed policy.
2. Set up an RDS Instance
Before starting, review the supported Postgres versions and storage requirements.
A. Create a root username and password
Create a root username and password for the database instance, referred to below as «db-root-username» and «db-root-password», respectively. These are the credentials you will use for your database connection; save them somewhere secure.
B. Create a security group and enable ingress
Before creating the database, you have to create a security group in the VPC you want to use.
In this tutorial, you will use the default VPC, which is the same VPC the EC2 instance is in.
To create the security group, run:
$ aws ec2 create-security-group --group-name develocity-database \
    --description "Develocity DB security group" \
--vpc-id $(aws ec2 describe-vpcs --filters Name=is-default,Values=true --query 'Vpcs[0].VpcId' --output text) (1)| 1 | The ID of the default VPC. |
Then enable ingress for port 5432 from your EC2 agent’s security group by running:
$ RDS_SECURITY_GROUP_ID=$(
    aws ec2 describe-security-groups \
    --filters Name=group-name,Values=develocity-database \
    --query 'SecurityGroups[0].GroupId' --output text
  )
$ aws ec2 authorize-security-group-ingress \
--protocol tcp --port 5432 \
--source-group develocity \(1)
--group-id ${RDS_SECURITY_GROUP_ID} (2)| 1 | The security group of your EC2 instance. |
| 2 | The security group of your RDS instance. |
C. Create a subnet group
Before creating the database, you need to create a subnet group to specify how the RDS instance will be networked.
This subnet group must have subnets in two availability zones, and typically should use private subnets.
Create a subnet group containing them by running:
$ DEFAULT_VPC_ID=$(
    aws ec2 describe-vpcs \
    --filters Name=is-default,Values=true \
    --query 'Vpcs[0].VpcId' \
    --output text
  )
$ SUBNET_IDS=$(
aws ec2 describe-subnets \
--query 'Subnets[?!MapPublicIpOnLaunch].SubnetId' \
--filters Name=vpc-id,Values=${DEFAULT_VPC_ID} \
--output json
)$ aws rds create-db-subnet-group --db-subnet-group-name develocity-database \
--db-subnet-group-description "Develocity DB subnet group" \
--subnet-ids ${SUBNET_IDS}| Consult RDS’s subnet group documentation for more details on subnet groups and their requirements. |
D. Create the RDS instance
Create the RDS instance:
$ RDS_SECURITY_GROUP_ID=$(
    aws ec2 describe-security-groups \
    --filters Name=group-name,Values=develocity-database \
    --query 'SecurityGroups[0].GroupId' --output text
  )
$ RDS_POSTGRES_VERSION=$(
aws rds describe-db-engine-versions \
--engine postgres \
--engine-version 17 \(1)
--default-only \
--query 'DBEngineVersions[0].EngineVersion' \
--output text
)| 1 | The latest major version of Postgres that Develocity supports. |
$ aws rds create-db-instance \
    --engine postgres \
    --engine-version ${RDS_POSTGRES_VERSION} \
    --db-instance-identifier develocity-database \
    --db-name gradle_enterprise \
    --allocated-storage 250 \(1)
    --iops 3000 \(2)
    --db-instance-class db.m5.large \
    --backup-retention-period 3 \(3)
    --no-publicly-accessible \
    --vpc-security-group-ids ${RDS_SECURITY_GROUP_ID} \(4)
    --master-username «db-root-username» \
--master-user-password «db-root-password»| 1 | Develocity should be installed with 250GB of database storage to start with. |
| 2 | As discussed in section 3. Choose the Storage and Database, Develocity’s data volumes and database should support at least 3,000 IOPS. |
| 3 | The backup retention period, in days. |
| 4 | The security group you created in the previous step. |
While not configured as part of this tutorial, RDS supports storage autoscaling.
| Consult AWS’s database creation guide and the CLI command reference for more details on RDS instance creation. |
You can view the status of your instance with:
$ aws rds describe-db-instances --db-instance-identifier develocity-databaseWait until the DBInstanceStatus is available.
Once available, you can see the hostname of the instance under Endpoint > Address. This is the hostname you will use to connect to the instance, subsequently referred to as «database-hostname».
3. Configure the RDS instance for IAM authentication (Optional)
Develocity supports connecting to the database using IAM authentication. This optional step describes how to configure your RDS instance to allow IAM database authentication for all the database users that Develocity will connect as (including the superuser, although it is possible for Develocity to not require superuser access, as explained in the Database setup with IAM database authentication section of the Standalone Helm chart Configuration Guide). If you want to use the simpler configuration option of providing Develocity with your RDS instance’s root username and password, skip ahead to the next step.
A. Enable IAM database authentication on the RDS instance
To modify your created RDS database instance to allow IAM database authentication, run:
$ aws rds modify-db-instance \
    --db-instance-identifier develocity-database \
    --apply-immediately \
    --enable-iam-database-authentication
B. Create a policy allowing database access
To create a role which is permitted to connect to the RDS database as the required database users, using IAM authentication, create a policy.json file with the following content:
{
   "Version": "2012-10-17",
   "Statement": [
      {
         "Effect": "Allow",
         "Action": [
             "rds-db:connect"
         ],
         "Resource": [
             "arn:aws:rds-db:«region»:«account-id»:dbuser:«dbi-resource-id»/ge_app",
             "arn:aws:rds-db:«region»:«account-id»:dbuser:«dbi-resource-id»/ge_migrator",
             "arn:aws:rds-db:«region»:«account-id»:dbuser:«dbi-resource-id»/ge_monitor",
             "arn:aws:rds-db:«region»:«account-id»:dbuser:«dbi-resource-id»/«superuser»"
         ]
      }
   ]
}
Then run the following commands:
$ CONFIGURED_REGION=$(aws configure list | grep region | awk '{print $2}') (1)| 1 | If awk isn’t available, you can set this environment variable directly. You can view your configured AWS region with aws configure list | grep region. |
$ ACCOUNT_ID=$(aws sts get-caller-identity --query Account --output text)$ DBI_RESOURCE_ID=$(
aws rds describe-db-instances \
--db-instance-identifier develocity-database \
--query 'DBInstances[0].DbiResourceId' \
--output text
)$ sed -i "s/«account-id»/${ACCOUNT_ID}/g" ./policy.json && \(1)
sed -i "s/«region»/${CONFIGURED_REGION}/g" ./policy.json && \
sed -i "s/«dbi-resource-id»/${DBI_RESOURCE_ID}/g" ./policy.json && \
sed -i "s/«superuser»/«db-root-username»/g" ./policy.json (2)| 1 | The policy.json file you created. |
| 2 | Replace «db-root-username» with the username you chose when creating your RDS instance’s root credentials. |
$ aws iam create-policy \
    --policy-name "develocity-rds-access" \
--policy-document file://policy.json (1)| 1 | The policy.json file you created. |
C. Create an EC2 instance profile with your policy
To allow Develocity to connect to RDS using the policy you just created, you need to create an IAM role that has attached to it the policy you just created, and an EC2 instance profile that enables applications running on an EC2 instance to assume that role.
If you have already created an EC2 instance profile for configuring access to an S3 bucket for Build Scan storage, you should skip the step for creating a new role and a new instance profile, and instead the only step you should do here is to attach your RDS access policy to the existing role you have created (using the attach-role-policy command). This is because an EC2 instance profile can contain only one role, and an EC2 instance can only have one instance profile. The same names have been used for the role and instance profile in both sections. |
Create a ec2-role-trust-policy.json file with the following contents:
{
  "Version": "2012-10-17",
  "Statement": [
    {
      "Effect": "Allow",
      "Principal": { "Service": "ec2.amazonaws.com"},
      "Action": "sts:AssumeRole"
    }
  ]
}
Then run the following commands:
$ aws iam create-role \
    --role-name "Develocity_Application_Role" \
    --assume-role-policy-document file://ec2-role-trust-policy.json
$ ACCOUNT_ID=$(aws sts get-caller-identity --query Account --output text)$ aws iam attach-role-policy \
--role-name "Develocity_Application_Role" \
--policy-arn "arn:aws:iam::${ACCOUNT_ID}:policy/develocity-rds-access" (1)| 1 | The ARN of the policy you created in the previous step. |
$ aws iam create-instance-profile \
    --instance-profile-name "Develocity_Application_InstanceProfile"
$ aws iam add-role-to-instance-profile \
--instance-profile-name "Develocity_Application_InstanceProfile" \
--role-name "Develocity_Application_Role"D. Attach the instance profile to your instance
Now that you have an instance profile that grants access to your RDS instance, you need to attach it to your EC2 instance.
| An instance can only have one instance profile. If you have already attached an EC2 instance profile when configuring access to an S3 bucket for Build Scan storage, you should skip this step. If you are otherwise already using an instance profile for your Develocity instance, either attach your new RDS access policy to its associated role, or replace it with the new instance profile. See AWS’s guide for details. |
To do this, run:
$ INSTANCE_ID=$(
    aws ec2 describe-instances \
    --filters Name=tag-key,Values=develocity \
    --query 'Reservations[0].Instances[0].InstanceId' \
    --output text
  )
$ aws ec2 associate-iam-instance-profile \
--iam-instance-profile Name=Develocity_Application_InstanceProfile \
--instance-id ${INSTANCE_ID} (1)| 1 | The instance ID of your EC2 instance, from section 4. Create your Instance. |
E. Grant rds_iam to the RDS superuser account
In order for Develocity to connect to the RDS database using IAM authentication as any given database user (including the RDS superuser), that database user needs to have been granted a special permission called rds_iam.
To grant this permission to the RDS superuser, you need to connect to your database instance as it. Ensure you install the PostgreSQL client psql on the EC2 instance. You can then connect to your RDS instance by running the following commands:
$ DATABASE_HOSTNAME=$(
  aws rds describe-db-instances \
  --db-instance-identifier develocity-database \
  --query 'DBInstances[0].Endpoint.Address' \
  --output text
  )
$ DATABASE_PORT=$(
aws rds describe-db-instances \
--db-instance-identifier develocity-database \
--query 'DBInstances[0].Endpoint.Port' \
--output text
)In the below psql command, substitute the values of «db-root-username» and «db-root-password» for those you chose when creating your RDS instance’s root credentials:
$ echo "PGPASSWORD=«db-root-password» psql \
  -U «db-root-username» \
  -d gradle_enterprise \
  -h ${DATABASE_HOSTNAME} \
  -p ${DATABASE_PORT} \
-c 'GRANT rds_iam TO «db-root-username»'" | ssh -i path/to/DevelocityKeyPair.pem ec2-user@${DEVELOCITY_HOSTNAME} 'bash -'|
IAM authentication takes precedence over password authentication, meaning that once you make this change, you will no longer be able to log in to the database using the root password you set up earlier. You will instead need to generate a temporary password by running an AWS CLI command run by someone with the permission to do so for the RDS superuser that is an IAM user that has attached your previously created RDS connection policy. To generate such temporary passwords, you need the RDS instance’s hostname, port, AWS region and the username of its RDS superuser, which you configured earlier. You can view the hostname and port using this command: The AWS region is part of the hostname e.g. With these values, you can generate a temporary password for the RDS superuser by running this command:
Using this generated temporary password, you can perform database queries or connect to the database using |
4. Configure Develocity with RDS
Add one of the two following configuration snippets to your Helm values file:
Option 1 - For Develocity to connect to the database using username-password credentials
database:
  location: user-managed
  connection:
    host: «database-hostname»
    databaseName: gradle_enterprise
  credentials:
    superuser:
      username: «db-root-username»
password: «db-root-password»| This action embeds your database superuser credentials in your Helm values file. It must be kept secure. If you prefer to provide the credentials as a Kubernetes secret, consult the Database options section of Kubernetes Helm Chart Configuration Guide. |
Option 2 - For Develocity to connect to the database using IAM authentication
| For this option to work, you need to have followed the instructions above to enable and configure IAM database authentication. |
database:
  location: user-managed
  provider: aws-rds
  connection:
    host: «database-hostname»
    databaseName: gradle_enterprise
  credentials:
    type: instanceProfile
    superuser:
      username: «db-root-username»
You can substitute «database-hostname» in the Helm values file by running:
$ DATABASE_HOSTNAME=$(
    aws rds describe-db-instances \
    --db-instance-identifier develocity-database \
    --query 'DBInstances[0].Endpoint.Address' \
    --output text
  )
$ sed -i "s/«database-hostname»/${DATABASE_HOSTNAME}/g" path/to/values.yaml| The superuser is only used to set up the database and create migrator and application users. You can avoid using the superuser by setting up the database yourself, as described in the Database options section of Kubernetes Helm Chart Configuration Guide. Please contact Gradle support for help with this. |
Appendix B: Storing Build Scan data in S3
This appendix will walk you through using Amazon S3 buckets to store Build Scan® and monitoring data such as metrics.
1. Obtain the required permissions
You need permission to create and manage Amazon S3 buckets. You also need to be able to create IAM policies, roles, and instance profiles.
The necessary permissions can be easily granted using the AmazonS3FullAccess and IAMFullAccess AWS managed policies.
If obtaining IAMFullAccess is difficult, request an admin to run create_s3_policy, create_instance_profile, and attach_instance_profile. |
2. Set up S3 Buckets
To create the S3 buckets, run:
$ ACCOUNT_ID=$(aws sts get-caller-identity --query Account --output text) \
  aws s3 mb s3://develocity-application-data-${ACCOUNT_ID} && \(1)
aws s3 mb s3://develocity-monitoring-data-${ACCOUNT_ID} (2)| 1 | The name of the bucket meant to store application data, like Build Scan data or Build Cache entries |
| 2 | The name of the bucket meant to store monitoring data, like metrics collected during application lifetime |
|
Storing data in different buckets allows you to apply various strategies, such as access control, replication, soft-delete, backup, and more. However, you can use only one bucket for both application and monitoring data; this is an operation’s decision based on your practices. |
3. Set up role for Elastic Kubernetes Service
To create a role allowing access to your bucket, first create a policy.json file with the following content:
$ ACCOUNT_ID=$(aws sts get-caller-identity --query Account --output text) \
  cat <<EOF > policy.json
{
    "Version": "2012-10-17",
    "Statement": [
        {
            "Effect": "Allow",
            "Action": [
                "s3:ListBucket"
            ],
            "Resource": [
                "arn:aws:s3:::develocity-application-data-${ACCOUNT_ID}",
                "arn:aws:s3:::develocity-monitoring-data-${ACCOUNT_ID}"
            ]
        },
        {
            "Effect": "Allow",
            "Action": [
                "s3:PutObject",
                "s3:GetObject",
                "s3:DeleteObject",
                "s3:AbortMultipartUpload"
            ],
            "Resource": [
                "arn:aws:s3:::develocity-application-data-${ACCOUNT_ID}/*",
                "arn:aws:s3:::develocity-monitoring-data-${ACCOUNT_ID}/*"
            ]
        }
    ]
}
EOF
aws iam create-policy \
    --policy-name "develocity-s3-access" \
    --policy-document file://policy.json (1)
| 1 | The policy.json file you created. |
C. Create an EC2 instance profile with your policy
To allow Develocity to access your S3 buckets using the policy you just created, you need to create an IAM role that has attached to it the policy you just created, and an EC2 instance profile that enables applications to assume that role.
If you have already created an EC2 instance profile for configuring IAM database authentication for RDS, you should skip the step for creating a new role and a new instance profile, and instead the only step you should do here is to attach your S3 bucket access policy to the existing role you have created (using the attach-role-policy command). This is because an EC2 instance profile can contain only one role, and an EC2 instance can only have one instance profile. The same names have been used for the role and instance profile in both sections. |
| Using an instance profile is the way we recommend configuring Standalone Develocity on EC2 to use S3 for object storage, but if you can’t use this approach, you can still fall back to configuring S3 access using access key credentials. However, if you would like to use the IAM database authentication feature, that does require using an instance profile and not access key credentials. |
Create a ec2-role-trust-policy.json file with the following contents:
{
  "Version": "2012-10-17",
  "Statement": [
    {
      "Effect": "Allow",
      "Principal": { "Service": "ec2.amazonaws.com"},
      "Action": "sts:AssumeRole"
    }
  ]
}
Then run the following commands:
$ aws iam create-role \
    --role-name "Develocity_Application_Role" \
    --assume-role-policy-document file://ec2-role-trust-policy.json
$ ACCOUNT_ID=$(aws sts get-caller-identity --query Account --output text) \
aws iam attach-role-policy \
--role-name "Develocity_Application_Role" \
--policy-arn "arn:aws:iam::${ACCOUNT_ID}:policy/develocity-s3-access" \(1)$ aws iam create-instance-profile \
--instance-profile-name "Develocity_Application_InstanceProfile"$ aws iam add-role-to-instance-profile \
--instance-profile-name "Develocity_Application_InstanceProfile" \
--role-name "Develocity_Application_Role"| 1 | The ARN of the policy you created in the previous step. |
D. Attach the instance profile to your instance
Now that you have an instance profile that grants access to your S3 bucket, you need to attach it to your EC2 instance.
| An instance can only have one instance profile. If you have already attached an EC2 instance profile for configuring IAM database authentication for RDS, you should skip this step. If you are otherwise already using an instance profile for your Develocity instance, either attach your new S3 bucket access policy to the instance profile’s associated role, or replace it with the new instance profile. See AWS’s guide for details. |
To do this, run:
$ INSTANCE_ID=$(
    aws ec2 describe-instances \
    --filters Name=tag-key,Values=develocity \
    --query 'Reservations[0].Instances[0].InstanceId' \
    --output text
  )
  aws ec2 associate-iam-instance-profile \
    --iam-instance-profile Name=Develocity_Application_InstanceProfile \
--instance-id ${INSTANCE_ID} (1)| 1 | The instance ID of your EC2 instance, from section 4. Create your Instance. |
(Alternative) E. Create an AWS user with access key credentials to access your S3 bucket
If you can’t use EC2 instance profiles for any reason, you can fall back to using a standard Access Key ID / Secret Access Key pair for a dedicated user.
First, create the user, by running:
$ aws iam create-user --user-name develocity-s3-userAttach the policy you created to the user, so they can access your S3 bucket, by running the below commands:
$ ACCOUNT_ID=$(aws sts get-caller-identity --query Account --output text)$ aws iam attach-user-policy --user-name develocity-s3-user --policy-arn "arn:aws:iam::${ACCOUNT_ID}:policy/develocity-build-scan-access"Next, generate access key credentials for the user by running:
aws iam create-access-key --user-name develocity-s3-userThe output of this command includes an AccessKeyId and a SecretAccessKey. Securely make a note of both these, because they are needed for configuring Develocity in the next section.
3. Configure Develocity to store incoming Build Scan data in S3
To do this, you must use the unattended configuration mechanism.
The unattended configuration mechanism lets you configure the storage location for Build Scan data (e.g. either in the configured database, or in the configured object store) as part of a configuration file, which can be embedded in your Helm values file as described in the unattended configuration guide.
This section will describe how to extend your Helm values file to include the correct unattended configuration block for S3 Build Scan storage.
First we need to create a minimal unattended configuration file. This requires you to choose a password for the system user and hash it. To do this, install the Develocity Admin CLI and then run:
The following command will prompt you to enter a password and write the hash into the secret.txt. We will refer to the hashed password as «hashed-system-password»
$ develocityctl config-file hash -o secret.txtTo use your S3 bucket, add the following to your Helm values file:
global:
  unattended:
    configuration:
      version: 13 (1)
      systemPassword: "«hashed-system-password»" (2)
      buildScans:
        incomingStorageType: objectStorage

enterprise:
  resources:
    requests:
      memory: 8Gi (3)
    limits:
      memory: 8Gi (3)

objectStorage:
  type: s3
  s3:
    bucket: develocity-application-data-«account-id» (4)
    region: «region» (5)
    credentials:
      type: instanceProfile (6)
    monitoring:
      bucket: develocity-monitoring-data-«account-id» (4)
      region: «region» (5)
      credentials:
type: instanceProfile (6)| 1 | The version of the unattended configuration. |
| 2 | Your hashed system password. |
| 3 | If you have already set a custom value here, instead increase it by 2Gi. |
| 4 | Your account ID, which you will substitute in below. |
| 5 | The region where your S3 bucket resides, which should be your current region. Viewable by running aws configure list | grep region. |
| 6 | The type of AWS credentials, in this example, the instance profile, as described in Instance Profile credentials configuration. If you used AWS access key credentials, you must update your configuration, as described in Keys credentials configuration. |
Then substitute «account-id» in the Helm values file by running:
$ ACCOUNT_ID=$(aws sts get-caller-identity --query Account --output text) \
  sed -i "s/«account-id»/${ACCOUNT_ID}/g" path/to/values.yaml
Once you have updated your Helm values file as described above, you need to reapply it using the method described in Changing Configuration Values. This will update your Develocity installation to use the unattended configuration you created above, and Develocity will restart.
4. Verify that incoming Build Scan data are stored in S3
| Develocity will start even if your S3 configuration is incorrect. |
To confirm that Develocity is storing incoming Build Scan data in S3 and also able to read them from S3, follow these steps:
-
Upload a new Build Scan to your Develocity instance.
-
Confirm that you can view the Build Scan.
-
Confirm that the Build Scan is stored in your S3 bucket, by running:
$ ACCOUNT_ID=$(aws sts get-caller-identity --query Account --output text)
  aws s3 ls s3://develocity-application-data-${ACCOUNT_ID}/build-scans/ \
    --recursive --human-readable --summarize
2022-09-27 19:11:06 6.6 KiB build-scans/2022/09/27/aprvi3bnnxyzm Total Objects: 1 Total Size: 6.6 KiB