The Develocity Build Cache follows a simple principle: the best way to do work faster is to avoid doing it at all. While Maven does not provide support for incremental builds, the Develocity Build Cache allows you to reuse outputs of goal executions from any previous build. Thus, it avoids executing costly goals and accelerates your Maven builds significantly.
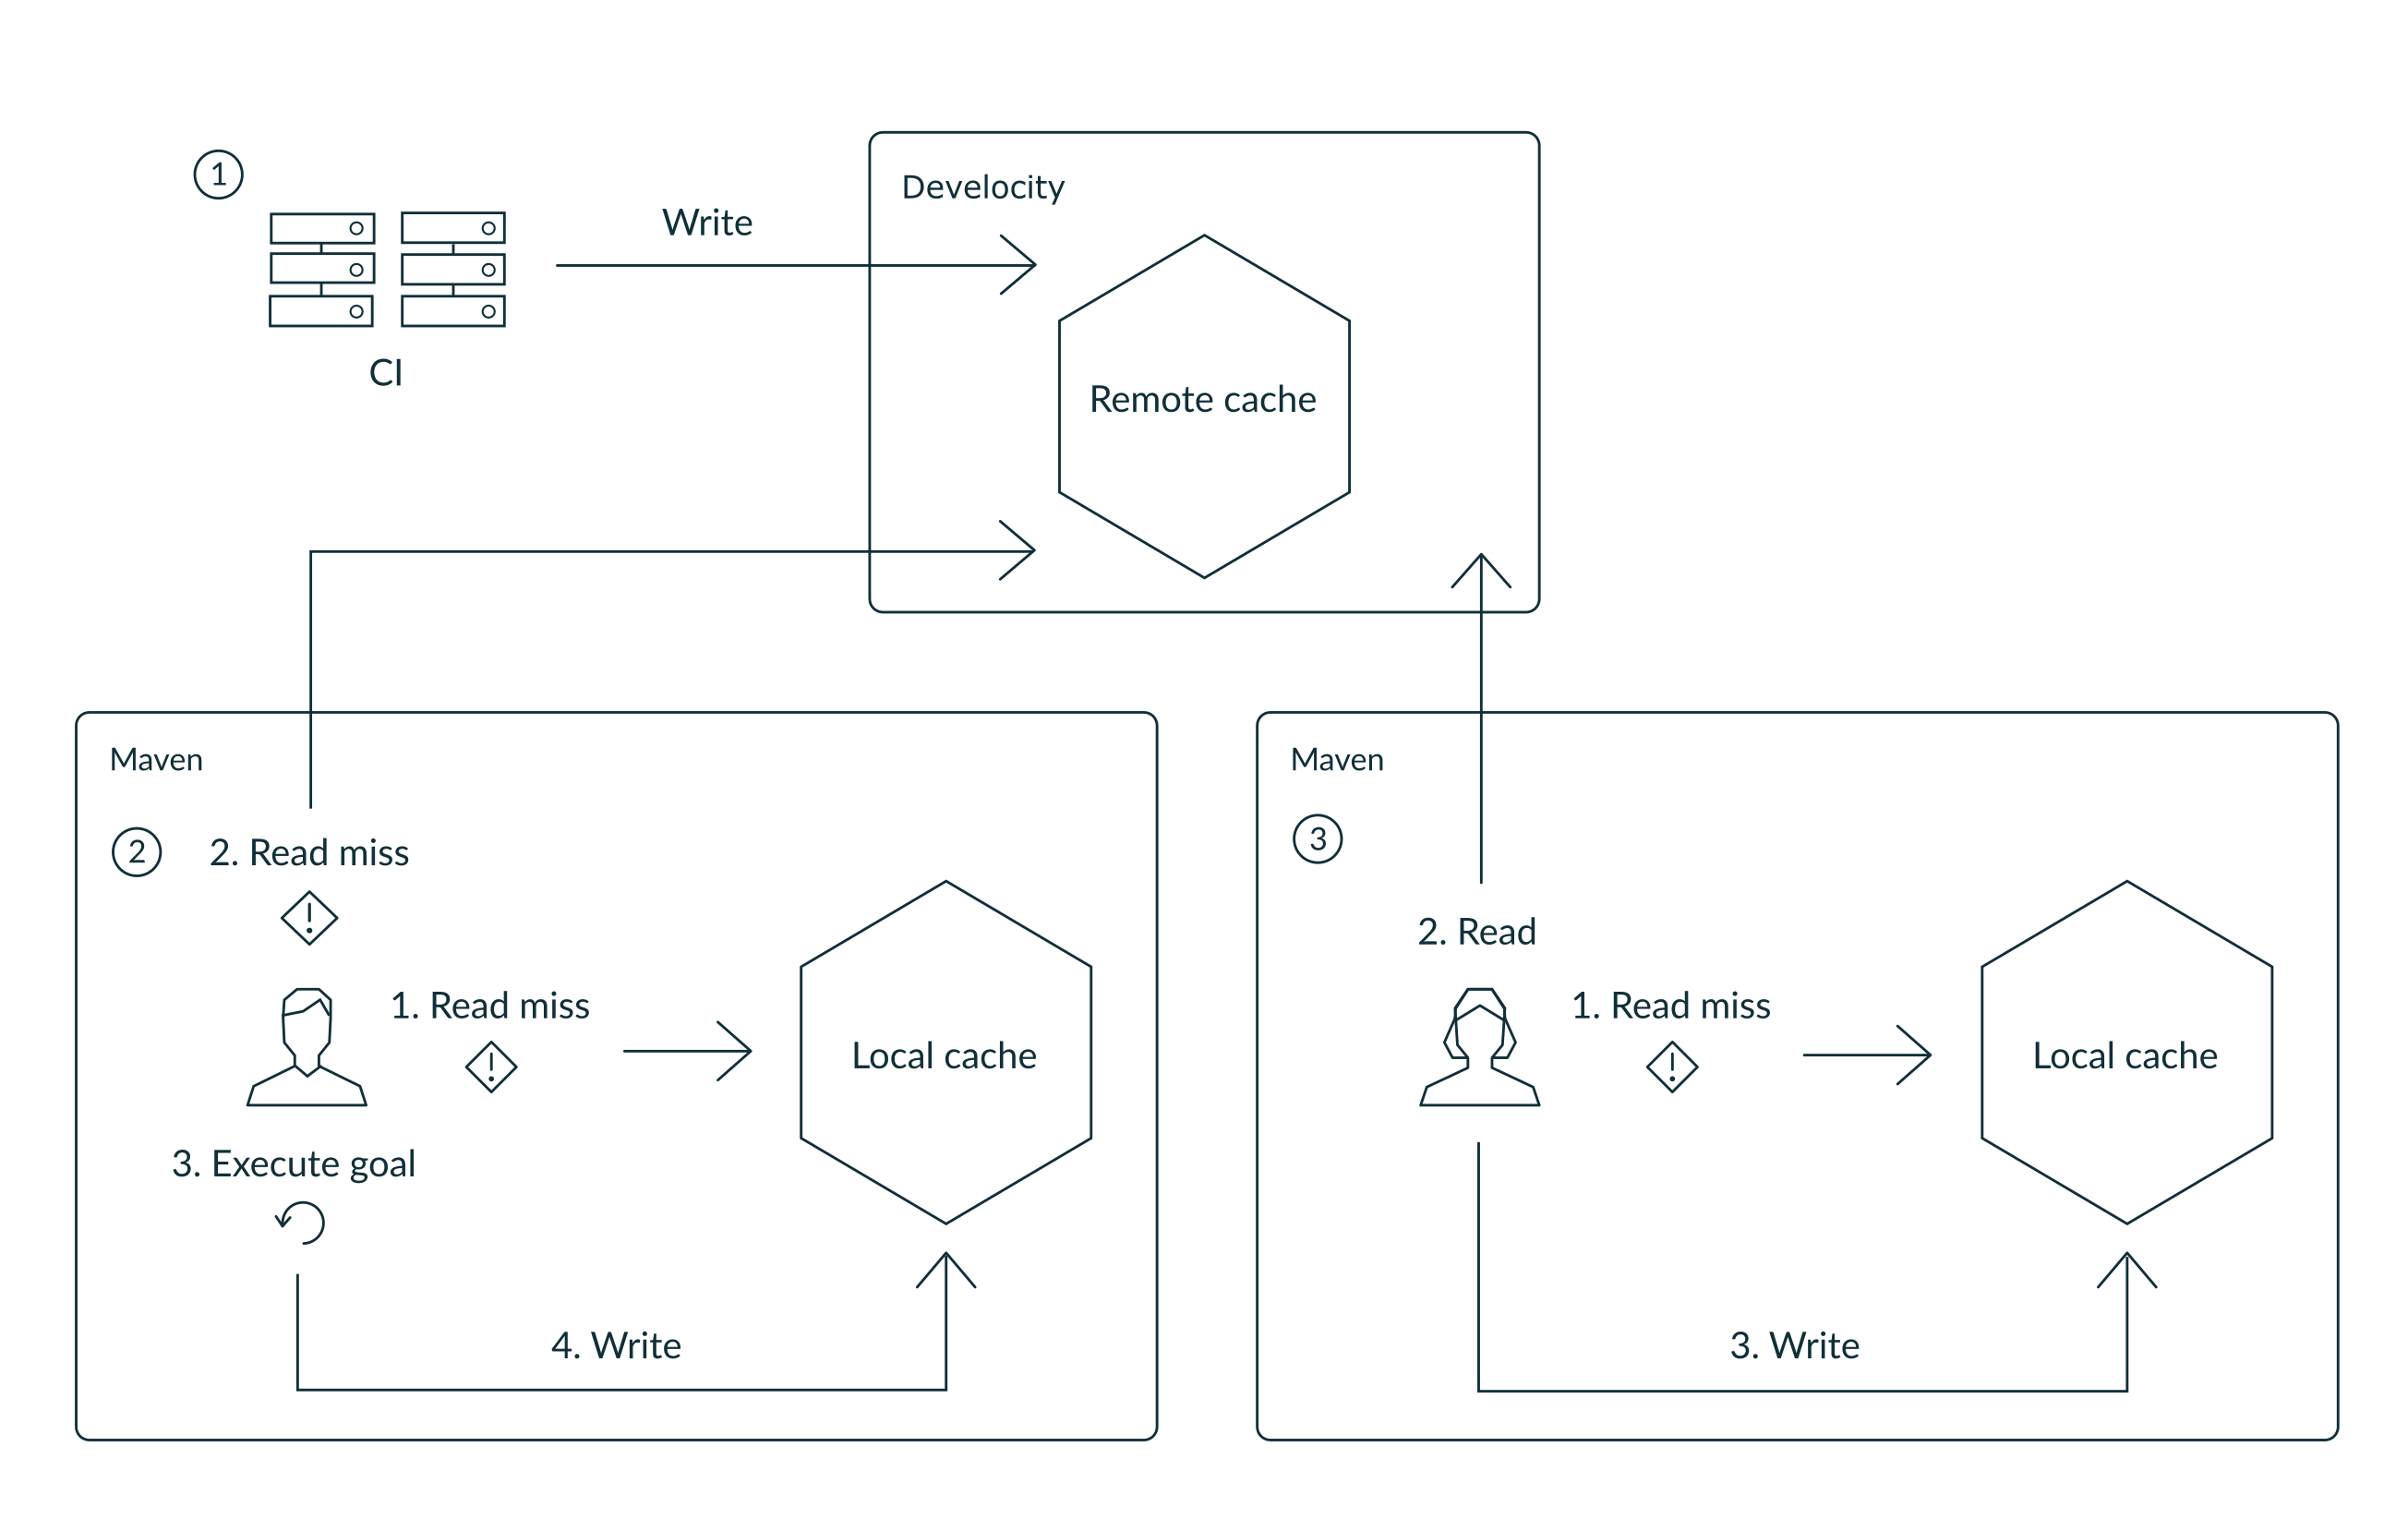
The remote Build Cache takes this even one step further: it allows you to share cached outputs across your whole team, including local and CI builds. In the diagram below, you can see the flow of CI agents pushing to the remote cache, and developers pulling from the remote cache.
-
A goal is executed on a CI server. The build is configured to push to a configured remote Build Cache, so that outputs can be reused by other CI pipeline builds and developer builds.
-
A developer executes the same goal with a local change to a file. The Develocity Maven extension tries to load the output from the local Build Cache, then the remote Build Cache. Neither contains a matching entry due to the local change, so the goal is executed. The output is stored in the local Build Cache. Outputs stored in the local Build Cache can be reused in subsequent builds on that developer’s machine.
-
A second developer executes that goal without any local changes from the commit that CI built. This time the remote Build Cache lookup is a hit, the cached output is downloaded and directly copied to the workspace and the local Build Cache. The goal does not need to be executed.
This guide will show you how to get started with the Maven Build Cache provided by the Develocity Maven Extension. The intended audience is build engineers who are looking to enable it for their existing builds. After you’ve seen the Build Cache in action, this guide will explain the basic concepts that are important to understand how the Build Cache works. You’ll learn how to measure the effectiveness of the Build Cache for your build and how to diagnose and solve common problems. Last but not least, this guide outlines how to roll out the Build Cache in your organization.
Getting started
| The configuration examples in this document assume you are using Develocity Maven extension 1.21 or later. For older versions, please refer to the (Legacy) Gradle Enterprise Maven Extension User Manual. |
In order to enable build caching for your Maven project, you need to add the Develocity Maven Extension to your build. For this purpose, create .mvn/extensions.xml with the following content in the project root directory:
<extensions>
  <extension>
    <groupId>com.gradle</groupId>
    <artifactId>develocity-maven-extension</artifactId>
    <version>1.21.6</version>
  </extension>
</extensions>
In addition, you need to configure the Develocity server in develocity.xml. There are multiple locations for this file that allow you to configure settings for your Maven installation, your project, or your local user (cf. user manual). When getting started, it’s usually easiest if you add the configuration to the current project in .mvn/develocity.xml:
<develocity>
  <server>
    <url>https://gradle.company.com</url>
  </server>
</develocity>
Once you’ve done that, you’re ready to run your first Maven build that uses the Build Cache.
$ mvn clean verify
...
[INFO] ------------------------------------------------------------------------
[INFO] BUILD SUCCESS
[INFO] ------------------------------------------------------------------------
[INFO] Total time:  3.276 s
[INFO] Finished at: 2019-03-15T16:06:09+01:00
[INFO] ------------------------------------------------------------------------
[INFO] 7 goals, 7 executed
[INFO]
[INFO] Publishing build scan...
[INFO] https://gradle.company.com/s/vcmc35bl4dd2w
[INFO]
|
Be sure to include the |
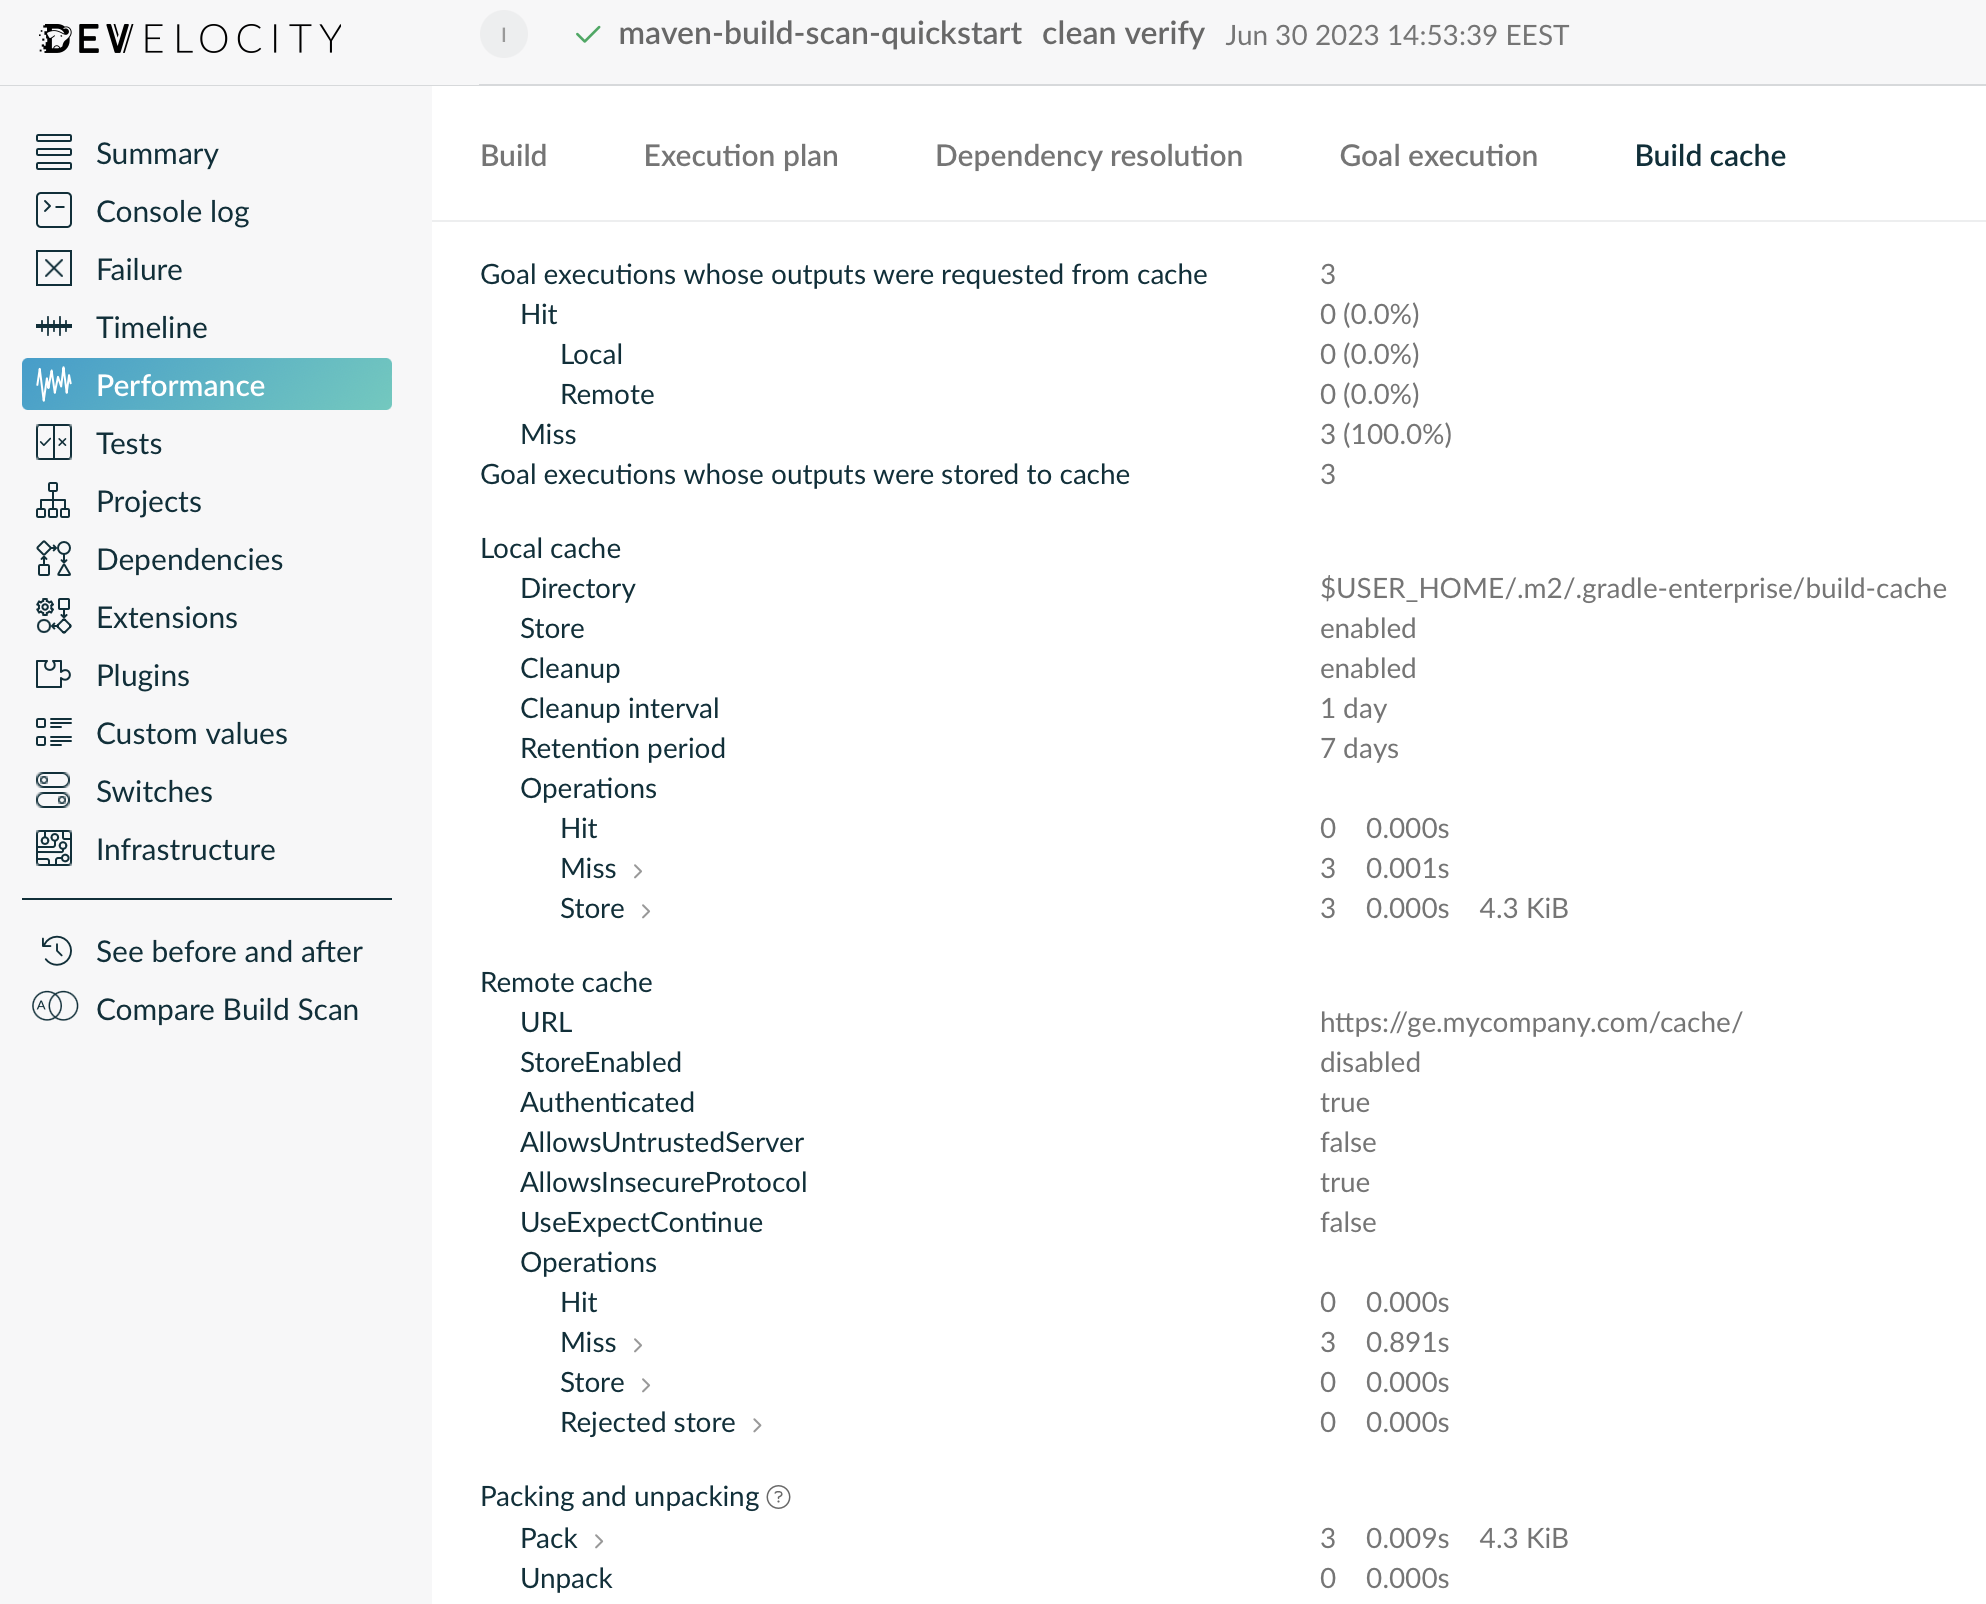
As you can see from the summary line, all goals were executed and none were loaded from cache. That’s not surprising since the build started with an empty cache. The resulting build scan provides a summary of all cache operations in the Build Cache section on the Performance page.
Important concepts
In order to get the most out of the Build Cache, it is important to understand the basic concepts of how it works.
Inputs and outputs
The outputs of a goal are the files it produces when executed. Its inputs are all files and properties that influence its outputs. For example, for the compile goal of the maven-compiler-plugin all Java source files in src/main/java are inputs as well as all configuration options (such as compiler flags) that influence the resulting class files, i.e. its outputs.
Cache key
Artifacts in the Build Cache are uniquely identified by a Build Cache key. A Build Cache key is assigned to each cacheable goal execution when running with the Build Cache enabled and is used for both loading and storing outputs of goal executions to the Build Cache. The following inputs contribute to the Build Cache key for a goal execution: the goal implementation class and its classpath, the names and values of its inputs, and the names of its output properties. Two goal executions can reuse their outputs by using the Build Cache if their associated Build Cache keys are the same.
Reproducible outputs
A goal execution is said to have reproducible outputs if it will always generate the same outputs given the same inputs. Some goals add extra information to their output that doesn’t depend their its inputs, e.g. a code generator might add a timestamp to the generated files. In such a case, re-executing the goal will result in different outputs. Consequently, goals that use these outputs as their inputs will need to be re-executed.
When a goal is cacheable the very nature of goal output caching ensures that its executions will have the same outputs for a given set of inputs. Therefore, cacheable goals should have reproducible outputs. Otherwise, the result of executing the goal and loading its outputs from cache may be different, which can lead to hard-to-diagnose cache misses.
Stable inputs
The outputs of a goal can only be loaded from cache if it has stable inputs. Unstable inputs result in frequent, unnecessary cache misses. Goals frequently depend on outputs of other goals as their input. For example, compiling tests depends on the result of compiling production code. Thus, in order for goals to have stable inputs, the goals they depend on should have reproducible outputs.
While we acknowledge that creating outputs that contain volatility (such as build timestamps) is a common practice for Maven builds, we see this as an antipattern because they drastically reduce the probability of cache hits. If, for example, one project in a multi-project build generates a build timestamp, the Build Cache has to assume that this timestamp is used by downstream projects. Therefore, all of them have to be rebuilt even if the timestamp is not actually used.
Timestamps in particular are of dubious significance. What does a timestamp tell us about the origin of the artifact? Does it help us to track it back to the CI job that created it? The answer is almost always "no", because the time the CI job was started is usually not identical with the timestamp the artifact was generated. Instead, you should use something that uniquely identifies the code that was used to produce the artifact. A good candidate for this is the SCM revision number or commit ID.
Input normalization
Having stable inputs is crucial for cacheable goals. However, achieving byte for byte identical inputs for each goal can be challenging. Sanitizing the output of a goal to remove unnecessary information is often a good approach, but sometimes it’s impossible to remove all volatility.
This is where input normalization comes into play. Input normalization is used to determine if two goal inputs are essentially the same. The extension uses normalized inputs when determining if a cached result can be re-used instead of executing the goal, e.g. by only considering the paths of input files relative to the project directory.
Runtime classpath normalization
The Build Cache understands the concept of a runtime classpath, and uses tailored input normalization to avoid running e.g. tests. For jar files on runtime classpaths, file timestamps and the order of the entries are ignored. This means that a rebuilt jar file would be considered the same runtime classpath input.
Your classpaths may contain files that are not relevant for running or testing your code. A typical example are property files containing the current time, an SCM revision number, or commit ID. If left unchecked, such property files trigger a rerun of your tests on every build because the extension needs to assume that your code is making decision based on the contents of these files. By default, the extension ignores the contents of pom.xml and pom.properties in all subfolders of META-INF/maven/ on the classpath. You can configure additional files to be ignored in your pom.xml. Please refer to the runtime classpath normalization section of the extension user manual for details.
System property normalization
System properties can contain information or references that change without having an effect on the result of the goal execution. Pointing to a temporary folder, or a timestamp can invalidate all test executions, when in practice, they have no influence on the test results.
In order to avoid this, it is possible to configure normalization for system properties.
Please refer to the system property normalization section of the extension user manual for details.
Compile avoidance
The Java compiler only considers the signatures of the classes on the classpath. The extension uses this knowledge to avoid recompiling your sources when only an implementation detail on the classpath has changed.
However, if there are annotation processors on the classpath, the extension needs to consider all implementation details, because annotation processors are executed during compilation. This disables compile avoidance and lowers your cache hit ratio. The extension will detect this and issue a build warning:
[WARNING] The following annotation processors were found on the classpath: [com.acme.SomeAnnotationProcessor].
Compile avoidance has been deactivated.
Please use the maven-compiler-plugin version 3.5 or above and use the <annotationProcessorPaths> configuration element to declare the processors instead.
If you did not intend to use the processors above (e.g. they were leaked by a dependency), you can use the <proc>none</proc> option to disable annotation processing.

For more information see https://gradle.com/help/maven-extension-compile-avoidance.
To fix this, please declare your annotation processors explicitly using the compiler plugin’s <annotationProcessorPaths> configuration. If you don’t want to use annotation processors at all (if they are only on your classpath by accident), you can use the <proc>none</proc> option to tell the compiler and the extension that these processors should be ignored.
Additional inputs and outputs
The extension tracks all known inputs and outputs of the supported goals. Sometimes your goals may read additional inputs or produce additional outputs. For example, your integration tests might read files from the non-standard src/test/samples folder. Or an annotation processor might generate an SQL schema to the non-standard location target/schema. In order for caching to work correctly, you need to specify these additional inputs and outputs.
Non-cacheable goals
We’ve talked quite a bit about cacheable goals, which implies there are non-cacheable ones, too. Maven goals do not declare their inputs and outputs so there is no generic way of making them cacheable. The extension supports a set of well-known goals, e.g. the compile and testCompile goals of the maven-compiler-plugin (see the extension user manual for the full list of supported plugins and goals).
Sometimes you may have goals that do things that can’t be cached. For example, you may have a systems test that depends on the state of an external system which can’t be tracked as an input. In that case, you need to disable build caching for that particular plugin or goal execution.
Making other goals cacheable
The extension allows you to mark any goal as cacheable, though a lot of care must be taken to specify all its inputs and outputs correctly. The extension will ensure that all configuration parameters of the goal are handled, to provide some safety against under-defined inputs. However, some goals have hidden inputs that they don’t expose as configuration parameters, e.g. resolving a project’s compile classpath. Other goals modify the MavenProject model when they run. These modifications would not happen when loaded from the cache, leading to potential issues later on. It is worth studying the goal’s implementation in detail to uncover such issues before marking it as cacheable. Note that not every goal is worth caching. Goals that are IO bound, like copying files or creating zips, will not benefit from the cache and might actually become slower.
Measuring cache effectiveness
Now that we understand the most important concepts of build caching, let us walk through an example of how to measure and improve cache effectiveness. We will be using the unstable-inputs-example project to illustrate the steps. We will run several scenarios in order to find potential causes of cache misses. We recommend that you run your project through the same set of scenarios before rolling out the cache in your organization. This will ensure a high cache hit ratio from the start.
Rebuilding when nothing has changed
Let’s start off by running the build for the first time:
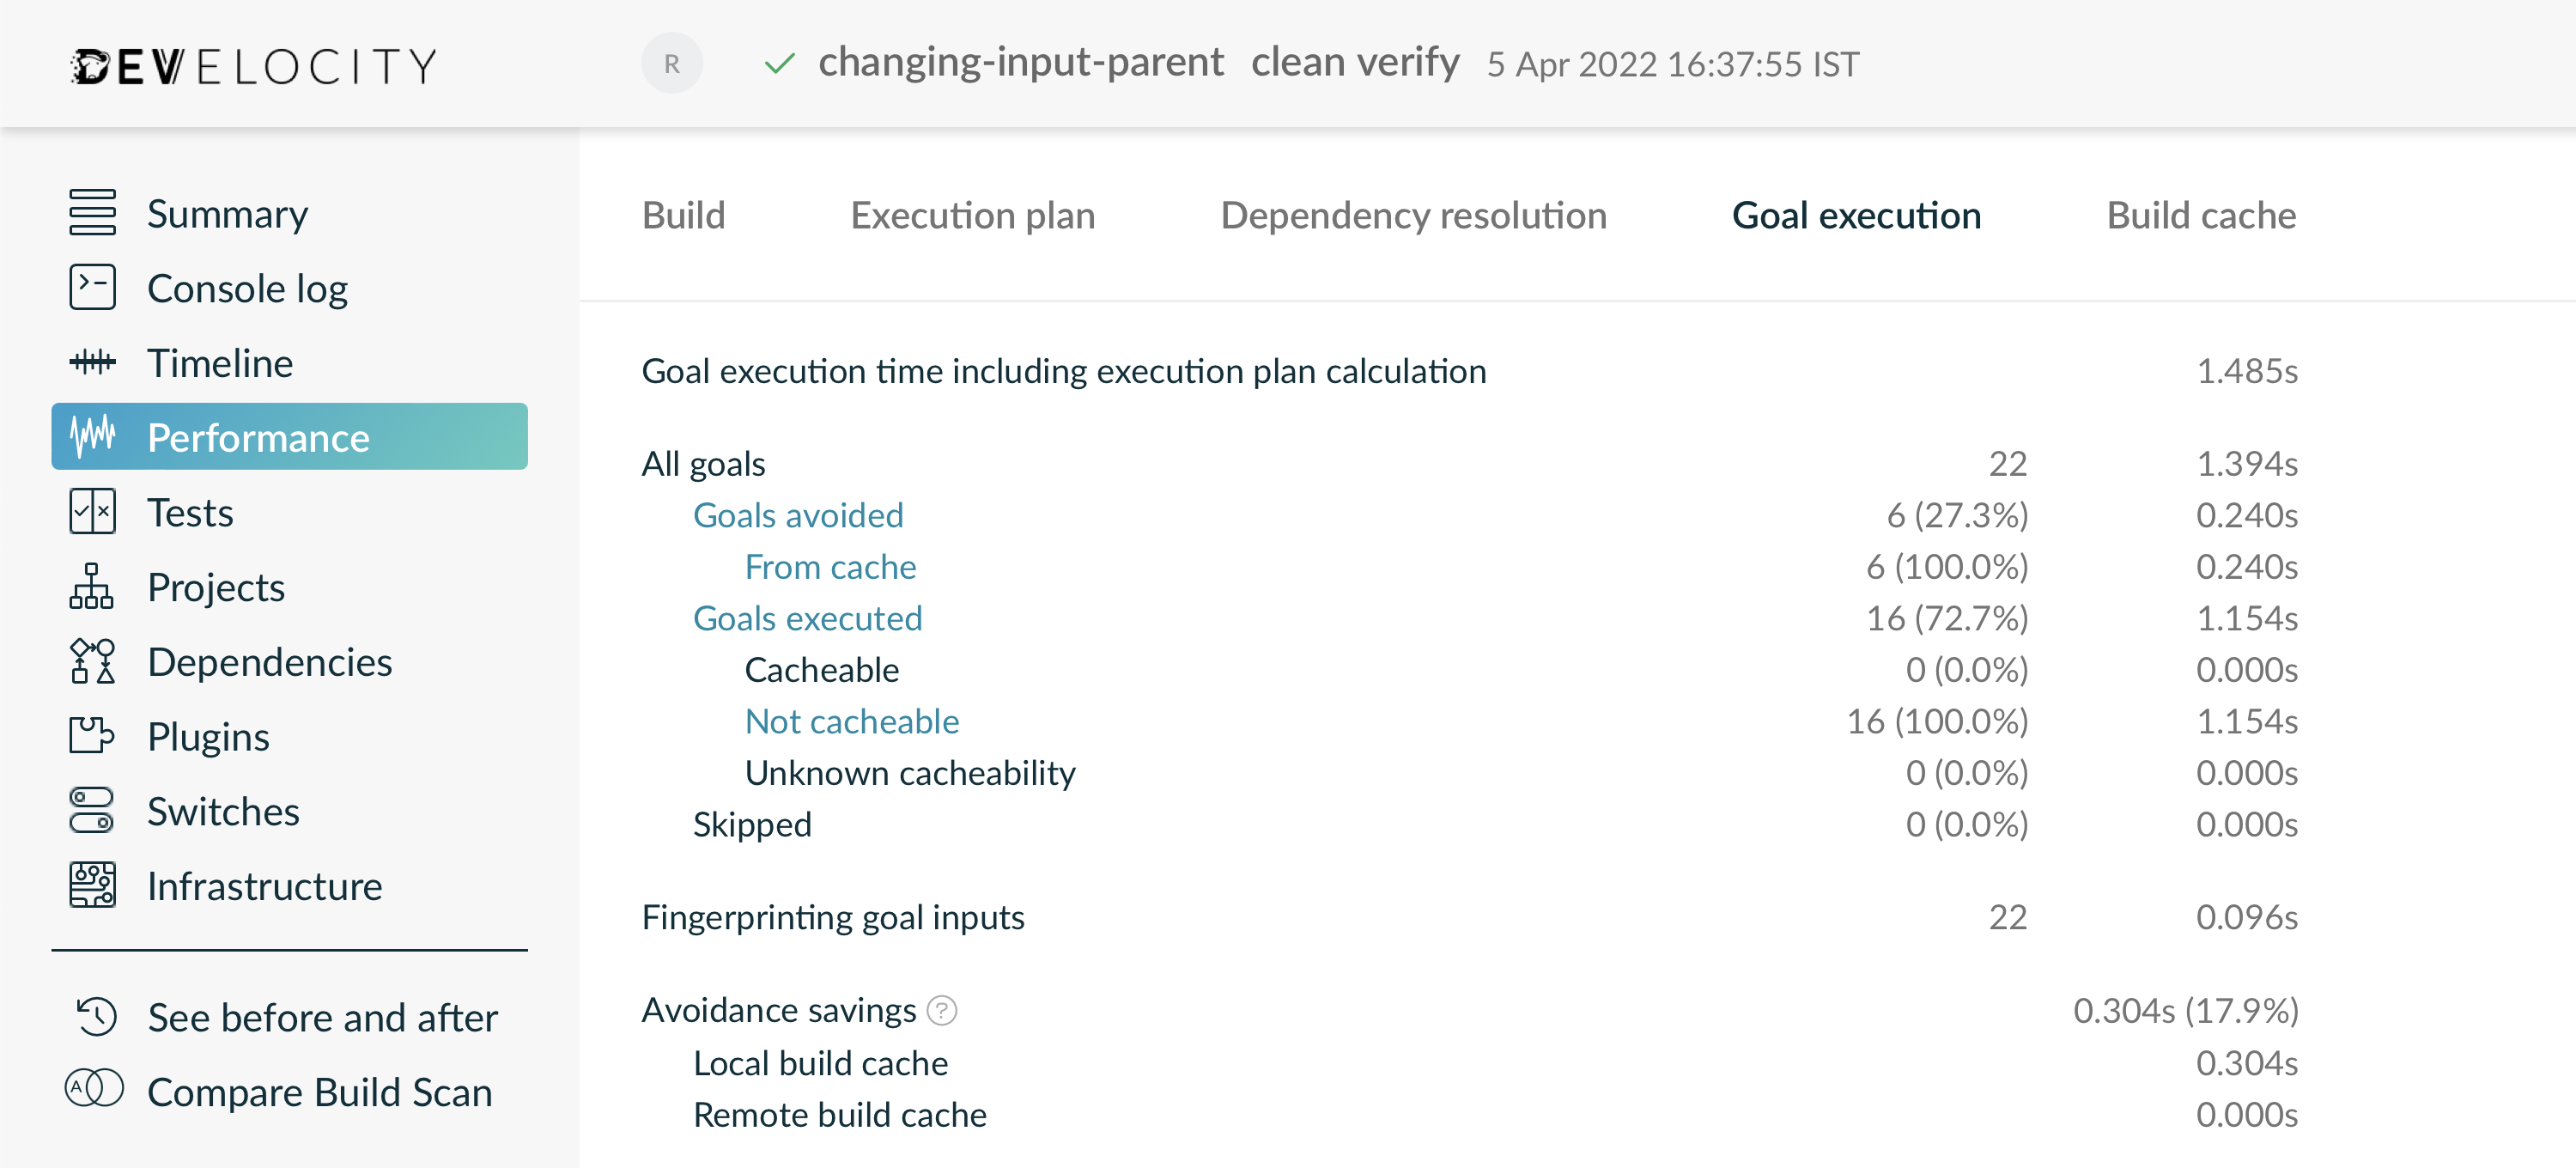
$ mvn clean verifyWhen a goal is executed, the extension first checks the local Build Cache for stored build results that may be reused. If no result is found in the local Build Cache, the remote Build Cache is queried. If neither provides a result, the goal is executed and the outputs of all cacheable goals are stored in the local Build Cache. Since we just activated the Build Cache for the project, the local Build Cache as well as the remote Build Cache are empty and all goals are executed. This is reflected in the corresponding build scan’s goal execution page.
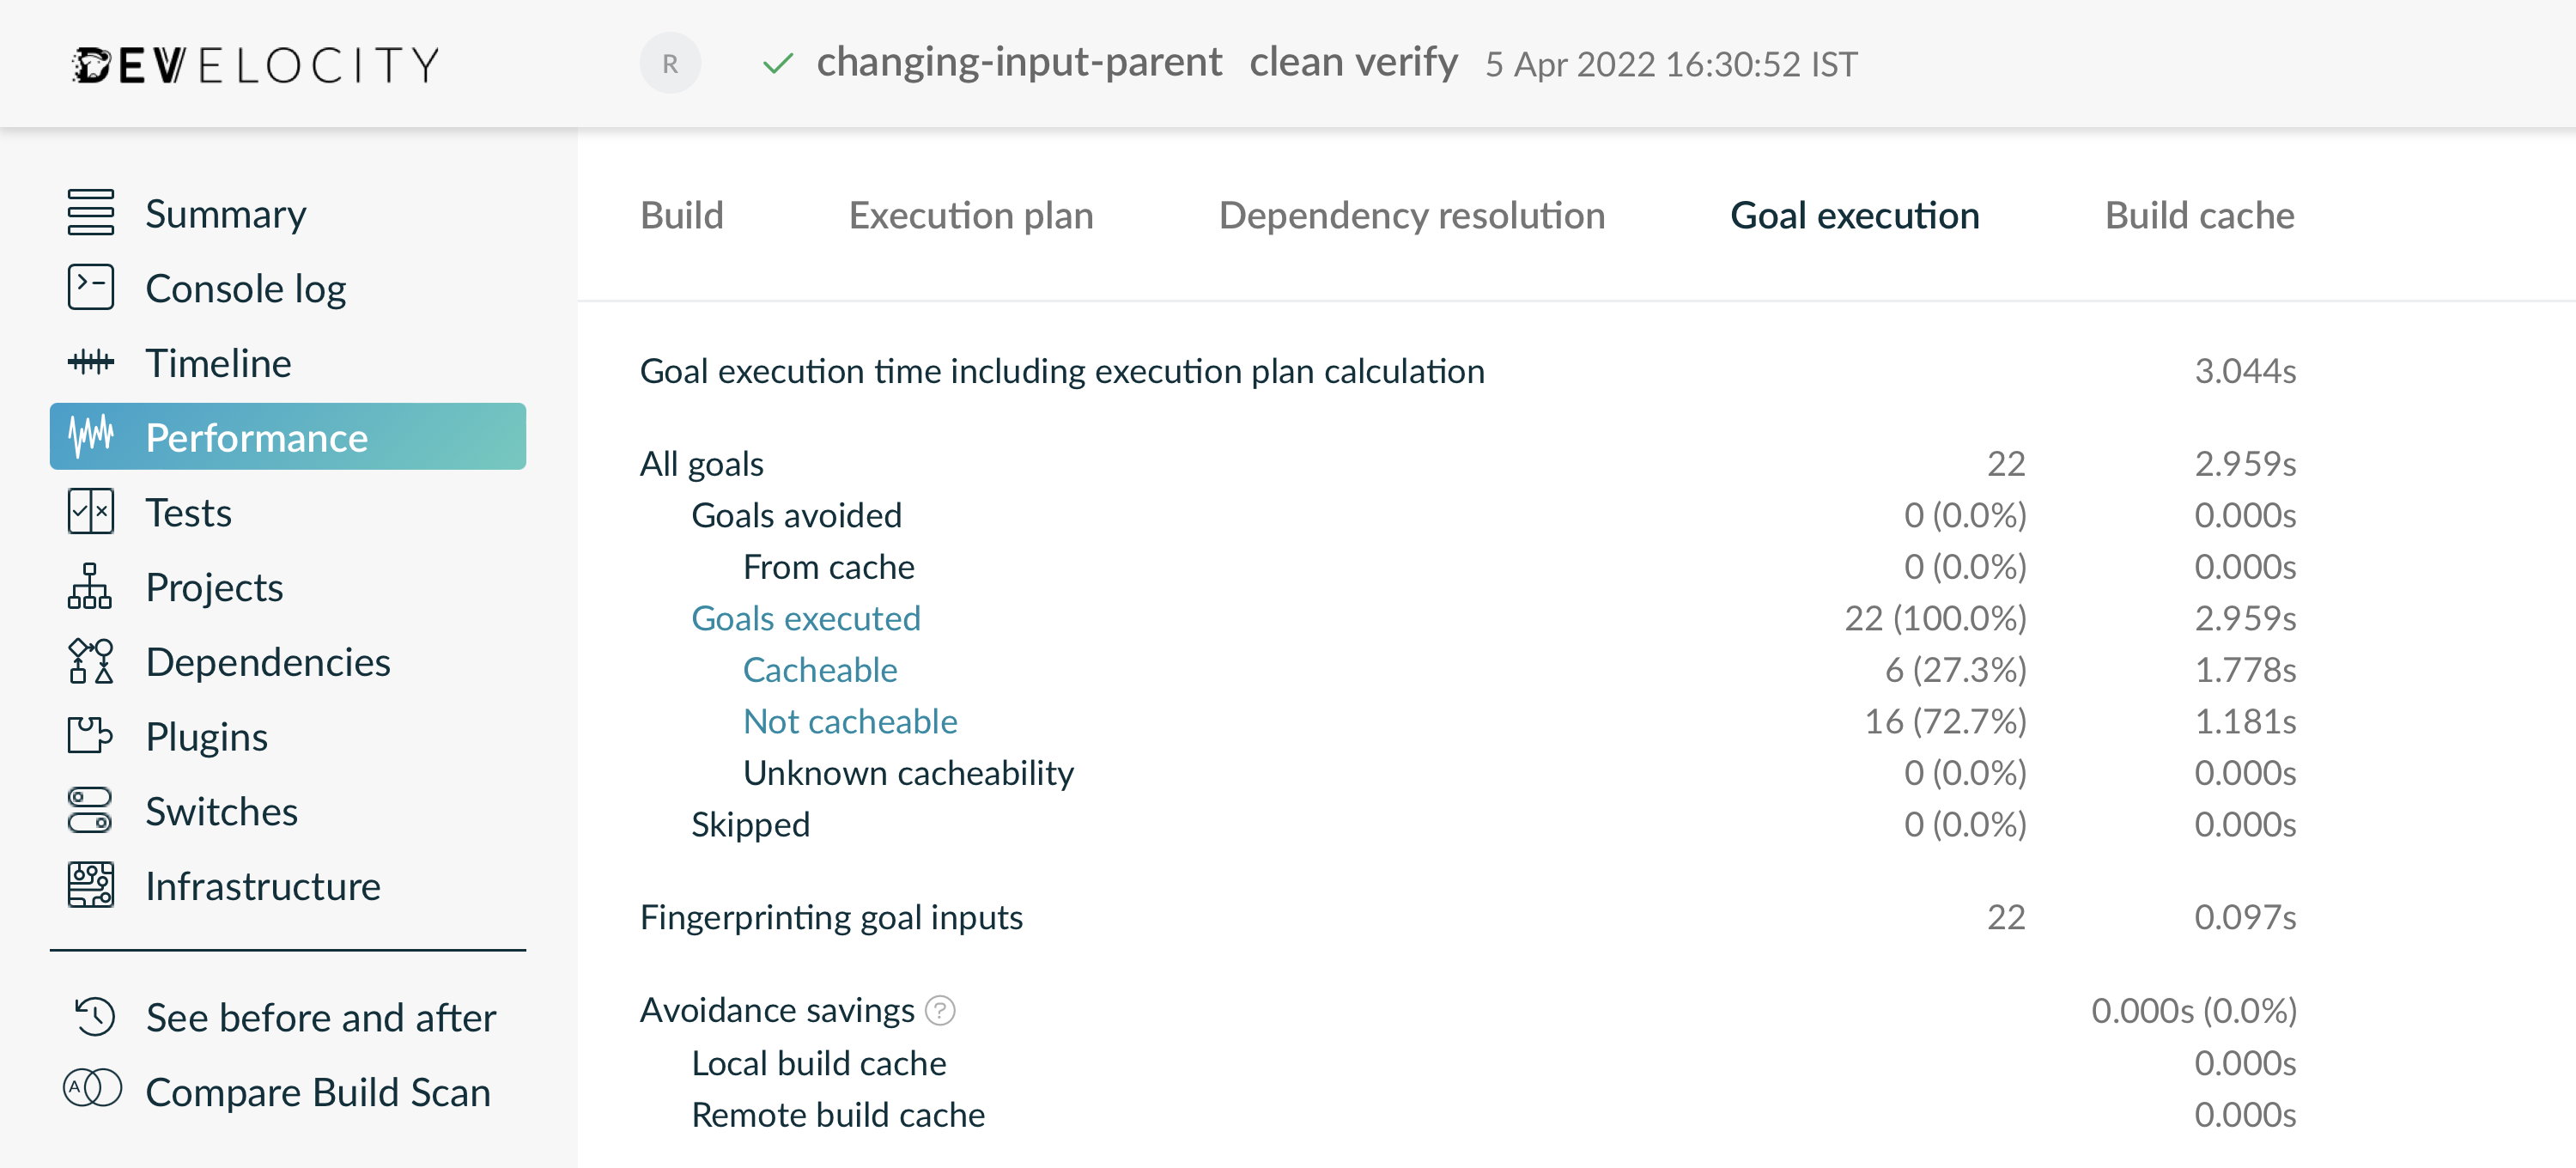
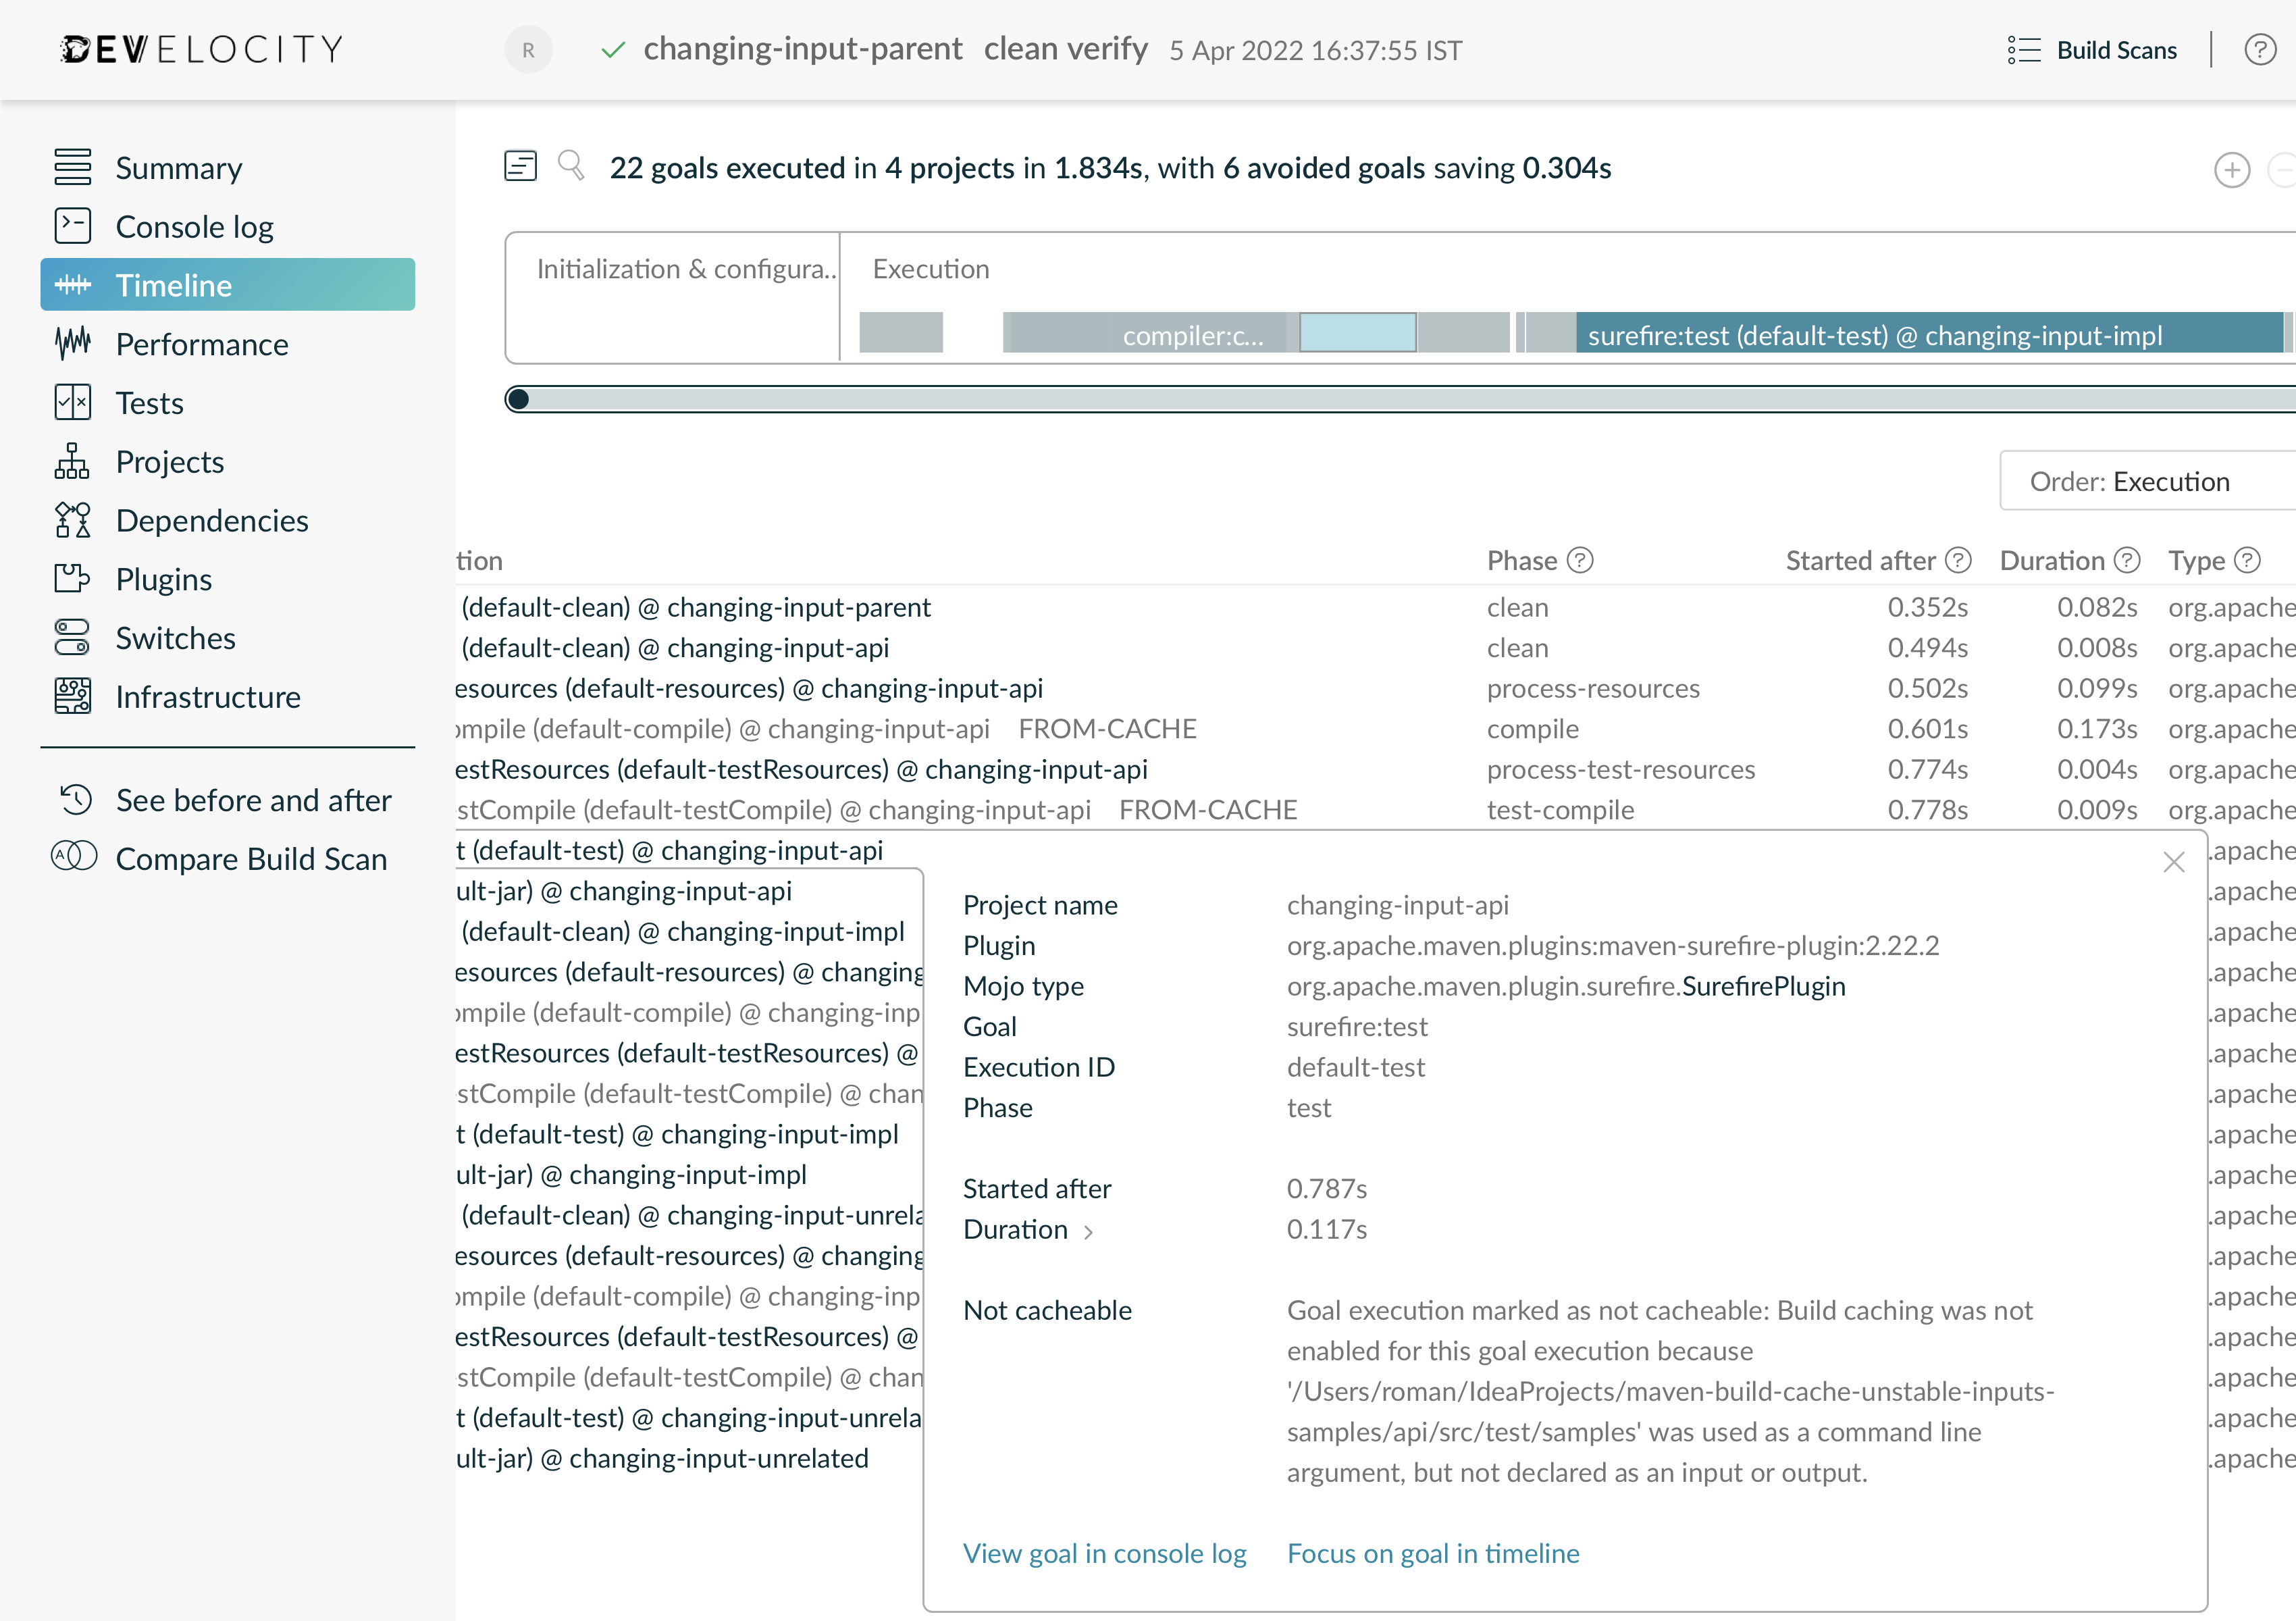
By clicking on the executed goals, we can get more details about them in the timeline view.
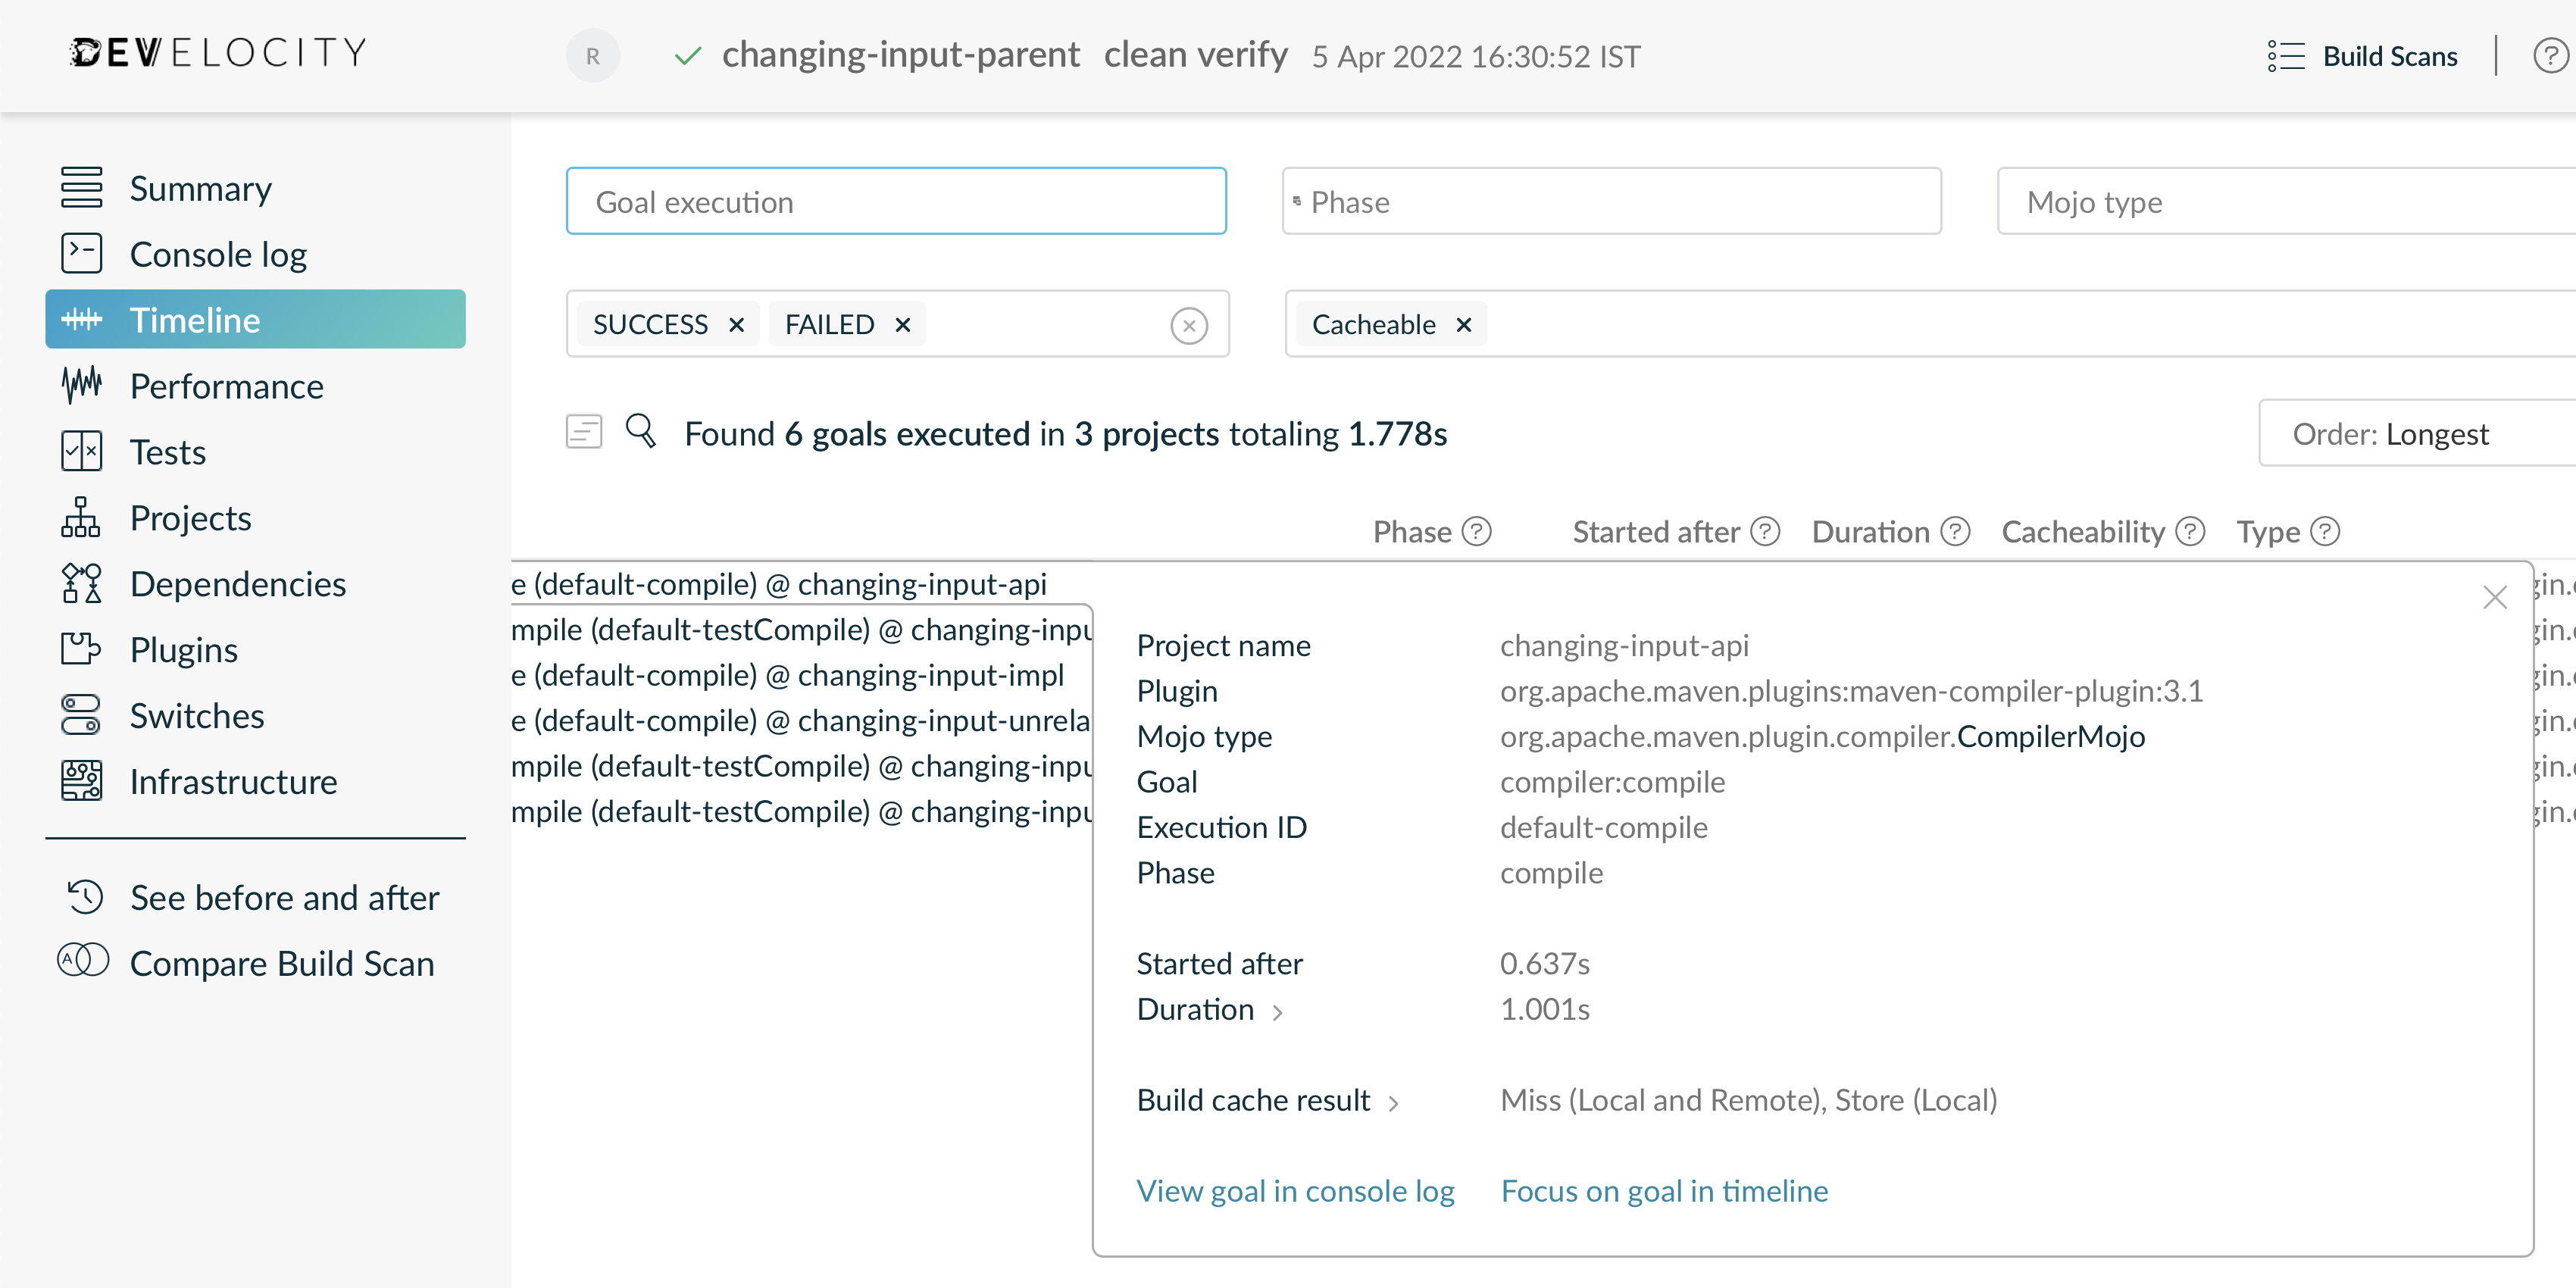
When we run the build a second time with a populated local cache, the build results of cacheable goals should be retrieved from the cache. However, some supported goals were not cacheable. By taking a closer look at the timeline, we can see the reason was undeclared inputs.
Declaring additional inputs and outputs
The extension automatically checks all command line arguments of cacheable goals for well-known paths that represent undeclared inputs and outputs. For example, in the above build scan, all executions of the surefire:test goal are not cacheable because they pass the src/test/samples directory using a system property.
In order to remedy the situation, you should declare the directory as an additional input for executions of the maven-surefire-plugin.
<pluginManagement>
  <plugins>
    <plugin>
      <groupId>com.gradle</groupId>
      <artifactId>develocity-maven-extension</artifactId>
      <configuration>
        <develocity>
          <plugins>
            <plugin>
              <artifactId>maven-surefire-plugin</artifactId>
              <inputs>
                <fileSets>
                  <fileSet>
                    <name>samples</name>
                    <paths>
                      <path>src/test/samples</path>
                    </paths>
                  </fileSet>
                </fileSets>
              </inputs>
            </plugin>
          </plugins>
        </develocity>
      </configuration>
    </plugin>
  </plugins>
</pluginManagement>
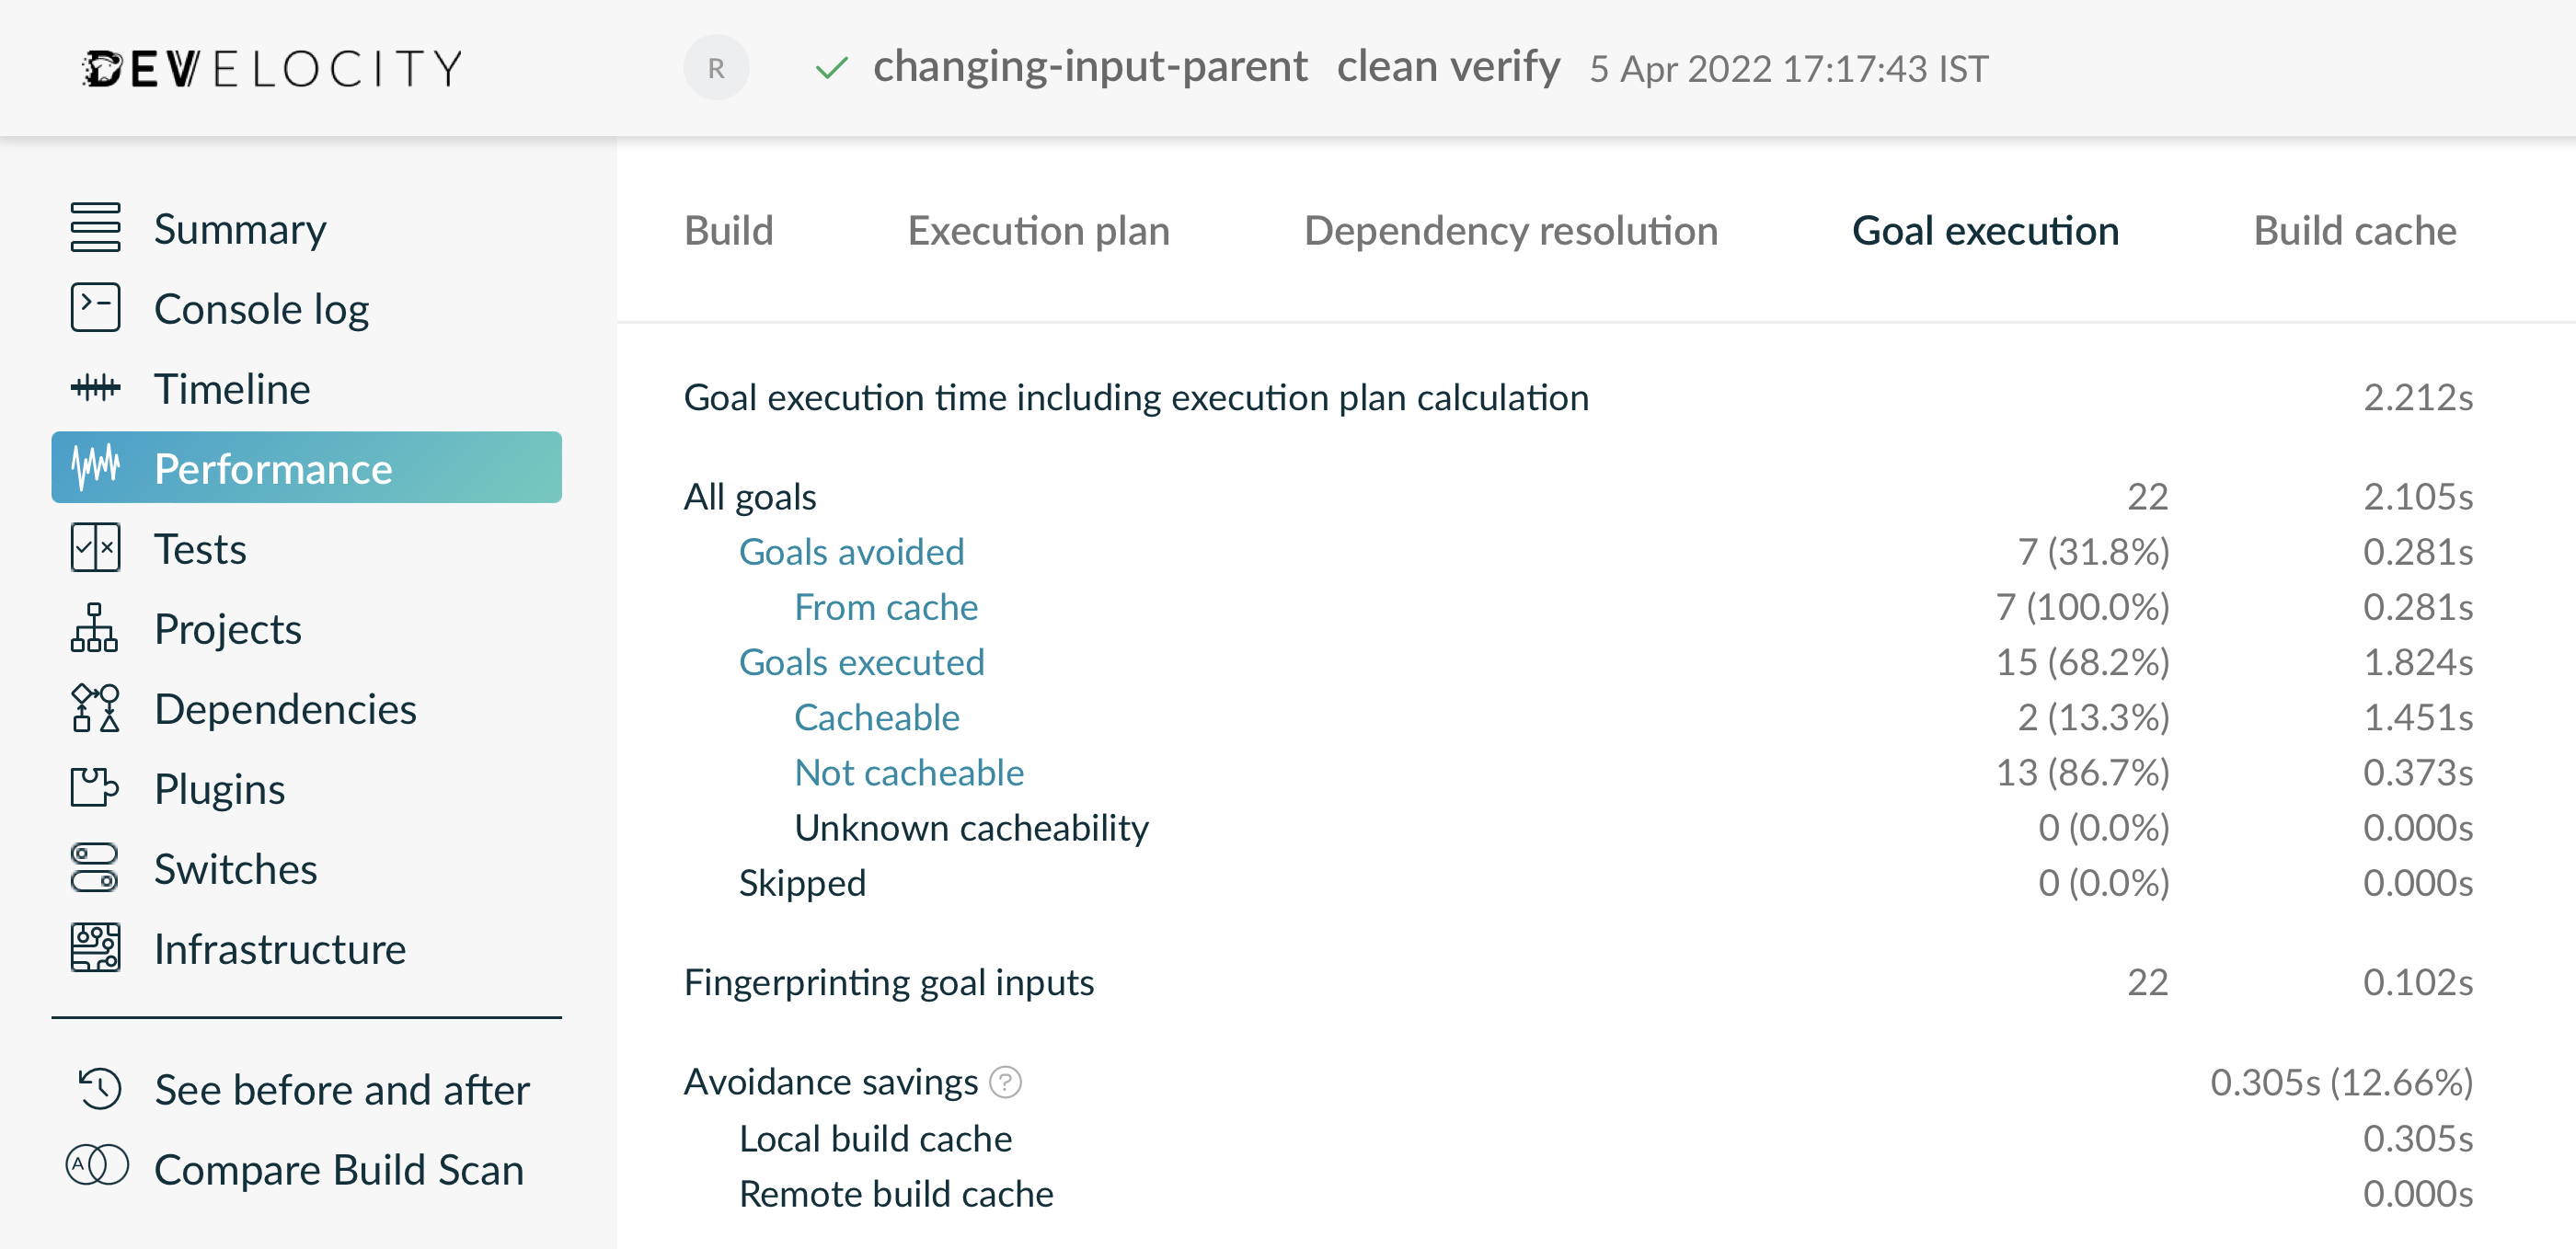
When we run the build another time, the build results of cacheable goals should be retrieved from the cache. However, some cacheable goals were executed again, telling us that they must have unstable inputs. We’ll need to find and fix those.
Finding the cause of cache misses
In order to identify which inputs changed between builds, we can use the Maven build comparison feature. We are going to run the same Maven build twice and compare those two builds. To make it easier for us to find unstable input files we explicitly enable capturing of goal input files using the -Dgradle.scan.captureGoalInputFiles=true flag.
|
Capturing goal input files has an impact on build performance. For this reason it is disabled by default. |
Once the build scans have been published we can compare the builds in Develocity.
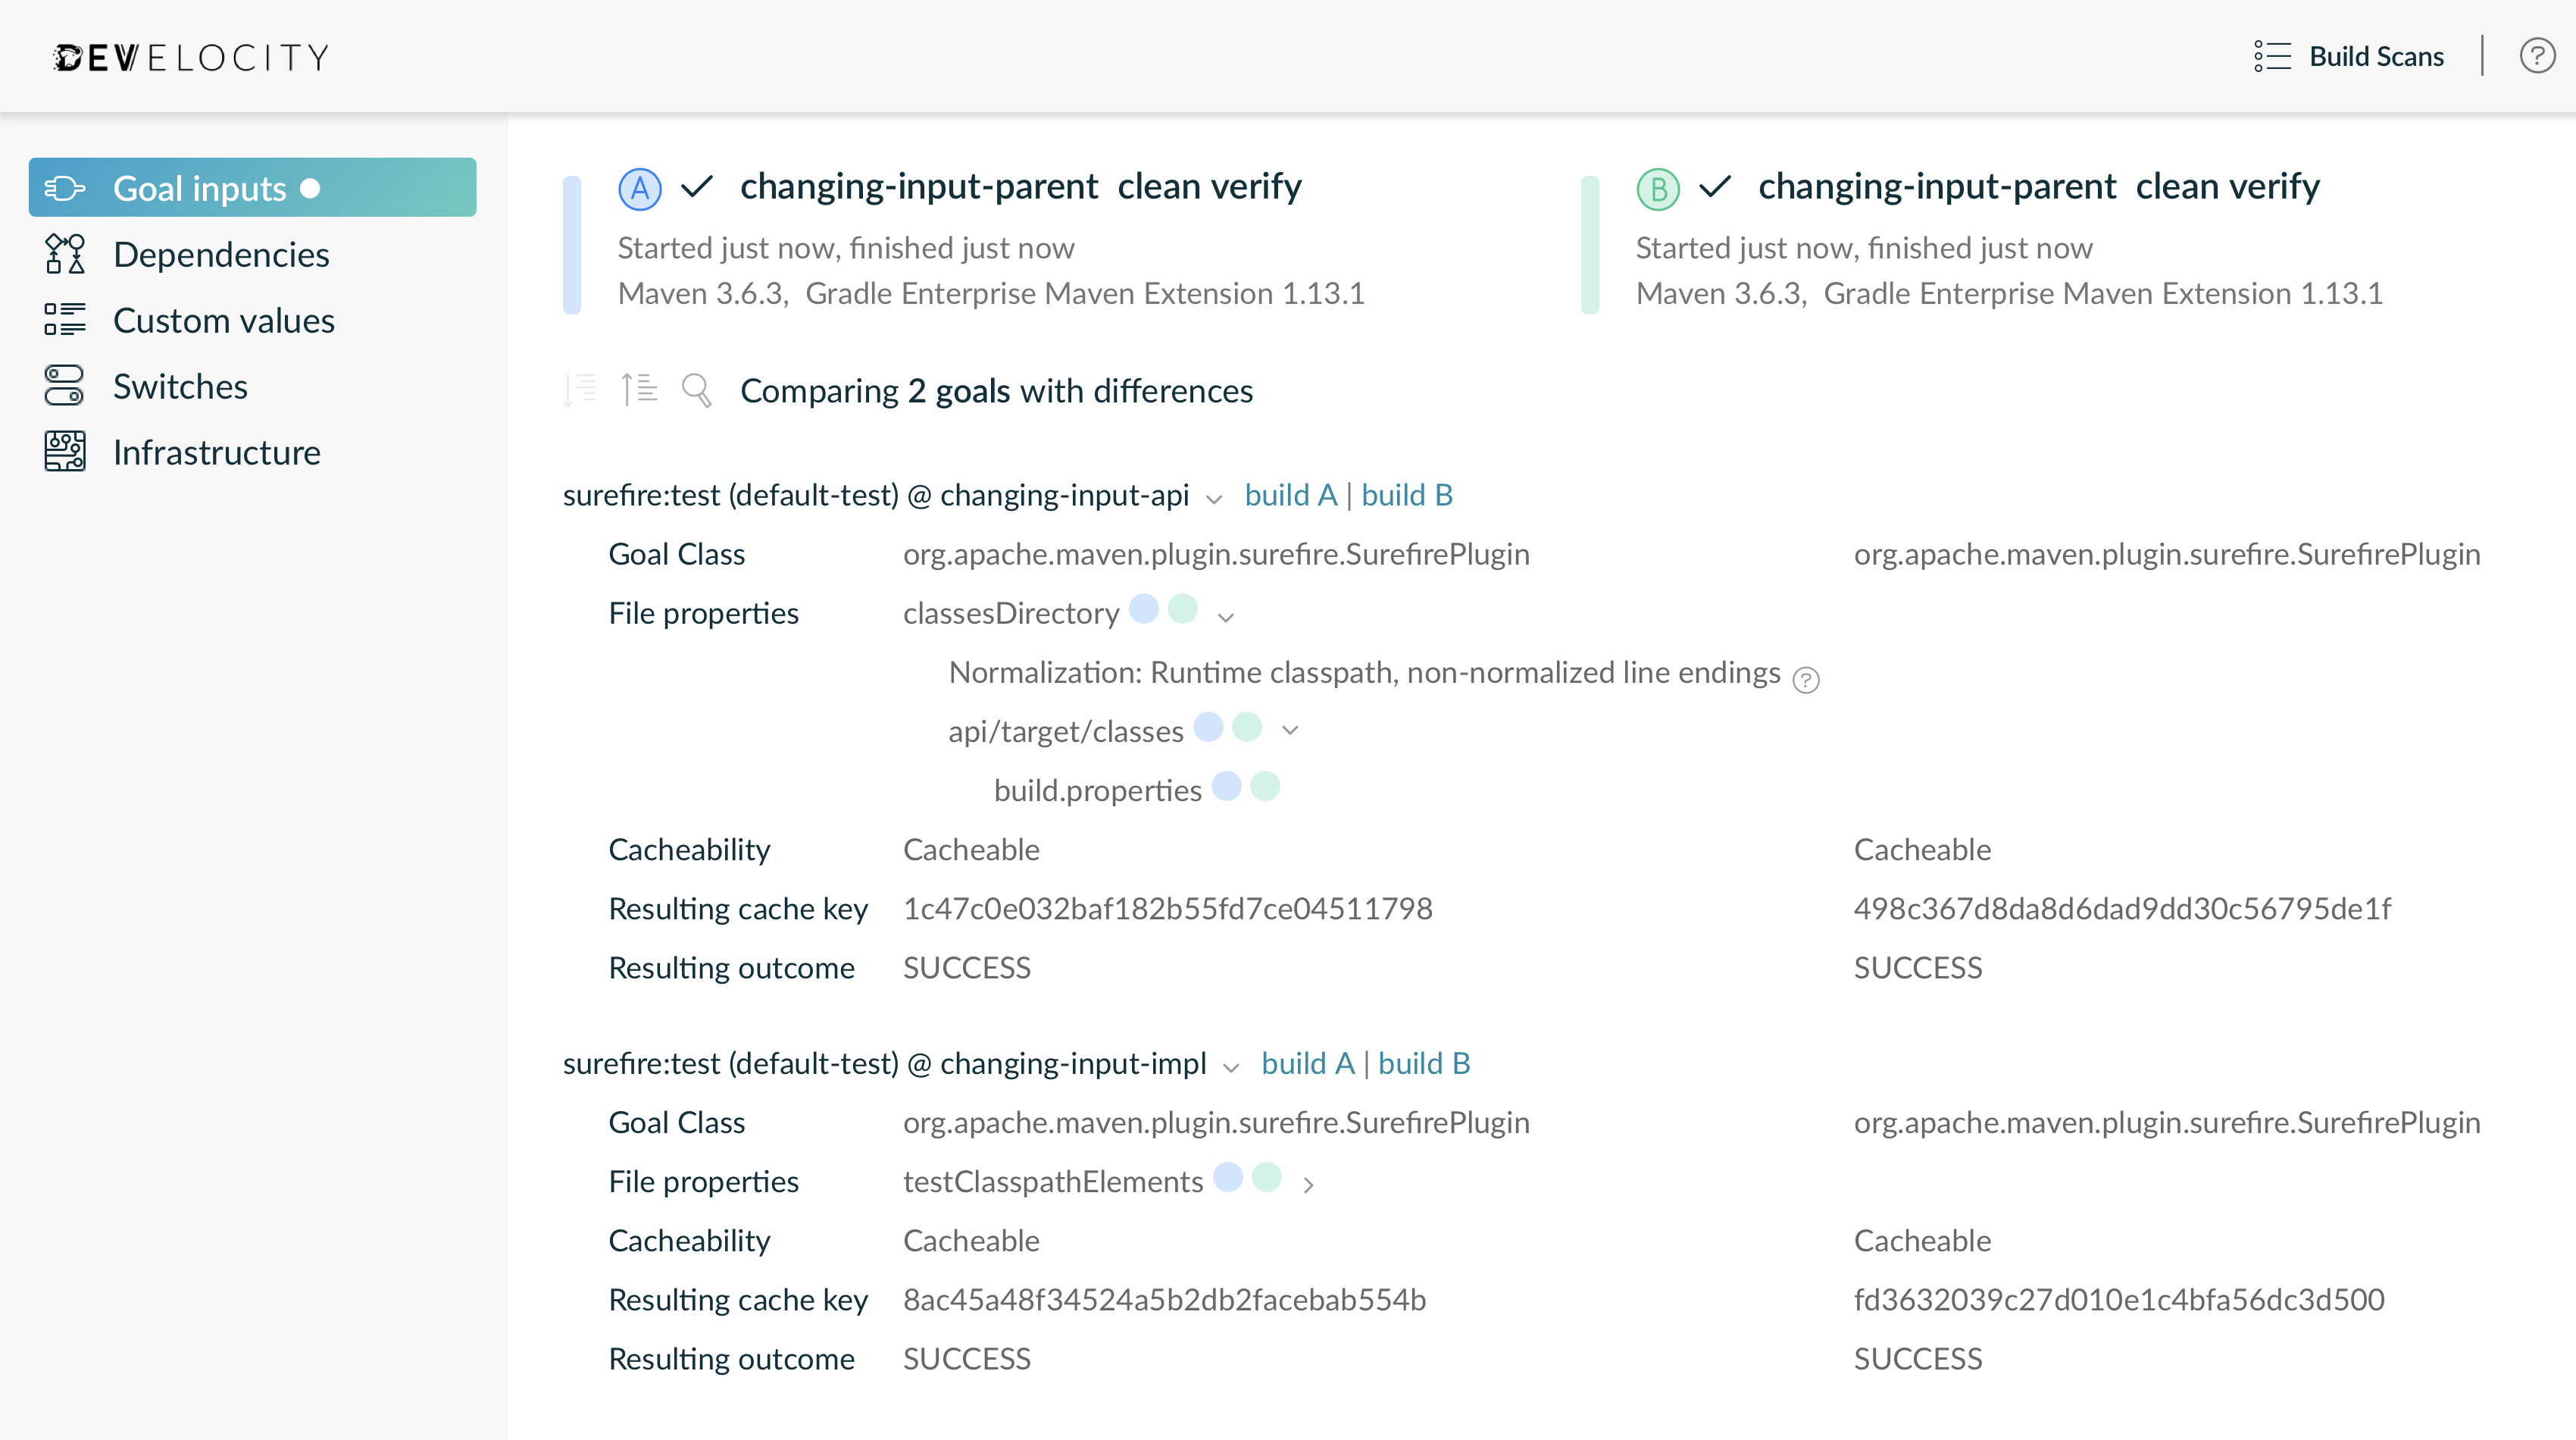
The build comparison shows that the build.properties file is the culprit. It causes the surefire:test goal to be rerun in the changing-input-api project, because processed resource files in target/classes are part of the inputs of that goal. Furthermore it causes the surefire:test goal to be rerun in the changing-input-impl project. This is because the build.properties file will be added to the resulting jar of changing-input-api which the downstream project changing-input-impl depends on. As you can see, unstable inputs can ripple through your build process and should be fixed.
We have several options to stabilize this input. We could decide to completely remove the timestamp property, since it is probably serving no important purpose in our application. We could move the timestamp generation to a Maven profile that is only used on release builds, so the timestamp no longer affects day-to-day development. Or we can use Normalization to ignore the changing file for the purposes of cache key calculation.
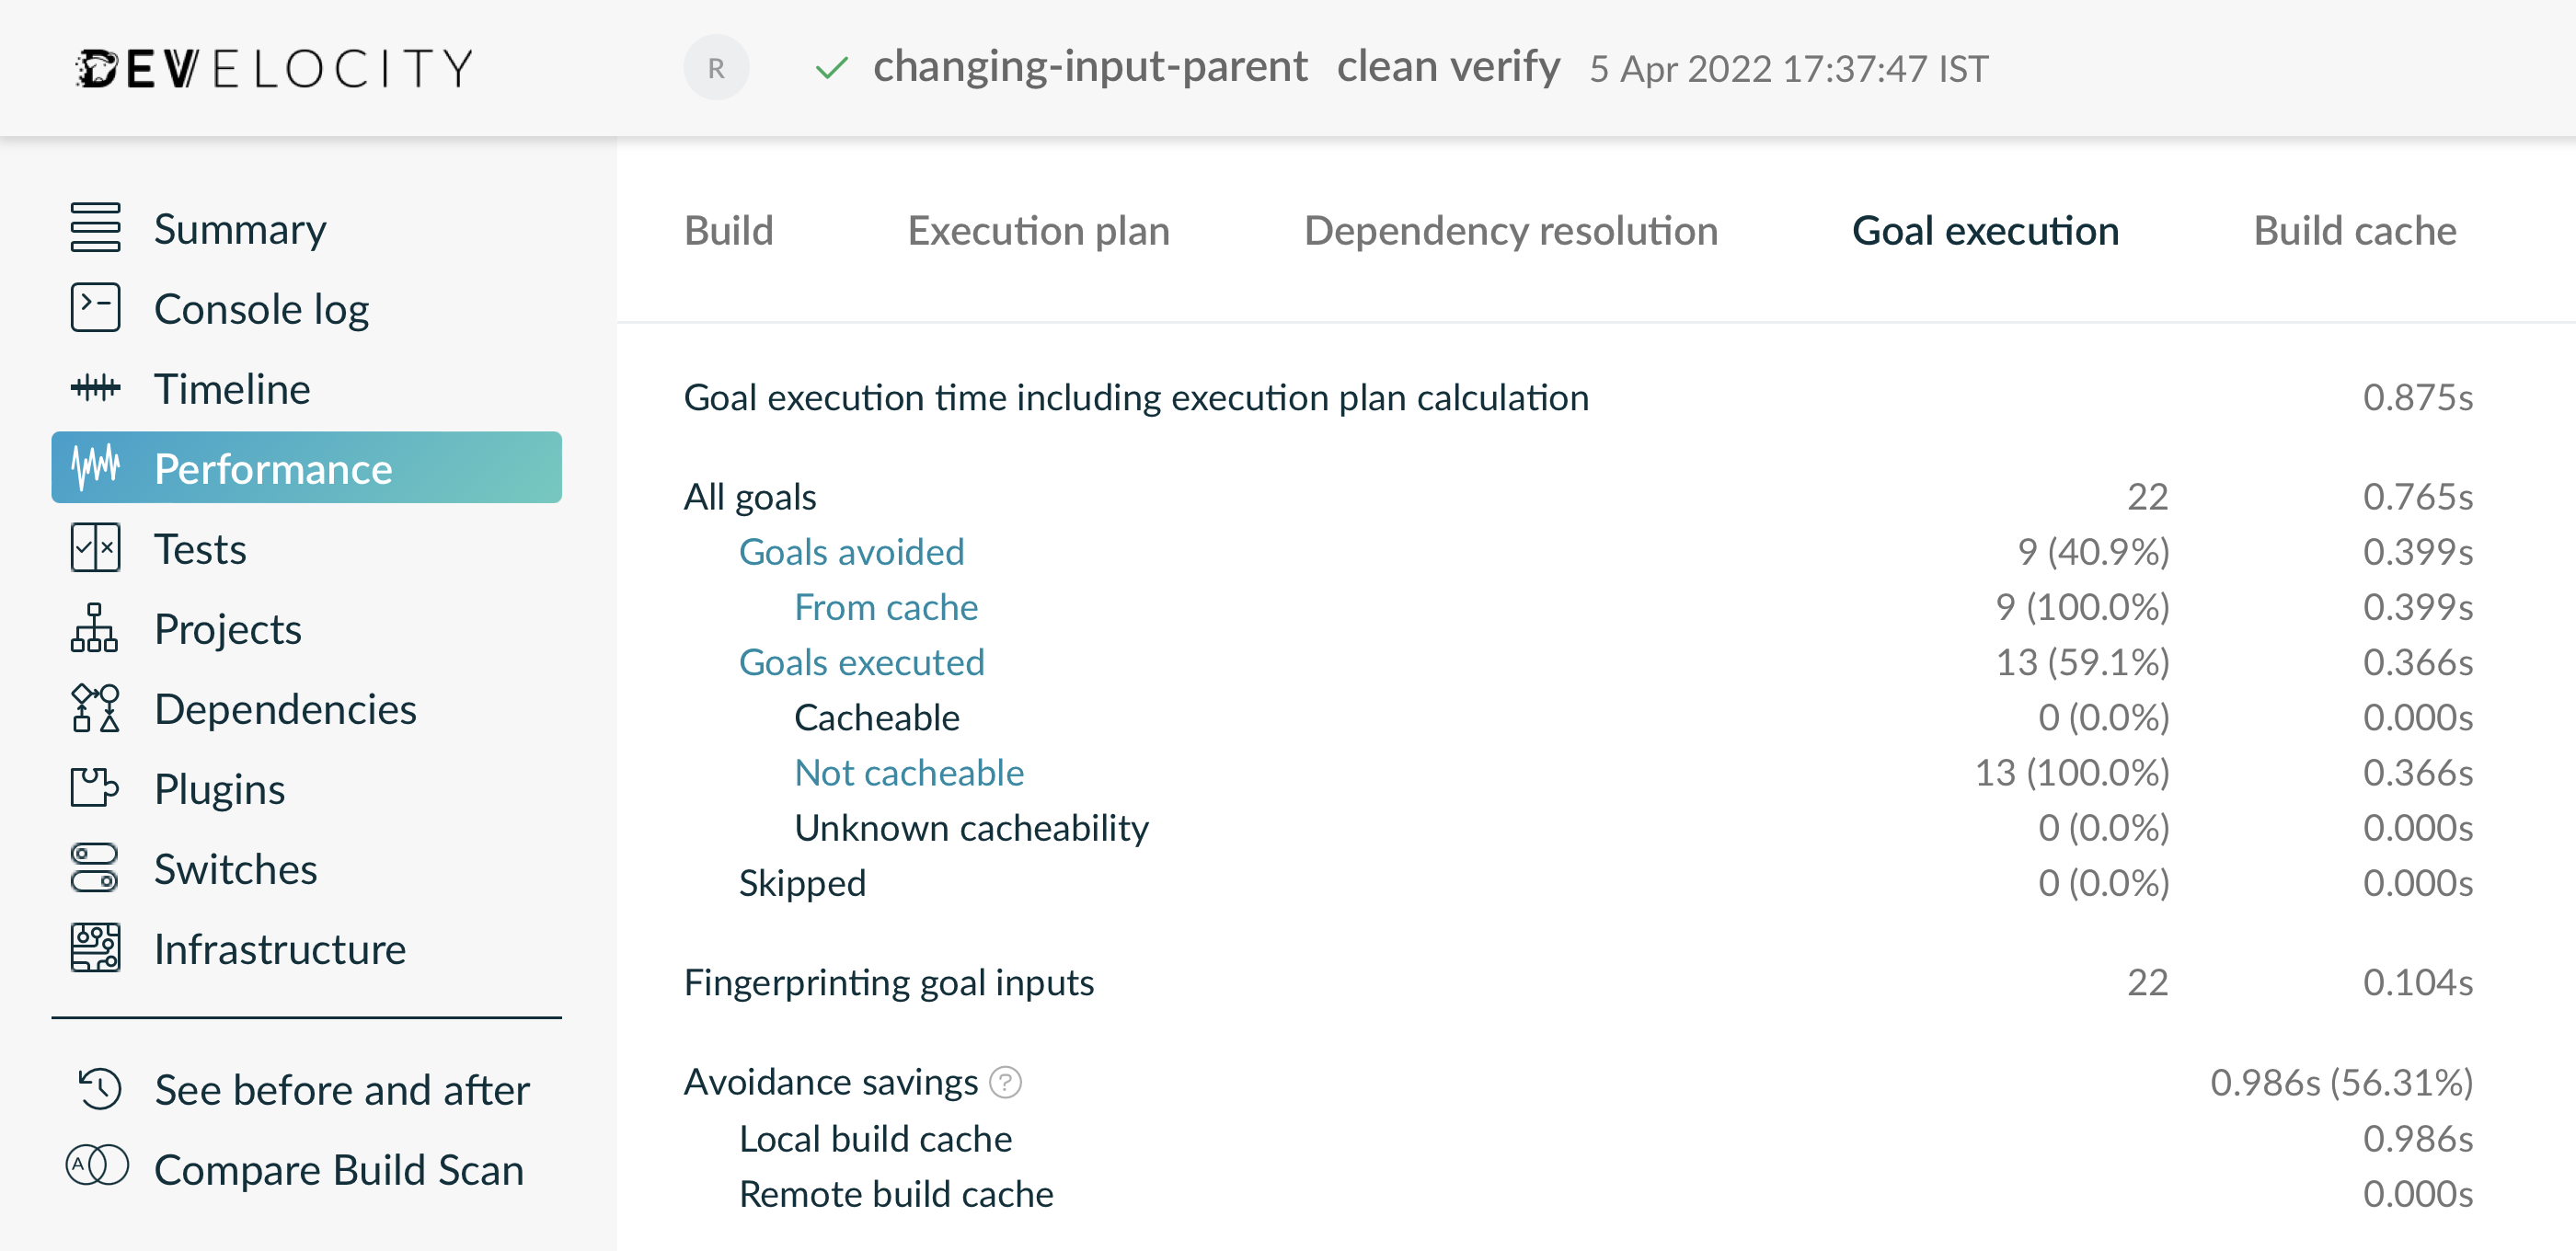
After employing one of these fixes, we get the expected number of cache hits when running mvn clean verify again.
We have compiled a list of common causes for cache misses and their solutions in the reference manual.
Non-ABI change
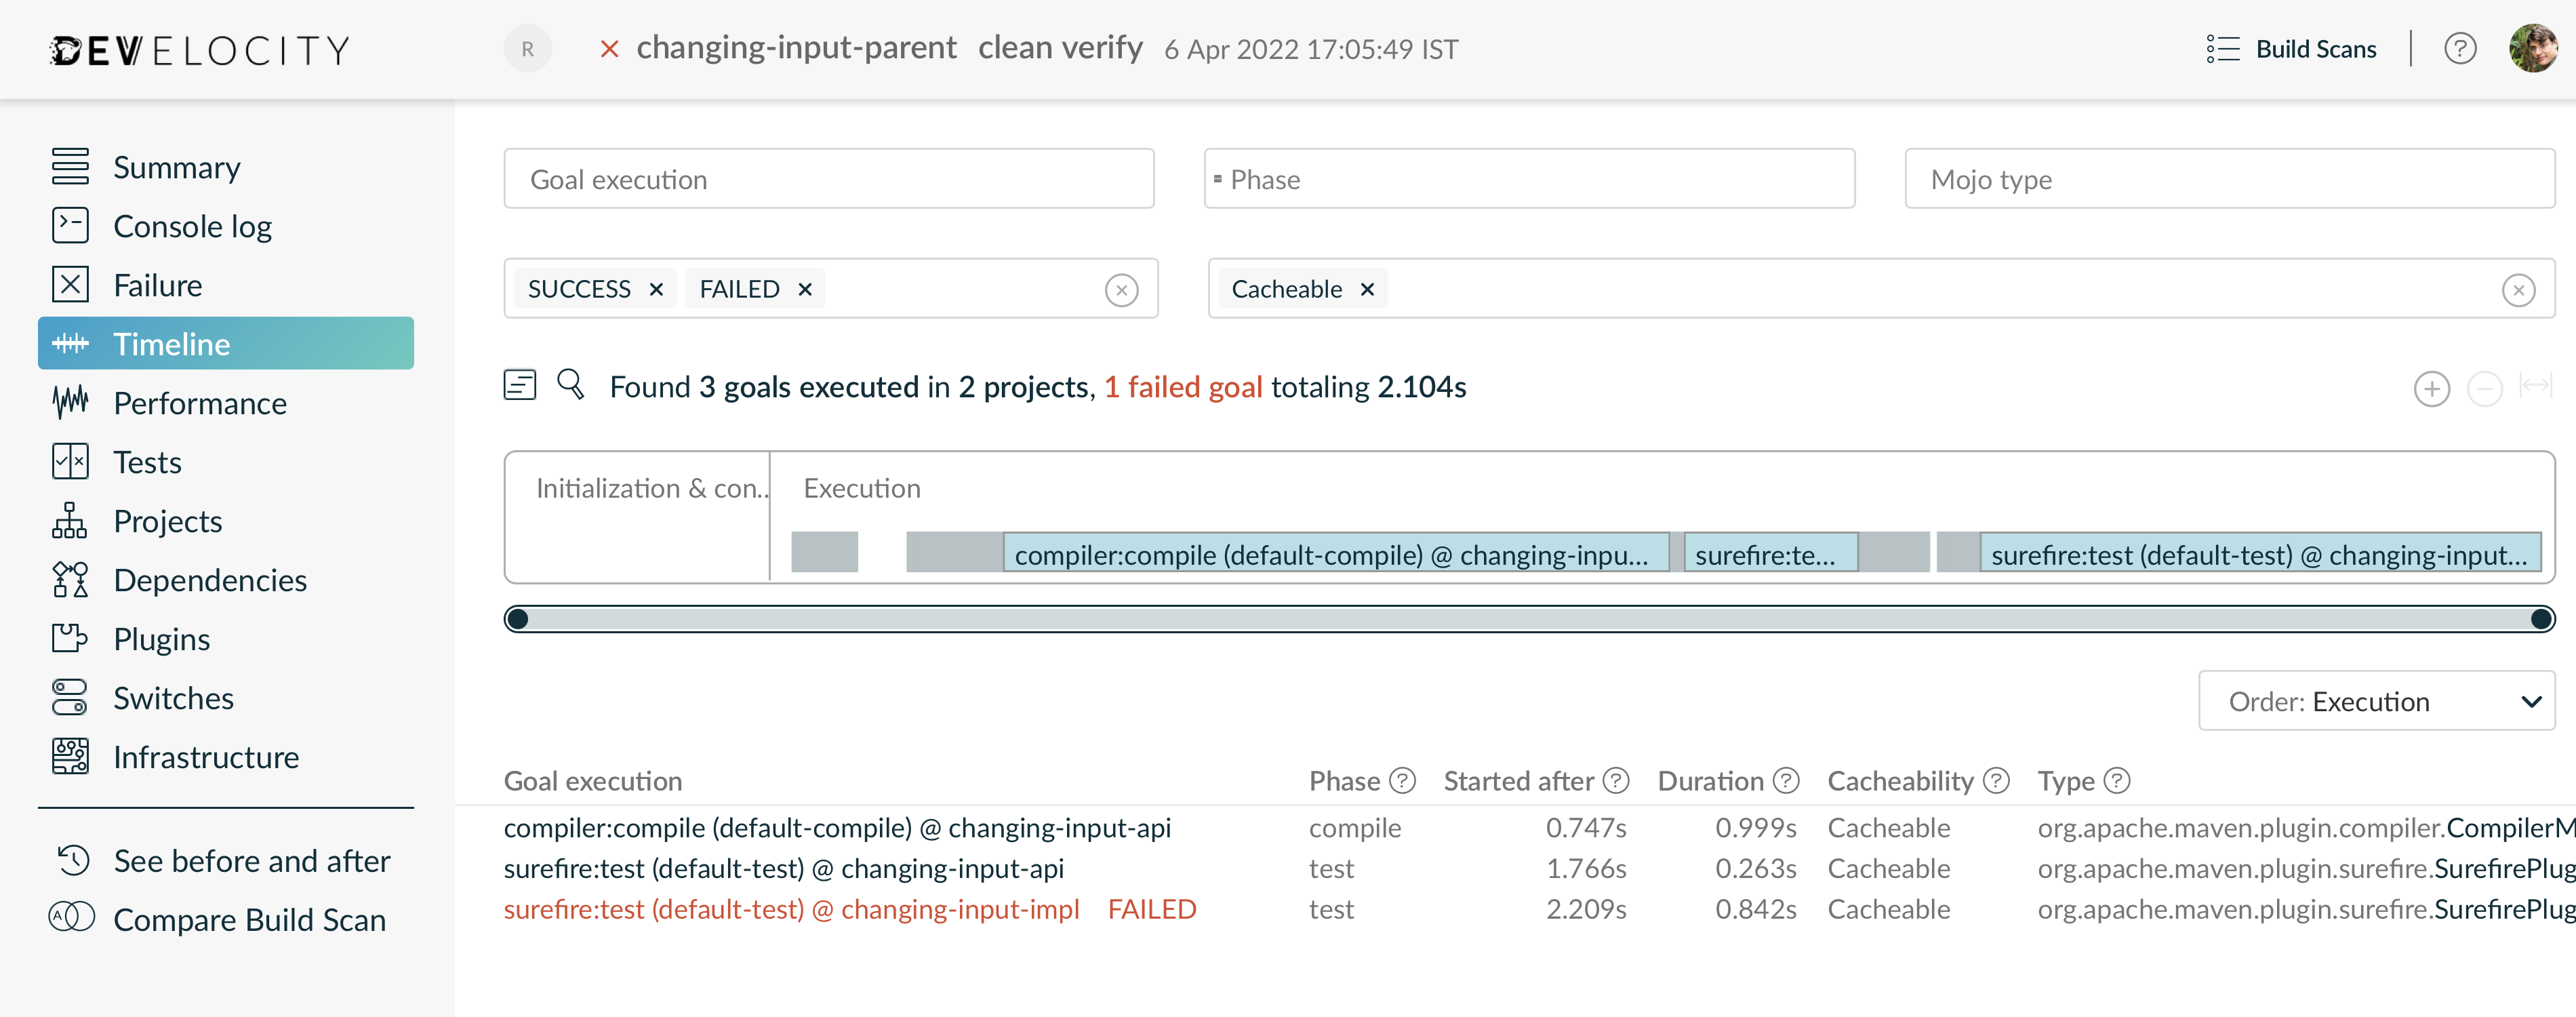
Next, let’s do a small implementation change in the api project by making the getTheAnswer method return 43 instead of 42. When we run the build, the compile goal for the api project is rerun, but the impl project is not recompiled. This is thanks to the Compile avoidance feature explained earlier. The tests of both api and impl are rerun, since they could be affected by the change in behavior. The unrelated project gets all its outputs from the local cache, as it does not depend on api. The build fails as expected, since the changed behavior no longer matches the test expectations.
ABI change
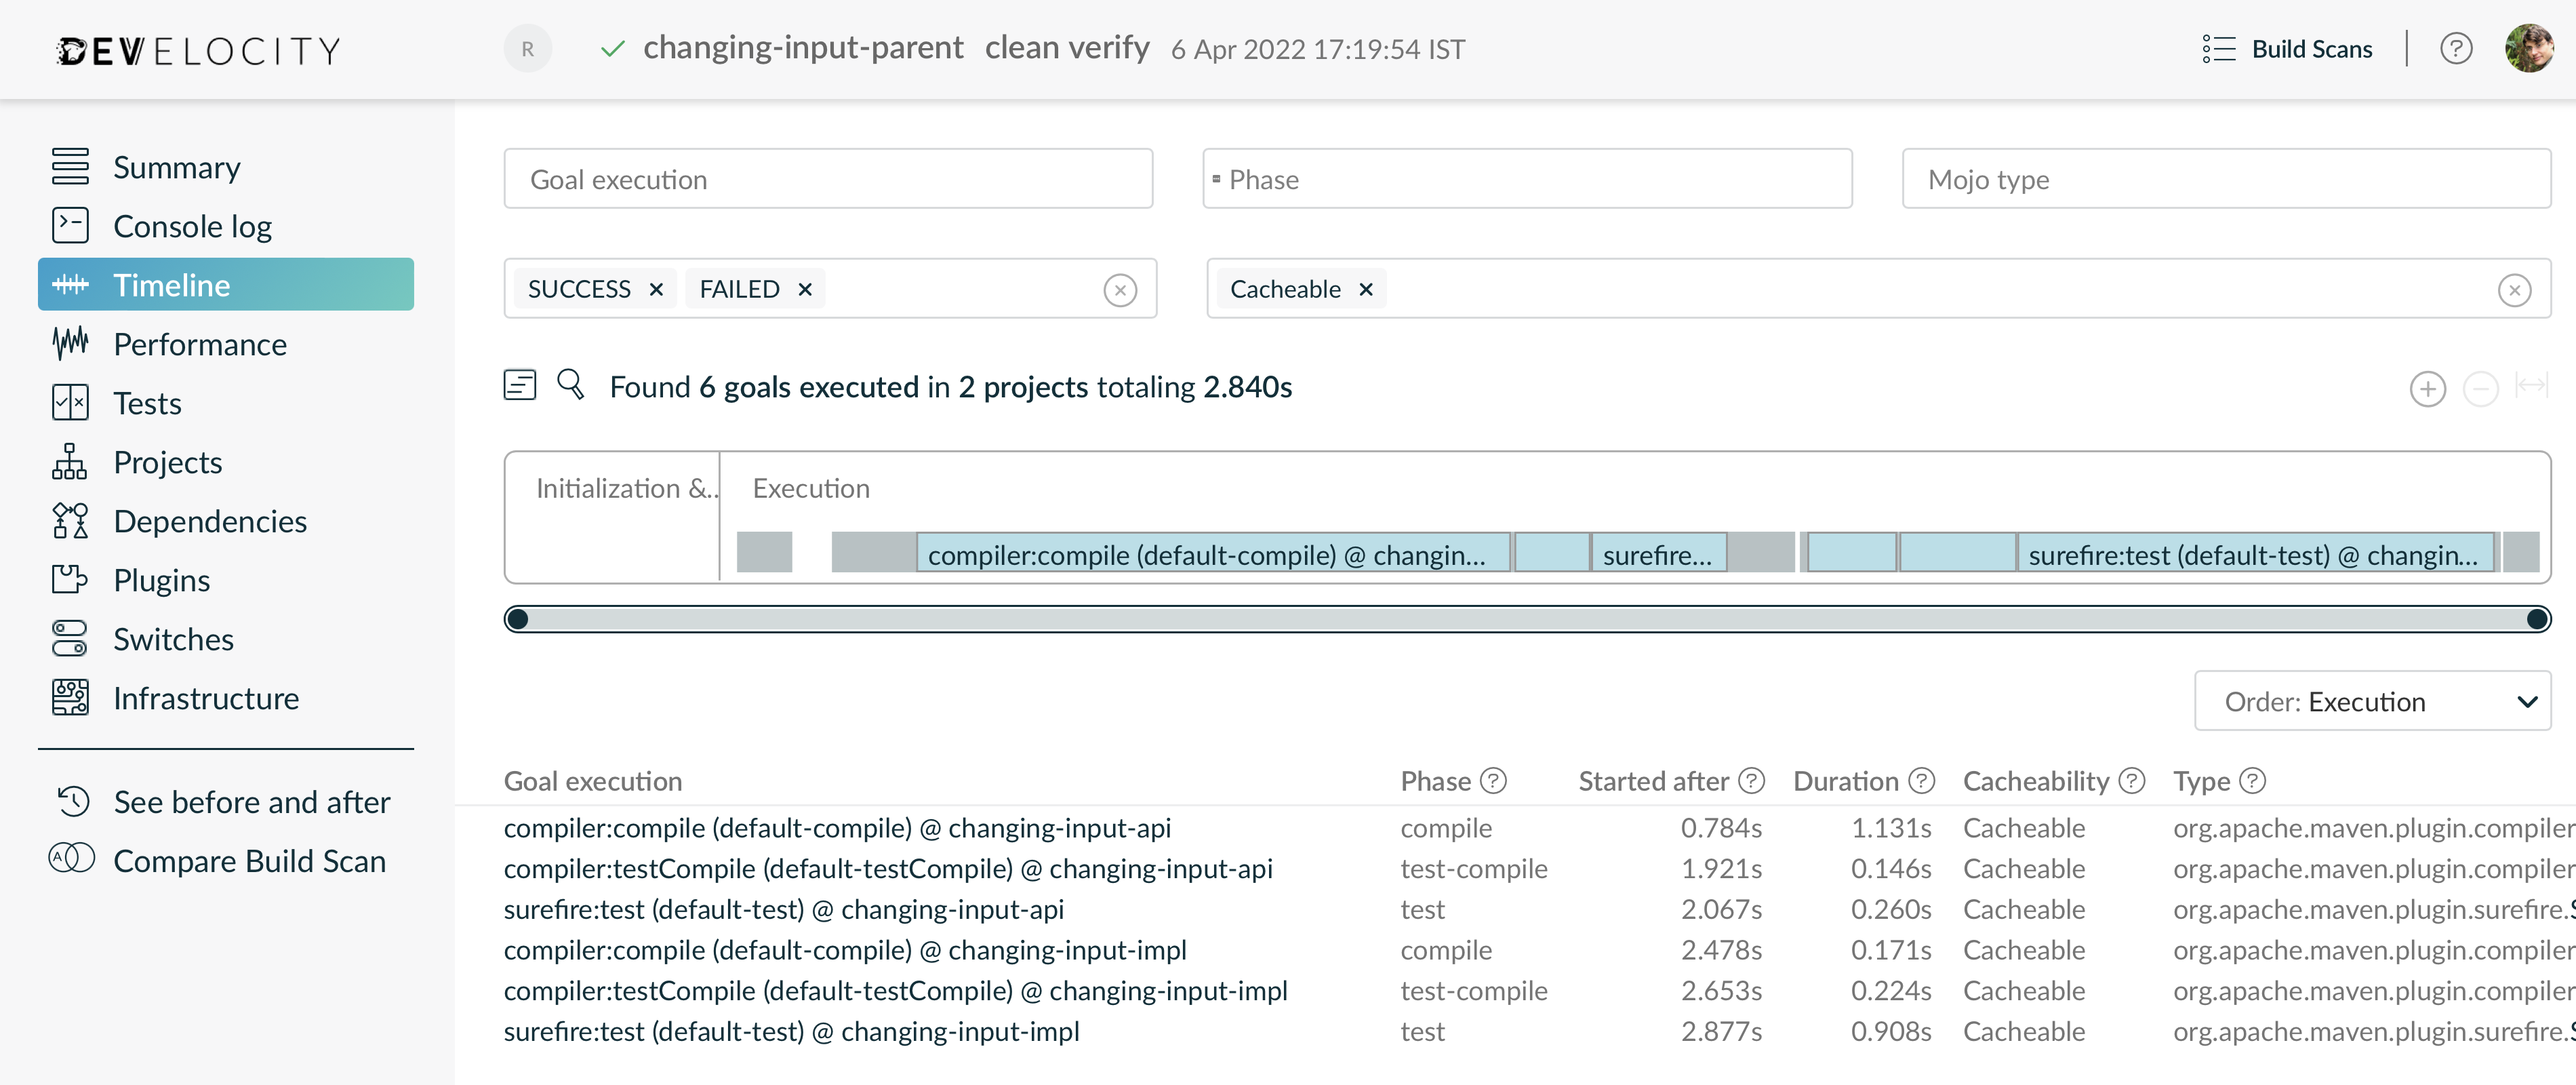
If we add a new public method to the Api class, both the api and impl project are recompiled and retested. The unrelated project on the other hand gets its outputs from the local cache again, as it does not depend on api:
Changed host
Last but not least, we need to ensure that the cache works even across machine boundaries. First, we’ll need to push some outputs to the remote cache, so we can use them from another machine:
$ mvn clean verify -Ddevelocity.cache.local.enabled=false -Ddevelocity.cache.remote.storeEnabled=trueNow we can log into another machine, maybe even one using another operating system, and check out the same commit of our project. Building it should retrieve all goal outputs from the remote cache:
$ mvn clean verify -Ddevelocity.cache.local.enabled=falseFor our example project, this works well after the fixes we did earlier. If your project does not retrieve its outputs from the remote cache, follow the steps above to find the changing inputs.
Likely candidates include the Java version and Maven version used on each machine. Both are an input to every goal. In order to make sure all developers are using the same Java and Maven versions the maven-enforcer-plugin can be used. The following configuration will fail the build if it is executed with a Java version different from the 1.8.x line or if a Maven installation different from Maven 3.6.1 is used.
<project>
  [...]
  <build>
    <plugins>
      <plugin>
        <groupId>org.apache.maven.plugins</groupId>
        <artifactId>maven-enforcer-plugin</artifactId>
        <version>3.0.0-M2</version>
        <executions>
          <execution>
            <id>enforce-versions</id>
            <goals>
              <goal>enforce</goal>
            </goals>
            <configuration>
              <rules>
                <requireMavenVersion>
                  <version>[3.6.1]</version>
                </requireMavenVersion>
                <requireJavaVersion>
                  <version>[1.8,9)</version>
                </requireJavaVersion>
              </rules>
            </configuration>
          </execution>
        </executions>
      </plugin>
    </plugins>
  </build>
  [...]
</project>
Another way to specify the Maven version to be used for builds is the Maven Wrapper. This makes it easier to roll out new Maven versions on CI and to all developers. Note that the Maven Wrapper does not take care of the Java version being used, so this would still have to be enforced using the maven-enforcer-plugin.
Rolling out the cache in your organization
This chapter will show you how you can adjust the extension’s settings to do a safe, staged roll-out of caching throughout your organization.
Enable the cache for a subset of your users
Once you’ve verified cache effectiveness on your own machine, you’ll probably want to allow a few other colleagues to try it out, without affecting everyone else on the team. You can do this by disabling the cache in the project’s .mvn/develocity.xml
<develocity>
  <buildCache>
    <local>
      <enabled>false</enabled>
    </local>
    <remote>
      <enabled>false</enabled>
    </remote>
  </buildCache>
</develocity>
and then letting your early adopters re-enable it in their user home ~/.m2/develocity.xml.
<develocity>
  <buildCache>
    <local>
      <enabled>true</enabled>
    </local>
    <remote>
      <enabled>true</enabled>
    </remote>
  </buildCache>
</develocity>
Make sure that your early adopters are seeing the same local Build Cache hit ratio that you had in your own experiments.
Enable the cache on CI
For your CI builds, changing settings in the user home is probably not an option, as that may affect other projects. Instead, you can put your CI settings into a custom file in your project, e.g. .mvn/develocity-ci.xml. You can use the
-Dgradle.user.config=.mvn/develocity-ci.xml
command line argument to enable that custom configuration for just the builds that you want. At first you may want to do this for a dedicated test pipeline, until you have convinced yourself that caching works well enough to roll it out to your main pipeline.
| Alternatively, you can use expressions to conditionally enable the cache on CI. |
You can also use this configuration file to enable storing in the remote Build Cache, so that later builds can benefit from the outputs that your CI agents created.
<develocity>
  <buildCache>
    <local>
      <enabled>true</enabled>
    </local>
    <remote>
      <enabled>true</enabled>
      <storeEnabled>true</storeEnabled>
    </remote>
  </buildCache>
</develocity>|
We strongly recommend letting local developers only load from the remote cache and letting your CI servers store results in the remote cache. For this reason, storing in the remote Build Cache is disabled by default and has to be explicitly enabled. |
Your CI builds will now populate the remote Build Cache. Your local builds should now get cache hits whenever they execute a goal that has already been executed on CI with the same inputs. Make sure this works well for all your developers.
Make the best use of the cache on CI
Many projects have a pipeline with multiple stages, with many steps running in parallel. In order to get the most out of the Build Cache, we recommend running
$ mvn clean package -Dmaven.test.skip.exec=trueas your first pipeline stage, so that all subsequent stages can reuse the compiled production and test code.
If you are using ephemeral CI agents, the local Build Cache will not give you any benefit, since it disappears together with the build agent. You can disable it to save some build time in this case.
Use multiple nodes to reduce latency
The effectiveness of using a remote Build Cache is largely dictated by the network latency between the build and the cache. Develocity provides a built-in cache node at https://gradle.company.com/cache. This is the node where outputs will be stored and loaded by default. You can install additional nodes and connect them with Develocity. See the Build Cache Node User Manual for more details. Using a Build Cache node that is closer to where the builds are run can significantly reduce build times.
Each team member should configure the closest node in their user home ~/.m2/develocity.xml:
<develocity>
  <server>
    <url>https://gradle.company.com</url>
  </server>
  <buildCache>
    <remote>
      <server>
        <url>https://my-cache/cache/</url>
      </server>
    </remote>
  </buildCache>
</develocity>
Enable the cache for everyone
Once you have convinced yourself that caching is working well for both your CI and local builds, you can remove the disable-by-default configuration from your project, so the cache is used by everyone.
Summary
This guide has introduced the Develocity Build Cache for Maven and explained the underlying concepts. You should now have the knowledge to adapt your own build, so it can make effective use of the Build Cache. In addition, you have learned how to roll out the Build Cache in your organization. Please refer to extension user manual for a reference of all available configuration options.
Be aware that your journey does not end here. As with any performance optimization, it’s an ongoing process, not an event. You should invest into keeping your build well-behaved and check regularly that you are still making effective use of the Build Cache. Build scans are an essential tool for keeping builds fast. You can learn more about them in the getting started guide.