|
You’re viewing the documentation for an old version of Develocity. If you still use that version, please consider updating Develocity. |
This manual covers the configuration and operation of Gradle Enterprise. It is useful for administrators and maintainers of Gradle Enterprise installations.
For installation instructions, please see one of the installation guides.
Prerequisites
This manual assumes that you have previously installed Gradle Enterprise using one of the above installation methods, and can access its web interface. If your installation is not at this point, please refer to the installation manual for your chosen installation type.
Application Configuration
Basic installation settings for Gradle Enterprise are configured via Helm values. This includes how Gradle Enterprise is accessed via the network, and how it stores its persistent data. These settings are covered in the installation manuals linked-to above.
Other configuration aspects are configured via the Gradle Enterprise application. Only users with the administration permission can do this, and they can do so by using the user menu in the top right of the application and choosing “Administration”. Until user accounts have been created, or in the case that no user accounts will be used, the system user can be used for this purpose.
Please read each of the following sections for information on recommended configuration.
System user password
The “system user” is an ever-present local user account that can be used to bootstrap the configuration of an installation, or for emergency local access in case of a failure with an external authentication provider once configured.
| It is strongly recommended to immediately change the system user password from its default after installation to secure your installation. |
To change the system user password, visit Gradle Enterprise in a web browser via the hostname that was specified during installation. Use the “Sign in” button at the top right of the page to sign in as the system user by using the username system and password default. You will then be required to specify a new password for the system user account. The new password should be recorded and kept secret as it can be used to access Gradle Enterprise as an administrator.
After setting the system user password, you will be redirected to the administration section.
It is recommended that the system user account not be used regularly. Instead, real administrator user accounts should be created by configuring access control.
Access control
Gradle Enterprise allows locally managed user accounts and permissions, and externally managed via an LDAP service or SAML 2.0 identity provider.
Initial setup can be performed by the system user. Subsequently, any user with the administration permission can configure access control by using the user menu in the top right of the application to access “Administration” and then “Access control”.
The following permissions are available to grant access to the described function:
| Permission | Description | Default role name |
|---|---|---|
|
Build Scan view |
Allows viewing of Build Scans and associated build data and use of Predictive Test Selection |
ge-scans-viewing |
|
Build Scan publish |
Allows publishing of Build Scans |
ge-scans-publishing |
|
Test Distribution |
Allows use of Test Distribution |
ge-distributed-testing |
|
Build data export |
Allows exporting build data via the API |
ge-data-export |
|
Build Cache read |
Allows reading of Build Cache data |
ge-cache-read |
|
Build Cache read and write |
Allows reading and writing of Build Cache data |
ge-cache-write |
|
Build Cache admin |
Allows administration of Build Cache functionality |
ge-cache-administration |
|
Admin |
Allows general administration of Gradle Enterprise (e.g. access control) |
ge-administration |
For locally managed accounts, permissions must be assigned for each user. A default set for all new users can be specified.
For externally managed user accounts (LDAP or SAML 2.0), permissions can be managed locally or by group/role membership defined by the provider. When using provider-defined membership, each permission can be mapped to one or more roles. By default, each permission maps to a unique role with the “default role name” specified in the table above. This can be changed for each permission.
Anonymous access
By default, Gradle Enterprise allows anonymous viewing and creation of Build Scans. This makes it easier to get started by reducing build configuration, but may not be suitable for your environment. Anonymous access to the built-in Build Cache node is not enabled by default.
Permissions for anonymous users can be changed by going to “Administration” via the top right hand user menu, then “Access control” → “Anonymous access”.
Authenticated build access
Builds can authenticate with Gradle Enterprise by supplying an “access key”.
Please consult the Gradle Enterprise Gradle Plugin User Manual or Gradle Enterprise Maven Extension User Manual for guidance on how to configure builds to authenticate with Gradle Enterprise.
Local users
Locally managed user accounts can be created to allow users to access Gradle Enterprise. They are not mutually exclusive with externally managed user accounts and both can co-exist provided the usernames and emails are unique.
Setup
-
From the Administration page, navigate to “Access control” → “Users”
-
Click Add.
-
Enter details for the user and set an initial password.
-
Assign the required roles for the user.
-
Click Save.
SAML 2.0
A SAML 2.0 identity provider can be configured to allow users to access Gradle Enterprise using their organization credentials. User accounts for users authenticating with the SAML provider will be created on first login.
A user cannot login via a SAML provider if a locally defined account exists for the same username or email.
Sign out from Gradle Enterprise will not log users out of the SAML identity provider.
Setup
-
From the Administration page, navigate to “Access control” → “Identity provider”
-
Check ”Enable external identity provider”
-
Choose “SAML 2.0” from Identity provider type options
-
Enter a name for the identity provider
-
Create a SAML application at your identity provider using the displayed “Service provider SSO URL” and “Service provider entity ID”.
-
Download the metadata for the SAML application from your identity provider, and select this file for the “Identity provider metadata file” field.
-
Configure signing/encryption options
-
Configure attribute mapping (described below)
-
Configure role management (described below)
-
Click Save.
If any signing or encryption is being used, use “Download service provider config” to obtain a configuration file that will need to provided your identity provider.
Attribute mappings
User’s “first name”, “last name” and “email” attributes can be obtained from the identity provider or prompted for on first login.
To obtain an attribute from the identity provider, select “Manage in identity provider” for the attribute and specify the name of the SAML attribute that will provide the value. Attribute changes made at the SAML identity provider will only take affect after either a user initiated logout, administrator force logout, or session expiry.
Locally managed attributes can be updated for a user by an administrator.
Roles
User role membership can be defined by the identity provider or managed locally.
To use identity provider specified role membership, select “Defined by identity provider” in the “Role membership” section. The name of the SAML attribute that defines the roles for a user must be specified, along with the values to map to Gradle Enterprise access roles.
When using “Defined by Gradle Enterprise” as the “Role membership” option, the default roles for users can be specified. Users will be assigned the default roles when they first sign in. Changing the default roles will change the role membership of users with default roles enabled. Administrators can change role membership for individual users after they have signed in for the first time, including whether the default roles should be enabled for the user
LDAP
An LDAP identity provider can be configured to allow users to access Gradle Enterprise using their organization credentials. User accounts for users authenticating with the LDAP identity provider will be created on first login.
A user cannot login via an LDAP provider if a locally defined account exists for the same username or email.
Setup
-
From the Administration page, navigate to “Access control” → “Identity provider”
-
Check ”Enable external identity provider”
-
Choose “LDAP” from Identity provider type options
-
Complete the connection details for your LDAP provider.
-
Configure user attributes (described below)
-
Configure role management (described below)
-
Click Save.
Attribute mappings
There are five required fields in Gradle Enterprise: “username”, ”first name”, “last name”, “email“, and “UUID”. These fields are required to be mapped to fields in your LDAP identity provider.
| Commonly, the “UUID” attribute is “entryUUID”, however for LDAP providers where this is missing, another sensible unique persistent ID should be used. For Active Directory, this is usually called “objectGUID”. |
Roles
User role membership can be defined by the identity provider or managed locally.
To use identity provider specified role membership, select “Defined by identity provider” in the “Role membership” section. Details on where to find roles and how they are defined must be provided.
| For most LDAP providers it is common for the role object class to be “groupOfNames”, however for Active Directory this is usually “group”. |
When using “Defined by Gradle Enterprise” as the “Role membership” option, the default roles for users can be specified. Users will be assigned the default roles when they first sign in. Changing the default roles will change the role membership of users with default roles enabled. Administrators can change role membership for individual users after they have signed in for the first time, including whether the default roles should be enabled for the user
Recursive group membership is supported, via an opt-in option.
Build Scan storage
Build Scans can be stored in the Gradle Enterprise database, or in in Amazon S3. By default, Build Scans are stored in the database that Gradle Enterprise is configured to connect to.
Disk space management
In most installations, storage space usage is dominated by the storage of Build Scan data. The amount of space used is dependent on how many scans are being published and how much information is being recorded for each build.
When Build Scan data is stored in the database, compression and deduplication techniques are used. This means that data growth is non-linear; storing data for twice as many builds does not mean that twice the space will be required.
When Build Scan data is stored in S3, each scan is stored as a compressed, self-contained object. This makes estimation of required storage easier: twice as many scans results in roughly twice as much storage being used.
To control the amount of storage space used, Gradle Enterprise can be configured to remove Build Scans based on their age. To avoid running out of disk space, you can configure automatic deletion of old Build Scans when the amount of free space drops below a specified percentage, as well as automatic rejection of incoming data when free space drops below a specified percentage. Additionally, the system can be configured to send warning emails when free space drops below a specified percentage.
These settings can be changed by going to “Administration” via the top right-hand user menu, then “Build Scans”.
Recommended Build Scan storage configuration
A configuration that maintains a predictable Build Scan retention period is:
-
Specify a maximum Build Scan age
-
Send a warning email when there is less than 10% of space free
-
Reject incoming data when there is less than 5% of space free
When storing scans in the database, an alternative configuration that stores as much Build Scan history as space permits is:
-
Do not specify a maximum Build Scan age
-
Automatically delete old Build Scans when there is less than 15% of space free
-
Send a warning email when there is less than 10% of space free
-
Reject incoming data when there is less than 5% of space free
When enabling automatic deletion of old Build Scans when disk space is low, be mindful that the result of another process filling the volume that Gradle Enterprise is using will be that all Build Scan data will be deleted.
| If backups are created on the same volume, make sure to leave enough room for them in your thresholds. For example, if the total space that your backups take up is 40% of the disk, the above recommended settings would be 55%, 50% and 45%. Store backups on a separate volume to simplify space management. |
| Configuring disk space management percentage thresholds is currently only supported when using the embedded database. Please consult your database provider for monitoring and alerts on database disk space when using a user-managed database. |
| When storing Build Scans in S3, the space used will not be taken into account in the above calculations. This means that if your installation is running low on database space, the likely cause will not be Build Scan data, so automatic deletion of Build Scans wil not recover much space. It is not recommended to set an auto-deletion threshold when storing Build Scan data in S3. |
Amazon S3 Build Scan storage
It is possible to store Build Scans in Amazon S3. While this is a more complex setup, there are a number of benefits:
-
High traffic installations typically see an improvement in Build Scan processing and cleanup performance.
-
S3 is a highly scalable and fault tolerant service, typically more so than an individual database.
-
It is cheaper to store more Build Scans.
-
With the vast majority of Build Scan data in S3, the main Gradle Enterprise database typically requires much less storage, and the installation (for embedded databases) or the user-managed database can be provisioned with fewer resources.
-
Database backup management is easier when the database is much smaller, and backups themselves take up less space and are cheaper to store.
There are some downsides:
-
Installation is more complex.
-
More memory must be allocated to the Gradle Enterprise application (2GB is the increase we recommend).
-
The persistent data of Gradle Enterprise is no longer fully contained within a database backup, because Build Scans are no longer stored in the database. This makes it more complicated to clone a Gradle Enterprise instance.
-
S3 storage is only supported for AWS installations.
Due to latency and traffic costs, it is only recommended to use S3 storage if your Gradle Enterprise instance is hosted in AWS.
| There are many S3-compatible object stores such as MinIO or Google Cloud Storage. If you wish to use a service other than Amazon S3, please contact Gradle Enterprise technical support. |
S3 prerequisites
Storing Build Scans in S3 requires the following:
-
An S3 bucket for storing Build Scans.
-
A policy granting required permissions to the bucket.
-
The policy permissions are granted to Gradle Enterprise. There are currently three supported ways to provide Gradle Enterprise with the permission to access your S3 bucket:
-
Create an IAM user and grant the policy to the user. Provide the access key credentials for that user to Gradle Enterprise.
-
When running Gradle Enterprise in EC2, create a role and EC2 instance profile with the policy attached. Run Gradle Enterprise on EC2 instances launched with that instance profile. This is the best option when running the Gradle Enterprise standalone distribution on an EC2 instance.
-
When running Gradle Enterprise on Amazon EKS, create a role with the policy attached that your EKS cluster can associate with a Kubernetes service account.
-
The two latter options both use credentials provided by AWS dynamically to access S3.
S3 configuration
Once the above bucket, policy and necessary credential setup is done, we can configure Gradle Enterprise.
| If writing a Gradle Enterprise configuration file by hand to do an unattended installation, please see here for S3 configuration examples. |
If you are using EKS service account based credentials, ensure that you have configured Helm with the necessary service account annotation and redeployed.
Go to the "Administration" → "Build Scans" page, then scroll down and select "Enable S3 Build Scan storage".
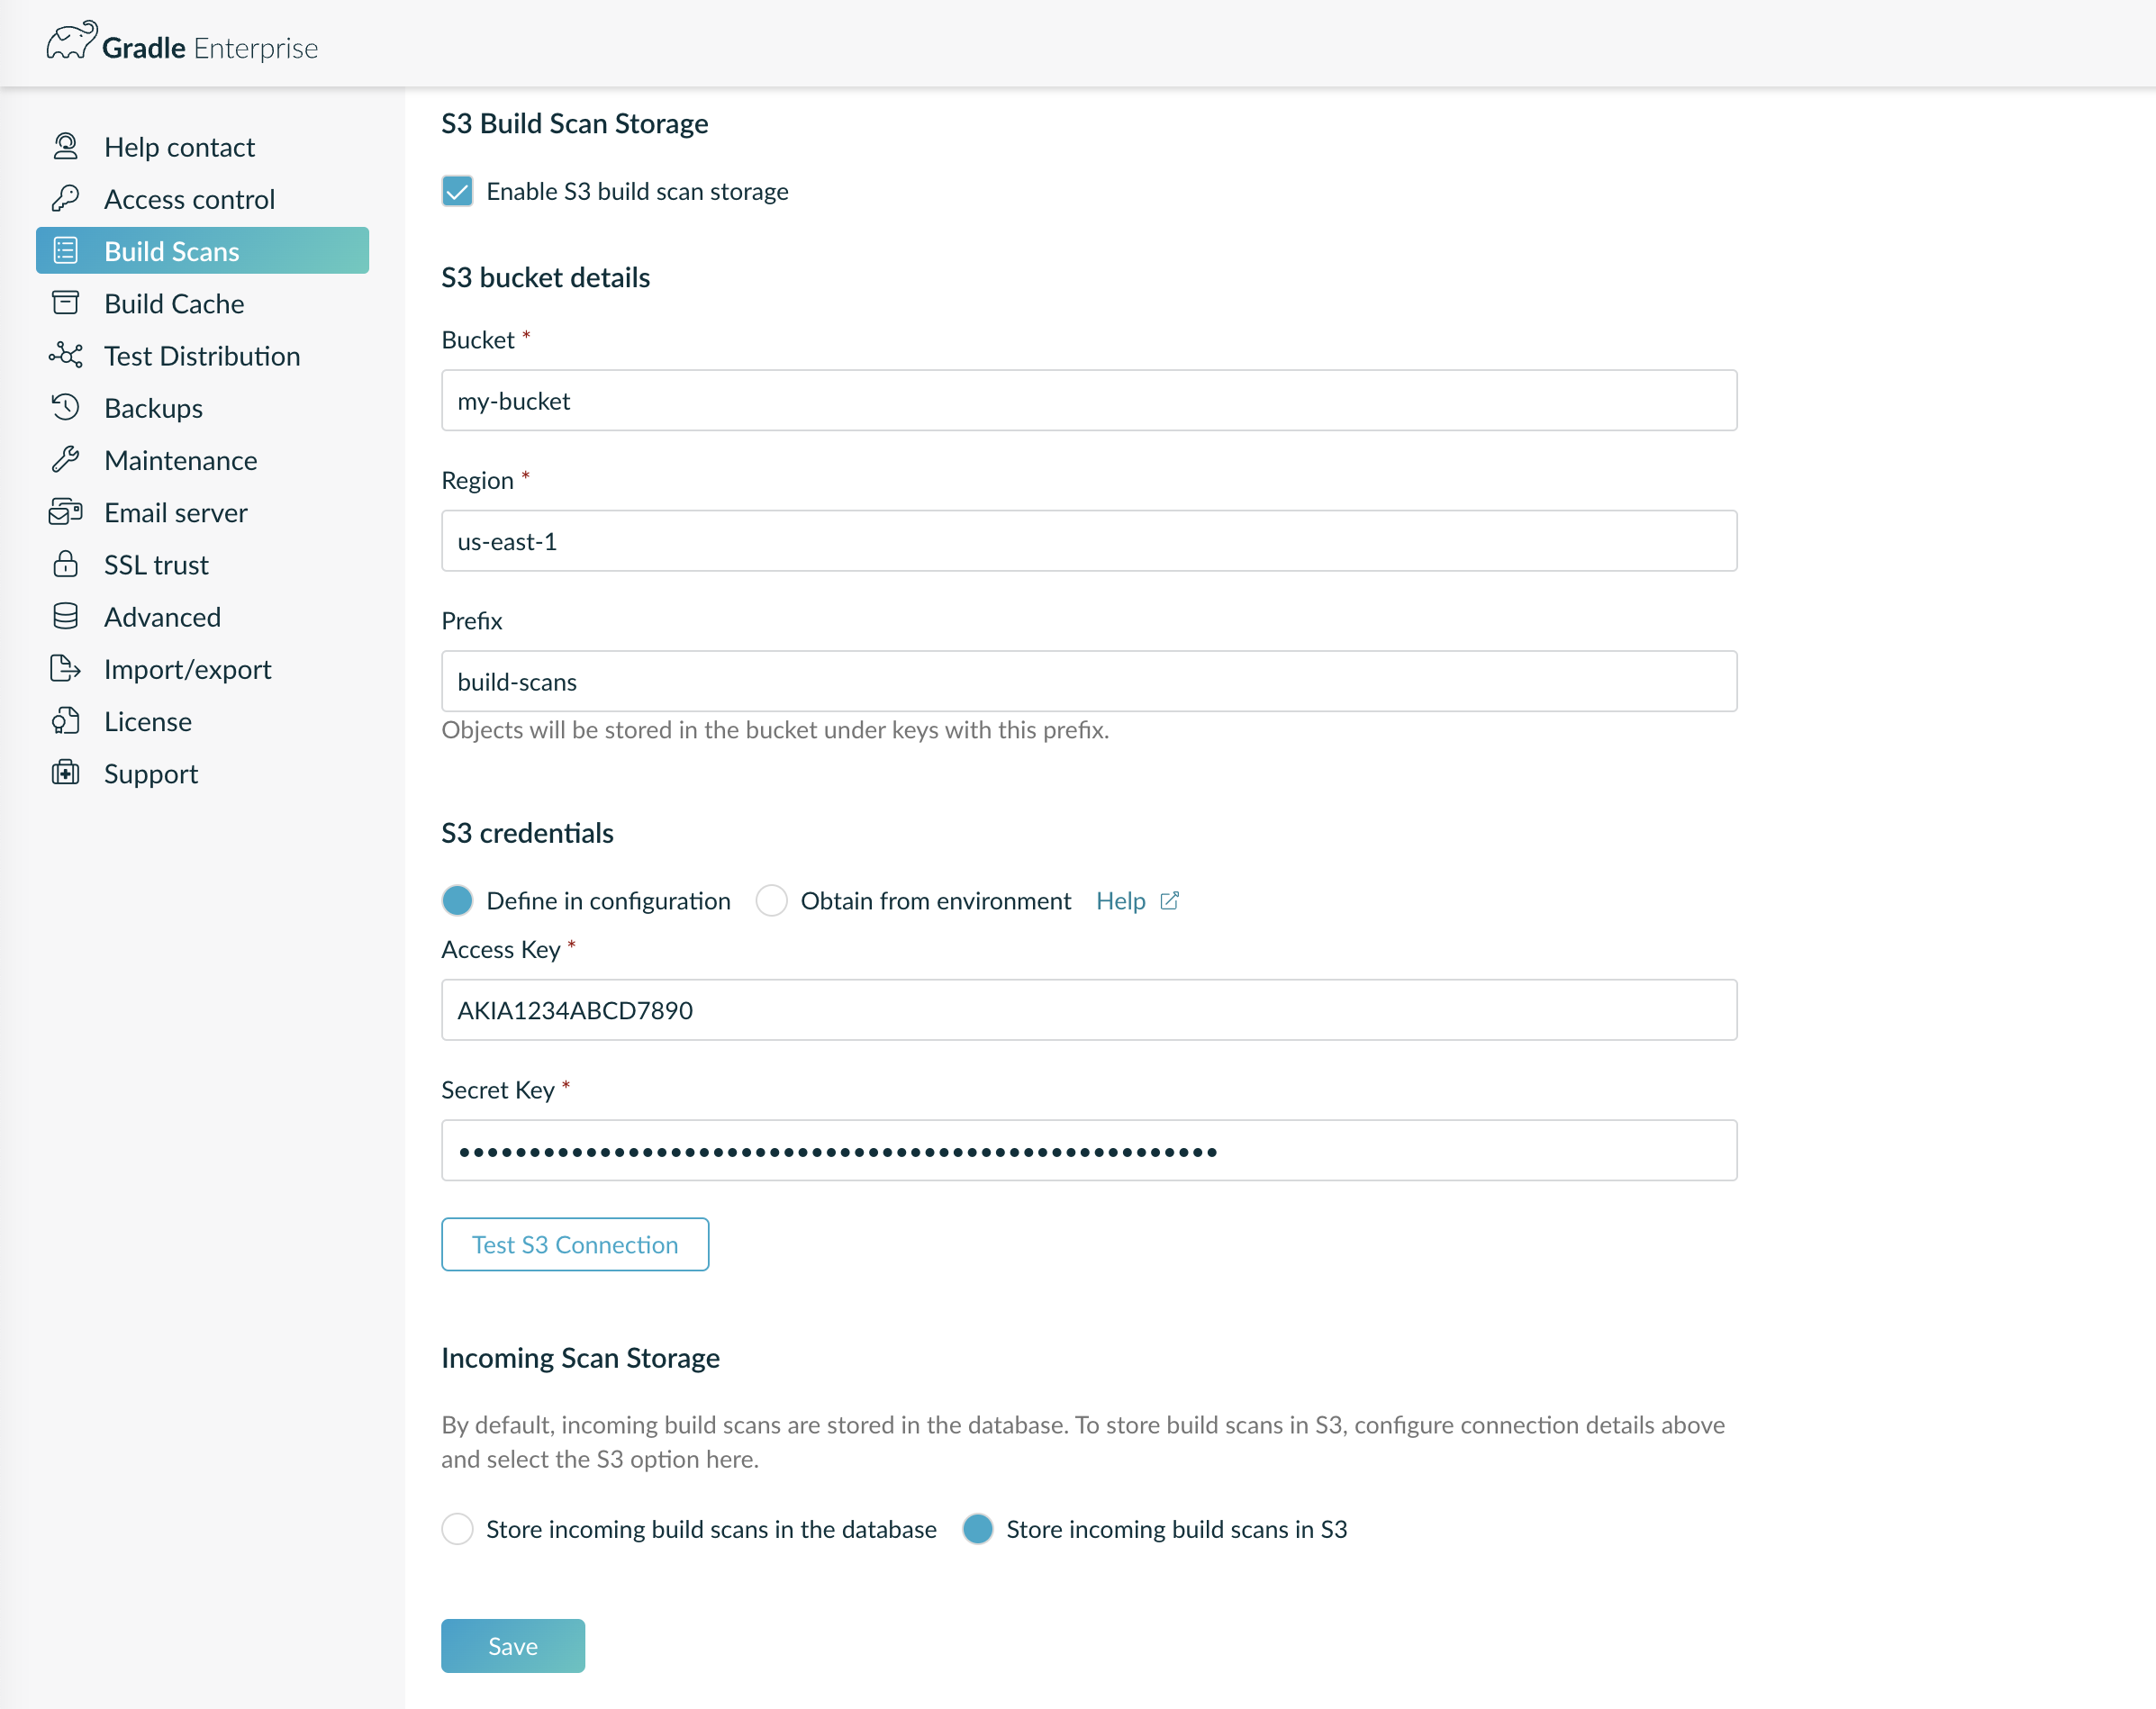
-
Enter the AWS region and bucket name.
-
Optionally adjust the prefix for the names of the Build Scan data files which will be stored in the bucket.
-
If using a static access key / secret key pair, enter these.
-
If using one of the other mechanisms, select "Obtain from environment".
-
The connection to S3 can be tested using the "Test S3 Connection" button. It is strongly recommended to test the connection to S3 on the admin page to troubleshoot connection issues before making permanent configuration changes.
-
Once successful, also select "Incoming Scan Storage" → "Store incoming Build Scans in S3".
-
Click "Save".
-
You will be prompted to restart to allow the configuration changes to be applied. Do not do this yet.
-
Go to the "Administration" → "Advanced".
-
Increase the "App" → "Heap memory" setting by 2048 MiB.
-
Click "Save".
-
You will be prompted to restart to allow the configuration changes to be applied. Do so.
Once Gradle Enterprise has restarted, all new Build Scans will be stored in S3. Any existing Build Scans will be loaded from the database, and will eventually be evicted according to the configured age-based retention period. If one of your reasons for adopting S3 scan storage was to reduce the size of your database, note that you will only start to see the size of your database reducing once scans start aging out after the retention window. To reduce the size of the database, Build Scan data needs to be deleted, and the space it took up needs to be reclaimed - a process which happens regularly, both daily and weekly.
Scheduled backups
For embedded database installations, the backup schedule and settings can be configured by going to “Administration” via the top right-hand user menu, then “Backups”.
An administrator can be notified of the backup process outcome, which is particularly important in the case of failures. This requires administrator email details and SMTP server settings to be configured for the Gradle Enterprise instance.
See below for details on restoring backups.
Email notifications
Email server settings can be configured by going to “Administration” via the top right-hand user menu, then “Email server”.
With an email server specified, Gradle Enterprise can send email notifications on completion of backups or when disk space is low. See the Disk space management and Creating backups sections for more details.
Once configured, it is possible to test email configuration by running the Gradle Enterprise Admin CLI system test-notification command.
Proxy configuration
Gradle Enterprise can be configured to use a proxy by going to “Administration” via the top right-hand user menu, “Network” page and then “HTTP proxy”.
With a proxy configured, Gradle Enterprise will use the configured proxy to make all outbound HTTP/HTTPS requests (to external endpoints on the internet). Both HTTP and HTTPS are supported as proxy protocols.
Proxy can also be configured during installation using the unattended configuration mechanism, see the Proxy configuration section of the installation guide (the instructions are identical for standalone installations).
Untrusted SSL certificates
Gradle Enterprise can be configured to trust additional SSL certificates by going to “Administration” via the top right-hand user menu, “Network” page and then “SSL trust”.
As the page notes, certificates should be added as X509 certificates in PEM format, newline seperated if there are more than one.
Additional trusted certificates can also be configured during installation using the unattended configuration mechanism, see the Untrusted SSL certificates section of the installation guide (the instructions are identical for standalone installations).
Operation
Backup and disaster recovery
Embedded database
Gradle Enterprise provides system backup and restore capabilities to facilitate disaster recovery. Backups can be triggered manually or scheduled to be done automatically on a periodic basis, and require no system downtime.
The backup process produces a single compressed archive which can be used to restore all user data to a state at the time of the backup. It is highly recommended that this archive additionally be copied to an off-host location, in the case of a complete loss of the host system or volume used to store backup archives.
In addition to disaster recovery, backup archives can be used to migrate your Gradle Enterprise data to a new host system. This can be useful in scenarios where a trial instance is promoted to a production one.
Creating backups
See Scheduled backups for details on configuring automated backups
In addition to configuring automatic scheduled backups, you may trigger a manual backup at any time by running Gradle Enterprise Admin CLI commands:
-
To create a backup, run the
backup createcommand. -
You can download the newly created backup locally by running the
backup copycommand.
The backup archive will be copied to the directory in which the command is executed. If multiple backups exist you will be prompted to select the backup you would like to copy.
Restoring from a backup
Once a backup archive is created you may use it to restore a Gradle Enterprise instance to the backup state at any time, by running the Gradle Enterprise Admin CLI backup restore command.
This command will require some downtime on Gradle Enterprise until the restore has finished.
| If horizontal scaling is enabled, this command will reset the current replica count on all scalable resources to the value set in the configuration UI. |
User-managed database
When data is stored in a user-managed database, backups and recovery is the responsibility of the user or database provider.
Creating backups
Please see your database provider for details on how to make backups and schedule them regularly.
Restoring from a backup
Restoring a database in-place
To restore a backup to the same database, overwriting the existing data, perform the following steps:
-
Stop the application by running the Gradle Enterprise Admin CLI
system stopcommand. -
Follow your database provider’s instructions on restoring a backup. This may be running a tool like
pg_restoreor restoring a database snapshot, depending on your database provider and backup type. -
If you are not providing superuser credentials to Gradle Enterprise, run the current database setup script used during database setup (see your installation manual) on the database and ensure that working application and migrator passwords are configured in the configuration interface or
Secretresources being used. -
Restart Gradle Enterprise by running the Gradle Enterprise Admin CLI
system startcommand.
Restoring to a new database instance
To restore a backup to a new database instance, perform the following steps:
-
Stop the application by running the Gradle Enterprise Admin CLI
system stopcommand. -
Follow your database provider’s instructions on restoring a backup to a new instance. This may be running a tool like
pg_restoreor restoring a database snapshot, depending on your database provider and backup type. -
Configure Gradle Enterprise with the new instance connection details and superuser credentials if those are being provided. This will mean re-running Helm, or updating the specified
ConfigMapandSecretresources. -
If you are not providing superuser credentials to Gradle Enterprise, run the current database setup script used during database setup (see your installation manual) on the database and ensure that working application and migrator passwords are configured in the configuration interface or
Secretresources being used. -
Restart Gradle Enterprise by running the Gradle Enterprise Admin CLI
system startcommand.
Troubleshooting
Support
If you are experiencing issues with Gradle Enterprise or related components please submit a support ticket at support.gradle.com, including details of the issue and an attached support bundle.
Support bundles assist our engineers in troubleshooting your issue by providing the following information about your Gradle Enterprise installation:
-
Server logs
-
System performance metrics
-
Gradle Enterprise database statistics
To generate a support bundle:
-
From the Administration page, navigate to “Support”.
-
Enter the system user password, and click “Generate”.
-
Download the support bundle.
It is also possible to generate a support bundle using the Gradle Enterprise Admin CLI, by executing the support-bundle command. This method should be used when the Gradle Enterprise user interface is not available.
Example downloading a support bundle using Admin CLI JAR file:
$ java -jar gradle-enterprise-admin-<VERSION>.jar \
    --kube-ns=gradle-enterprise \
    support-bundle
Example downloading a support bundle using Admin CLI Docker image:
$ docker run --rm -it \
    -v "${HOME}/.kube/config:/kube-config:ro" \
    -v "${HOME}/bundles:/home" \
    gradle/gradle-enterprise-admin-cli \
    --kube-ns=gradle-enterprise \
    support-bundle
The generated support bundle will be stored in the mounted directory (in this case it will be ${HOME}/bundles).
| Generation of the support bundle may take several minutes to complete. |
If you have questions about a particular Build Scan, please submit a support ticket at support.gradle.com, and attach a dump of the Build Scan.
To generate one, replace /s/ with /scan-dump/ in the Build Scan url, e.g. https://develocity.example.com/scan-dump/vbdei7xhyojq2
Licensing
Running Gradle Enterprise requires a valid license, which is initially provided by the user as a license file during installation.
Gradle Enterprise’s current license can be viewed by going to “Administration” via the top right-hand user menu, then “License”.
License expiration
Gradle Enterprise will only successfully start if it has an unexpired license (either already available or via checks during start-up). The current expiration date of your license can be checked by going to “Administration” via the top right-hand user menu, then “License”.
While this version of Gradle Enterprise will not disable running instances when a license expires, there are various situations that may result in an instance restarting (e.g. Kubernetes pod adjustments and regular cycling). If the current license expires and a new license cannot be downloaded during start-up, subsequent restarts will fail.
Online updates
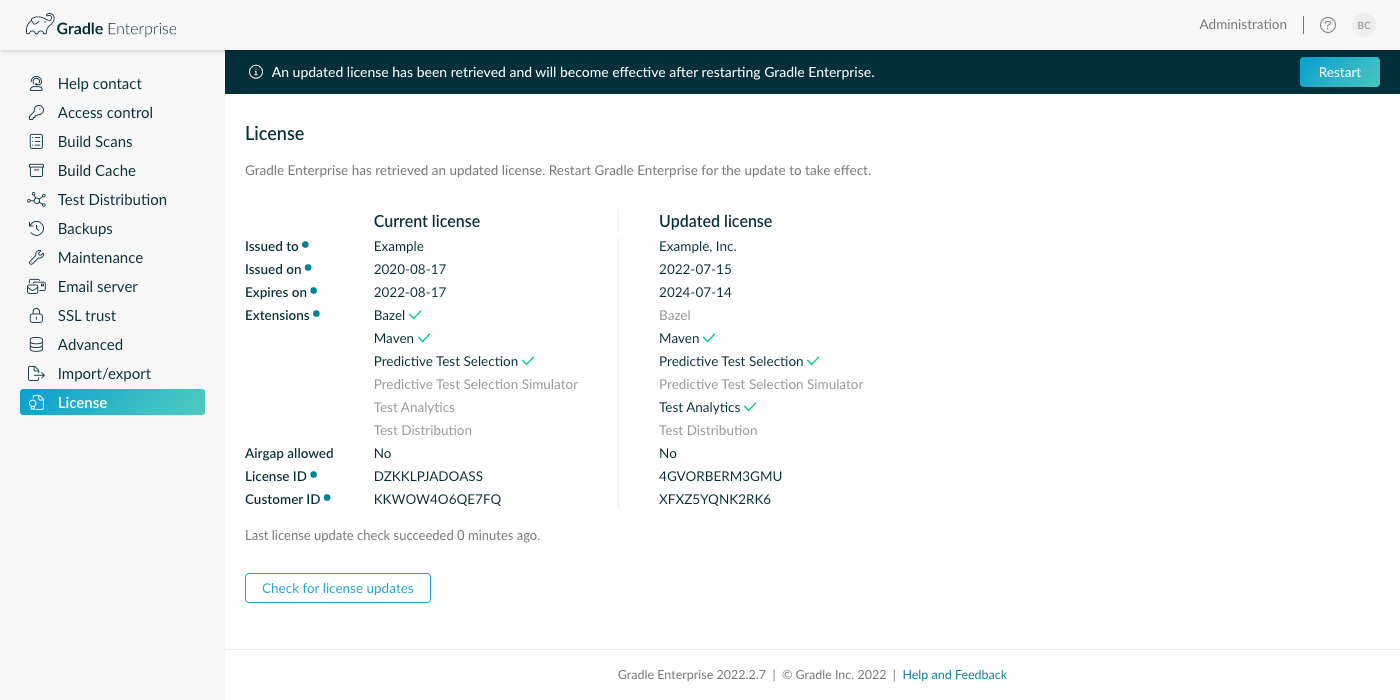
Online installations automatically check Gradle’s license server for license updates. It does so both on startup and every hour thereafter. If a license update requires a restart to take effect, a notification is displayed to administrators.
If license checks fail for 72 hours, the instance will fail to restart.
For online installations, all that is needed to avoid expiration is to ensure that your customer success representative has extended your license. There is no need to obtain or install a new license file, as the update will be applied automatically. If the application has failed to start due to license expiration, restart it after your customer success representative has extended your license.
In online installations, the “Administration” section “License” tab can also be used to:
-
verify the current license’s information, such as expiration date
-
compare the current license and updated license (when an updated license has been downloaded)
-
restart Gradle Enterprise to apply the updated license (when an updated license has been downloaded)
-
check whether license checks are functioning properly
-
initiate an on-demand license check
Airgap updates
Airgap installations do not receive automatic license updates. If you need an updated license file, contact your customer success representative. When you receive an updated Gradle Enterprise license file, it can be applied using helm upgrade. Further details can be found in the “Changing configuration values” section of the Gradle Enterprise Upgrade Guide for Kubernetes cluster installations or the Gradle Enterprise Helm Standalone Installation Manual for installation onto a single host.
Using Gradle Enterprise
Build Scans
A Build Scan is a shareable record of a build that provides insights into what happened and why.
For information on how to create Build Scans, please consult the links below.
-
Gradle: the Gradle Enterprise Gradle Plugin User Manual and the Getting Started with Gradle Enterprise guide for Gradle users
-
Apache Maven™: the Gradle Enterprise Maven Extension User Manual and the Getting Started with Gradle Enterprise guide for Maven users
Compatibility between versions of Gradle Enterprise and the Gradle Build Scan plugin or the Gradle Enterprise Maven extension can be found here.
Build Cache
Build caching dramatically decreases build times for both local development and continuous integration builds. Build Caches store outputs from Gradle tasks and Maven goal executions and serve them to later builds to reuse, instead of the outputs being built again.
Gradle Enterprise provides a built-in Build Cache node as part of each installation, and allows optionally connecting one or more remote nodes to use as discrete caches or replicas for reducing network latency.
For information on how to use the Gradle Enterprise Build Cache, please consult the Getting Started guides for Gradle or Maven.
Build Cache administration is available at /cache-admin of your Gradle Enterprise installation.
Configuration
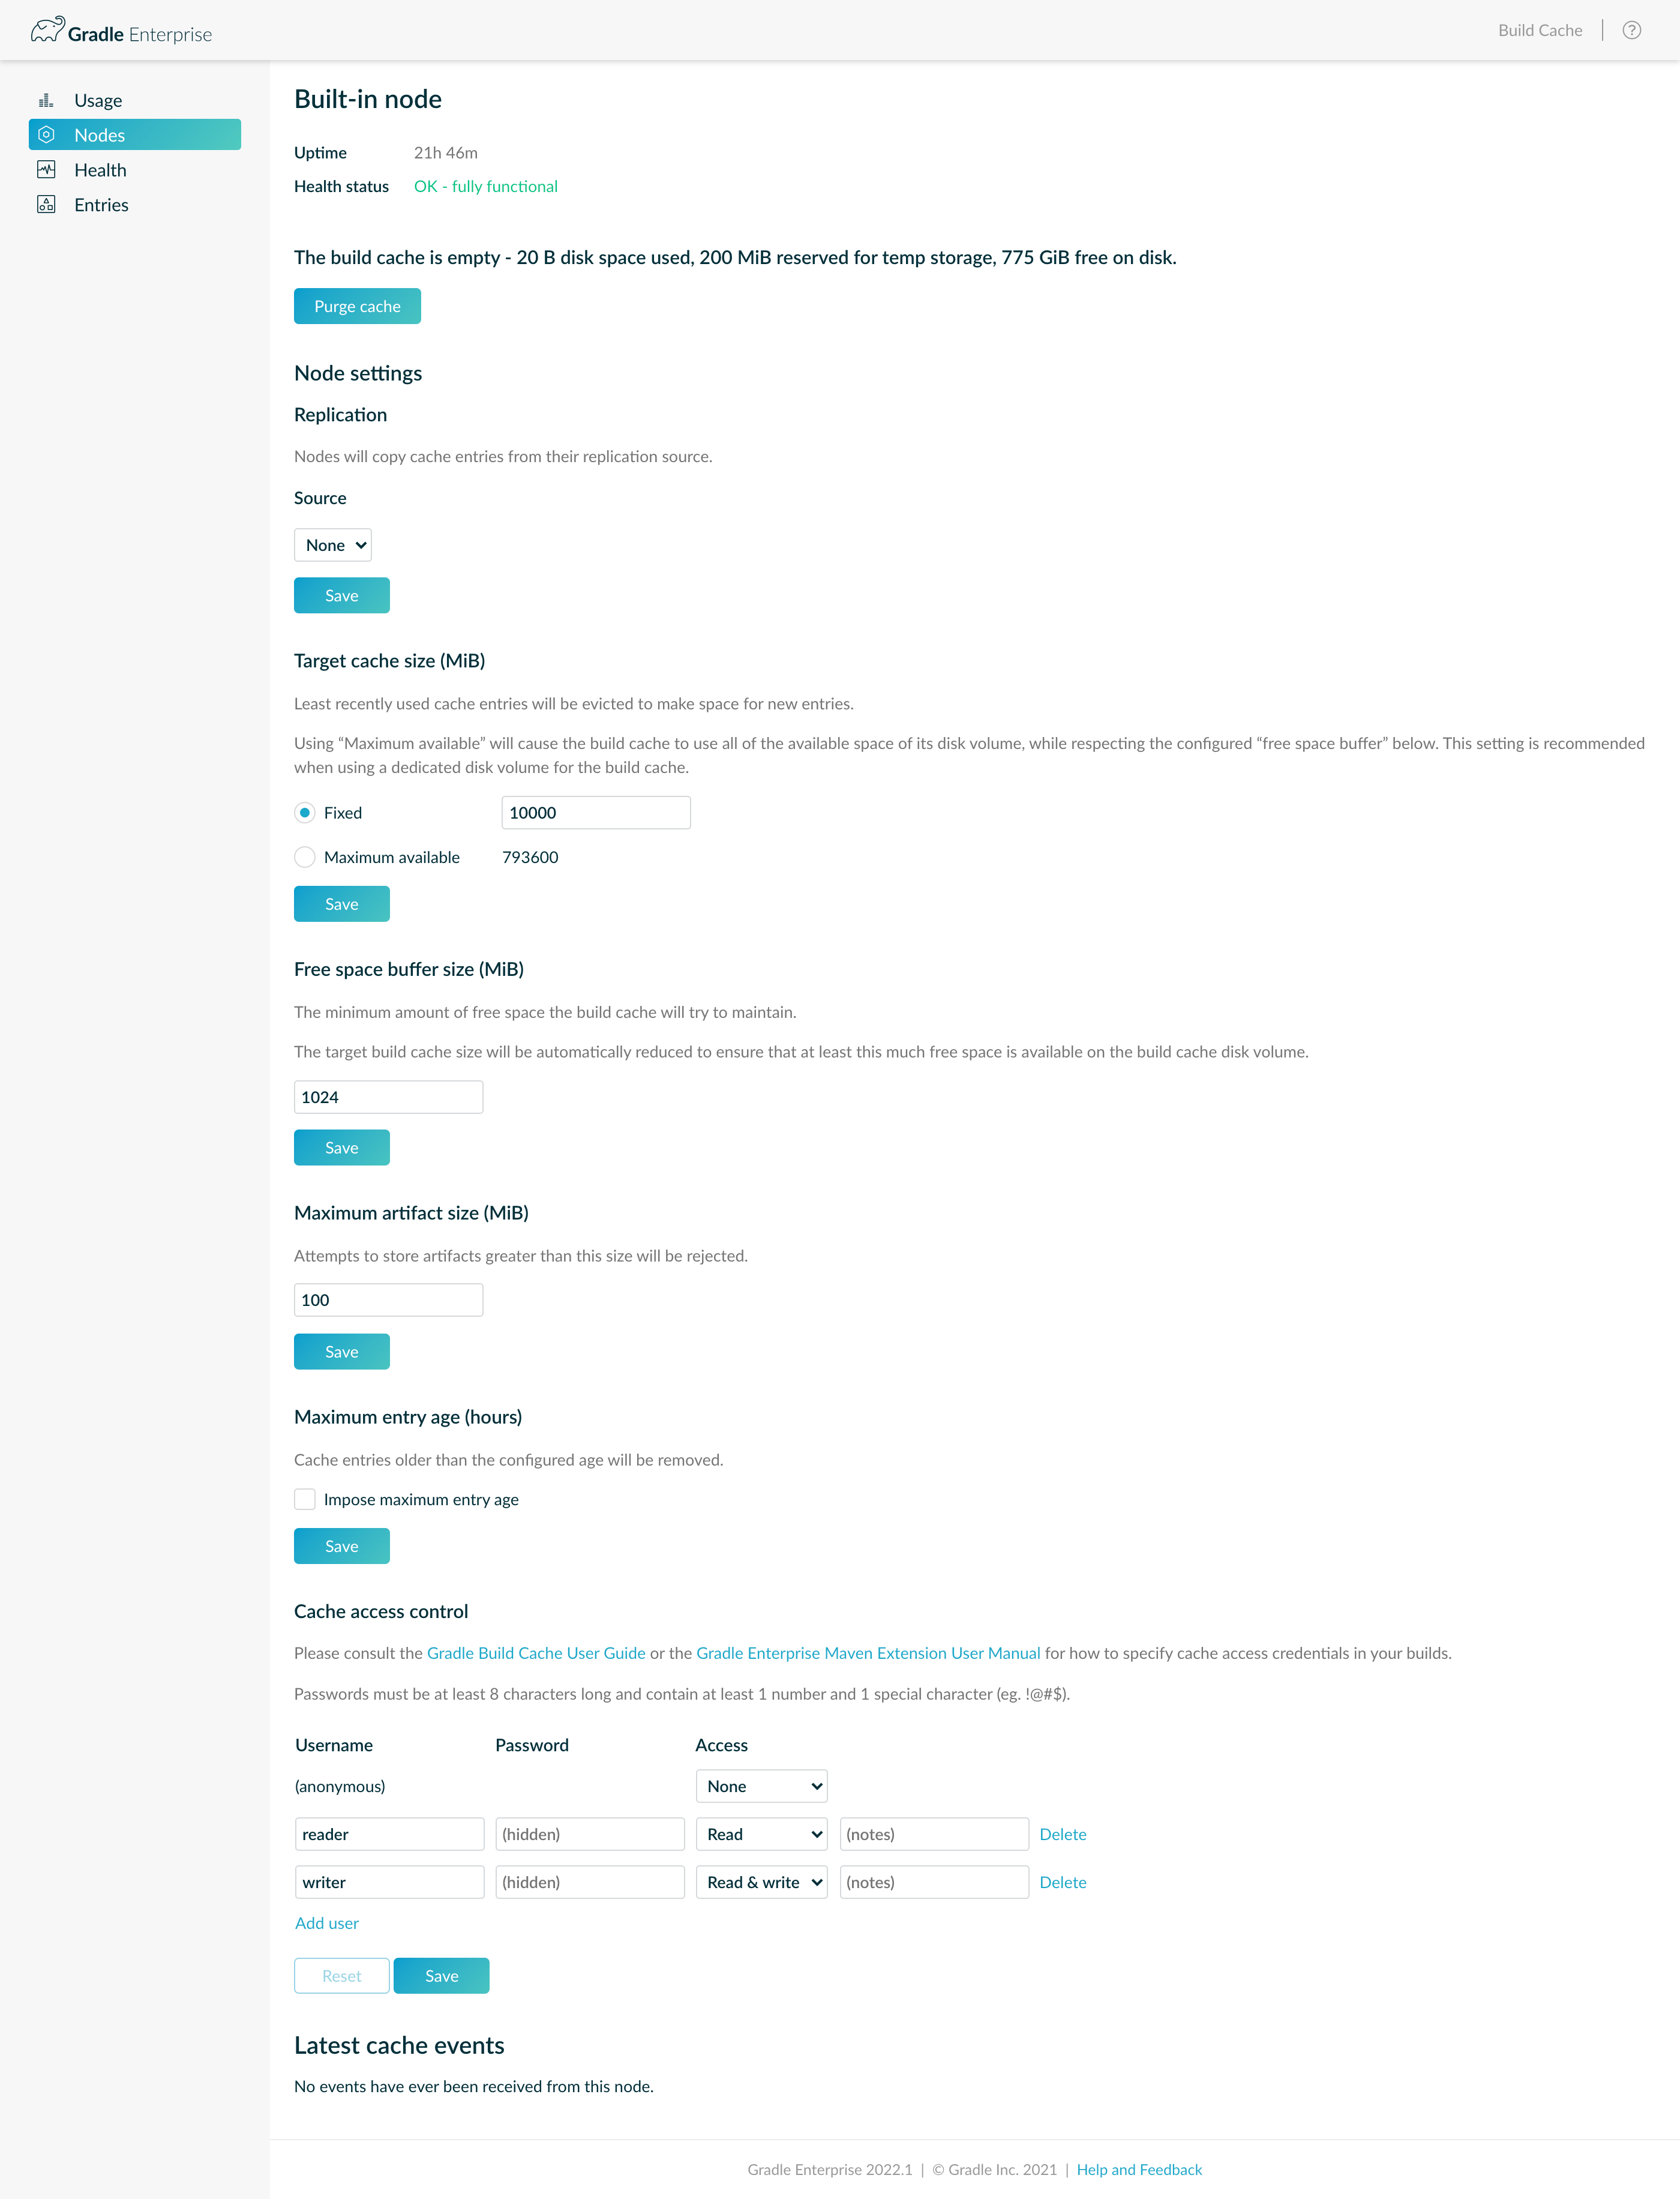
The built-in Build Cache is configured with the following defaults:
-
All cache access is disabled.
-
Target cache size of 10 GiB (how much data to retain in the cache).
-
Free space buffer size of 1 GiB (how much free disk space to ensure is available at all times, reducing cache size if necessary).
-
Maximum artifact size of 100 MiB (the largest cache artifact to accept).
-
No limit on cache entry age.
To change this configuration, click the Nodes item in the left menu to access the node listing, then click View built-in node details.
If you are using an installation method that gives the built-in build cache node an exclusive data volume (like Ship), the "Target cache size" section may instead look like this:

Access control
By default, access to the built-in cache node is disabled. There are two access control mechanisms that can be used. Which one you should use depends on the version of the Gradle Enterprise Gradle plugin or Gradle Enterprise Maven extension you will be using.
Version 3.11+ of the Gradle Enterprise Gradle plugin and version 1.15+ of the Gradle Enterprise Maven extension can authenticate to the build cache with Gradle Enterprise access keys. Permissions for these users are managed via the same access control mechanism used for other functions. Users with the “Build cache read” permission can read data from any connected build cache, while users with the “Build cache write” permission can read and write data from any connected build cache.
To control access for earlier versions, separate username and password credentials can be specified in the “Build Cache” section of Gradle Enterprise, in the details section for each build cache node. This section of Gradle Enterprise is only accessible by users with the "Build cache admin" permission.
How to configure your builds to supply credentials is described in the Gradle Enterprise Gradle Plugin User Manual for Gradle, and in the Gradle Enterprise Maven Extension User Manual for Maven.
Anonymous access control can also be configured using the same anonymous access control mechanism used for other functions, or by configuring node-specific anonymous permissions in the details section for each build cache node. When both are configured, the most permissive setting is used.
| When the anonymous access level is set to Read and Write, writing to the build cache does not require credentials which may allow anyone to write malicious cache entries. |
Remote nodes
Remote build cache nodes are installed separately from Gradle Enterprise. They can be used to separate cache artifacts, distribute load, or improve build performance by having a better network link between the build and the node.
By connecting remote nodes to a Gradle Enterprise instance, you are able to configure them centrally from Gradle Enterprise, and have them replicate entries from other cache nodes.
Installation and operation of remote build cache nodes is documented in the dedicated Build Cache Node User Manual.
Connecting with Gradle Enterprise
To connect a remote node to your Gradle Enterprise installation, you first need to create a record for the node with Gradle Enterprise by following either of these options:
Manual registration
Visit /cache-admin of your Gradle Enterprise installation, and select Nodes from the left menu. In the Remote nodes > Create new node section, enter the name for your node and click Create new node.
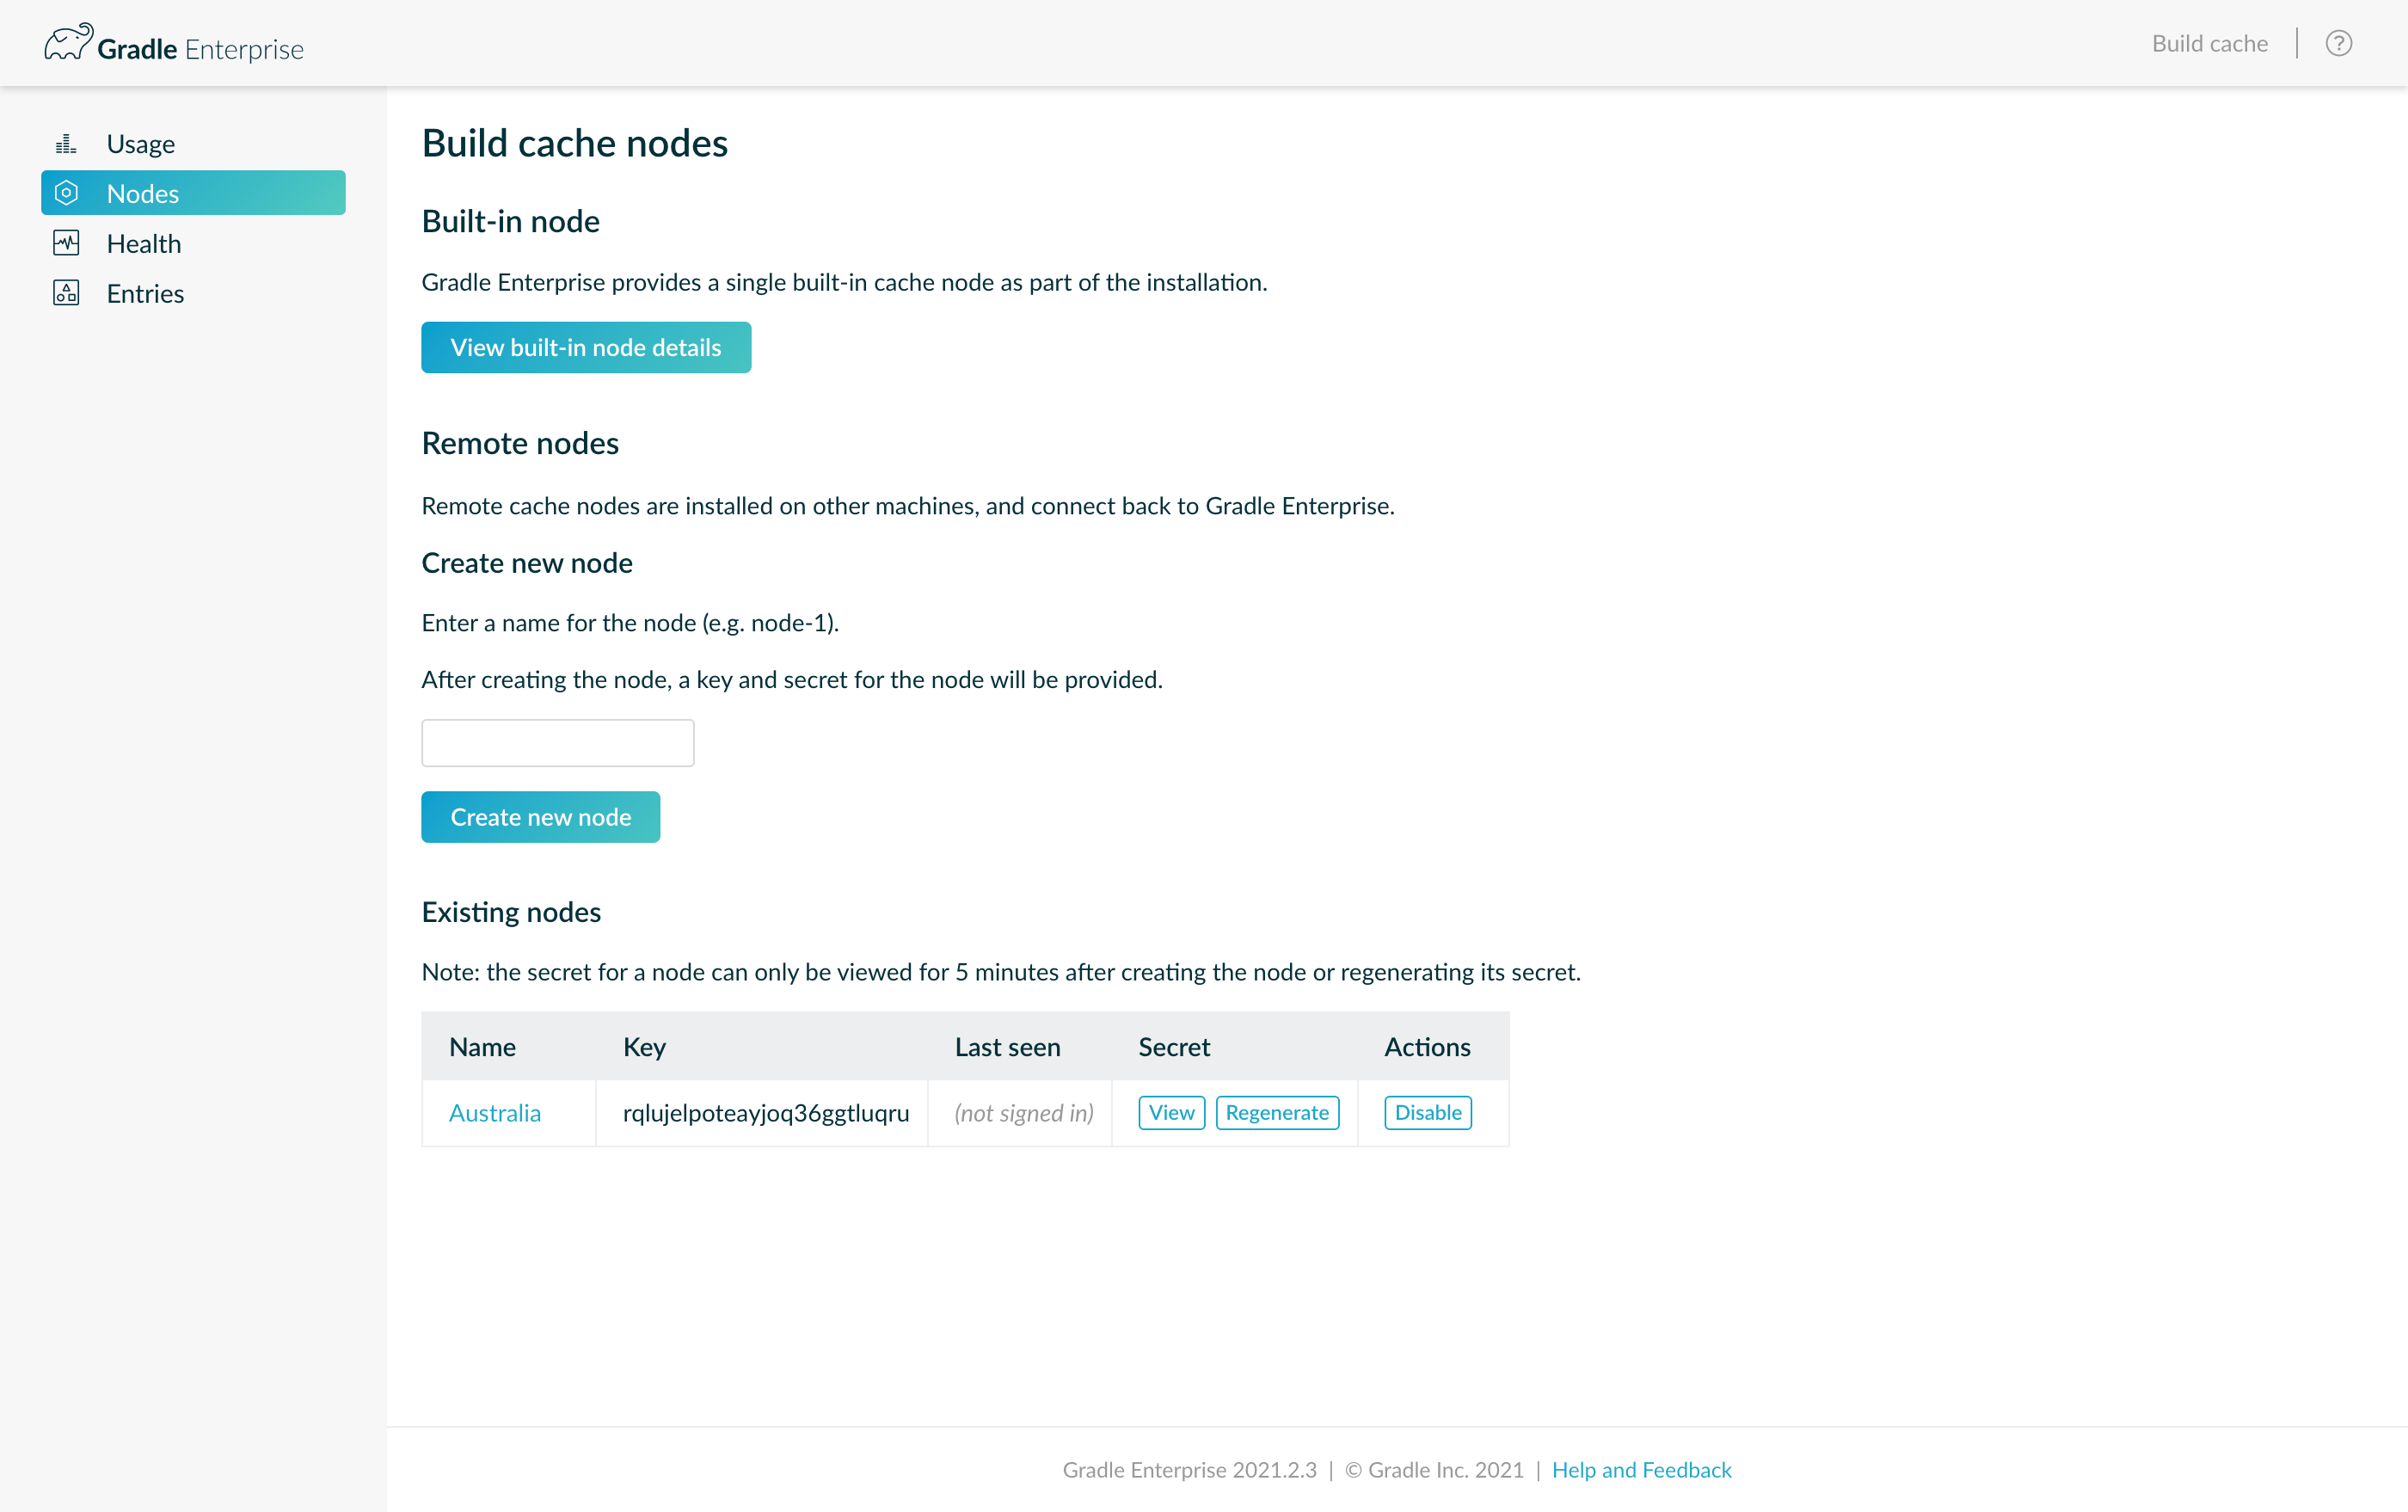
The node will now be listed in the Existing nodes section. Each node is assigned a key and a secret. To view it, click in the View button on the Secret column for the newly created node.
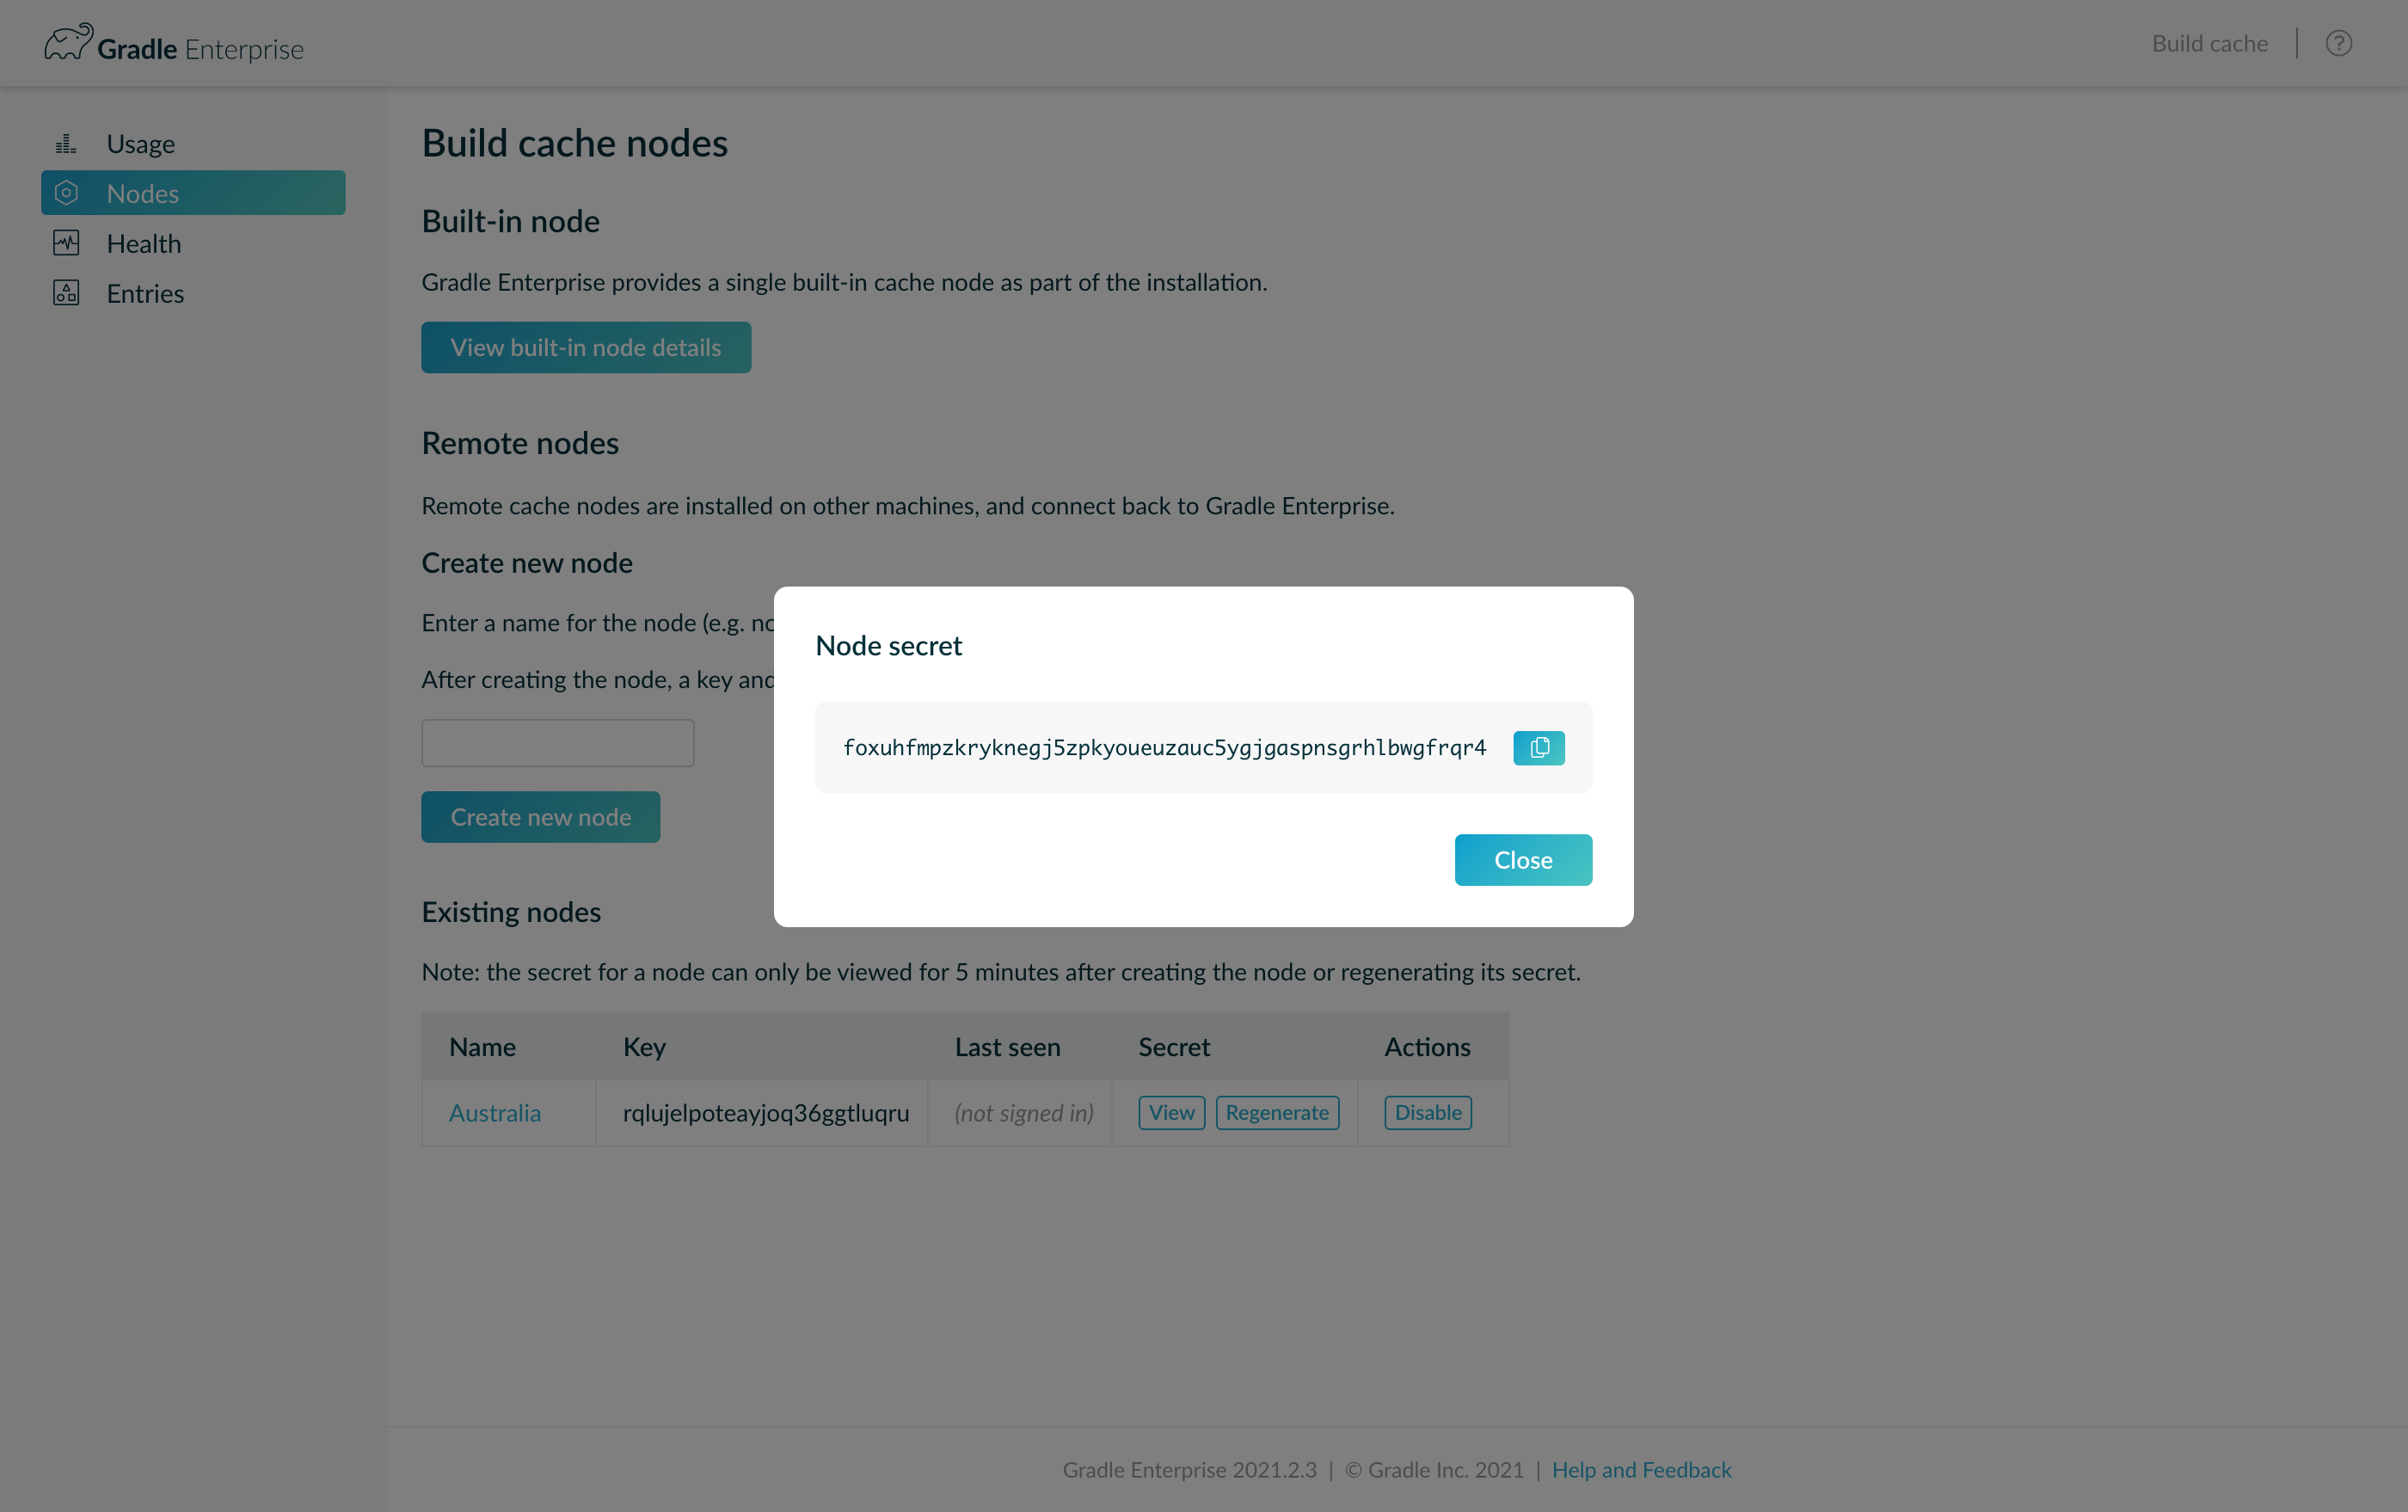
| The secret is only viewable for 5 minutes after node creation. If the node secret is lost, use the regenerate function to issue a new secret which will then be viewable for 5 minutes. |
As a last step you need to update the node configuration with the assigned key and secret.
Unattended registration
In case nodes are required to be managed by provisioning software (e.g., Terraform) Gradle Enterprise offers an unattended option to register the node via the Gradle Enterprise API. Please consult the access control section of the API manual on how to connect to the Build Cache section of the Gradle Enterprise API.
Once you have access to the Gradle Enterprise API, we can start with the registration of a node via the Gradle Enterprise API.
The following example uses ge.example.com as the installation host, 7asejatf24zun43yshqufp7qi4ovcefxpykbwzqbzilcpwzb52ja as the access key of the user which has the Cache admin role, and cURL as the HTTP client.
First, a new node (referred to as node-1) is registered in Gradle Enterprise using the Create/Update endpoint by specifying a unique descriptive value for the name of the node, e.g.:
$ curl -X PUT https://ge.example.com/api/build-cache/nodes/node-1 \
    -d '{"enabled":true}' \
    -H "Authorization: Bearer 7asejatf24zun43yshqufp7qi4ovcefxpykbwzqbzilcpwzb52ja" \
    -H "Content-Type: application/json"
If applicable, a replication configuration (in this example a preemptive replication from parent-node-1 is configured) can be specified at creation time:
$ curl -X PUT https://ge.example.com/api/build-cache/nodes/node-1 \
    -d '{"enabled":true,"replication":{"source":"parent-node-1","preemptive":true}}' \
    -H "Authorization: Bearer 7asejatf24zun43yshqufp7qi4ovcefxpykbwzqbzilcpwzb52ja" \
    -H "Content-Type: application/json"
Second, a request to the secret endpoint is made using the name of the node used in the previous step. This generates a key-secret pair that the node requires for connecting to Gradle Enterprise:
$ curl -X POST https://ge.example.com/api/build-cache/nodes/node-1/secret \
  -H "Authorization: Bearer 7asejatf24zun43yshqufp7qi4ovcefxpykbwzqbzilcpwzb52ja"
{
"key":"fqysvmfd3u5dcgis5reunrxjce",
"secret":"cpgovxdo6f6phkdyxdrfzyy43q5hflatc2umzgguxv6adap2qyyi"
}As a last step you need to update the node configuration with the returned key and secret. Please consult the reference documentation of the Gradle Enterprise API for further functionality with regard to node management.
Update node configuration
The node must also be configured with details of the server to connect with, including the assigned key and secret. Please consult the Gradle Enterprise Registration section of the Build Cache Node User Manual for information on how to do this.
Replication
The bandwidth and latency of the network link between a build and a build cache significantly affects build performance. Replication allows users to use a cache node that they have a better network link to, while reusing artifacts from another cache node that is further away. This is particularly effective for geographically distributed teams.
The replication settings for each node can be configured via the node’s configuration page in Gradle Enterprise. They can not be configured for remote nodes via the remote node’s user interface or configuration file.
A typical arrangement is to have continuous integration builds push to a cache node on a local network, and have other nodes used by developers in different locations, ideally on their local network, use it as their replication source.

Replication is one-way (i.e. replication sources do not copy artifacts from nodes using them as a source). Furthermore, a node that is acting as a replication source cannot itself use a replication source.
| Replication is not supported with remote nodes earlier than 3.0. This setting will not be shown for such nodes. |
By default, cache entries are replicated on demand. Nodes will copy a cache entry from their replication source when that particular cache entry is requested for the first time. This avoids copying entries between nodes that will never be used, but forces builds to wait for the transfer on first use.
Preemptive replication enables better build cache performance, at the expense of more network transfer between nodes. When preemptive replication is enabled, nodes will copy cache entries from their replication source as soon as they are added. The downside of this approach is that entries may be copied that are never used. If network bandwidth usage between nodes is not a concern, this is the best configuration.
Only cache entries that are added to the replication source after the node has connected are copied preemptively. Any already existing entries will be copied on demand.
| Preemptive replication is only supported for nodes of version 4.0 or later. If the node or its replication source is older than this, replication will be on demand. |
Health monitoring
The Health page provides an overview of the operational status of all enabled build cache nodes.
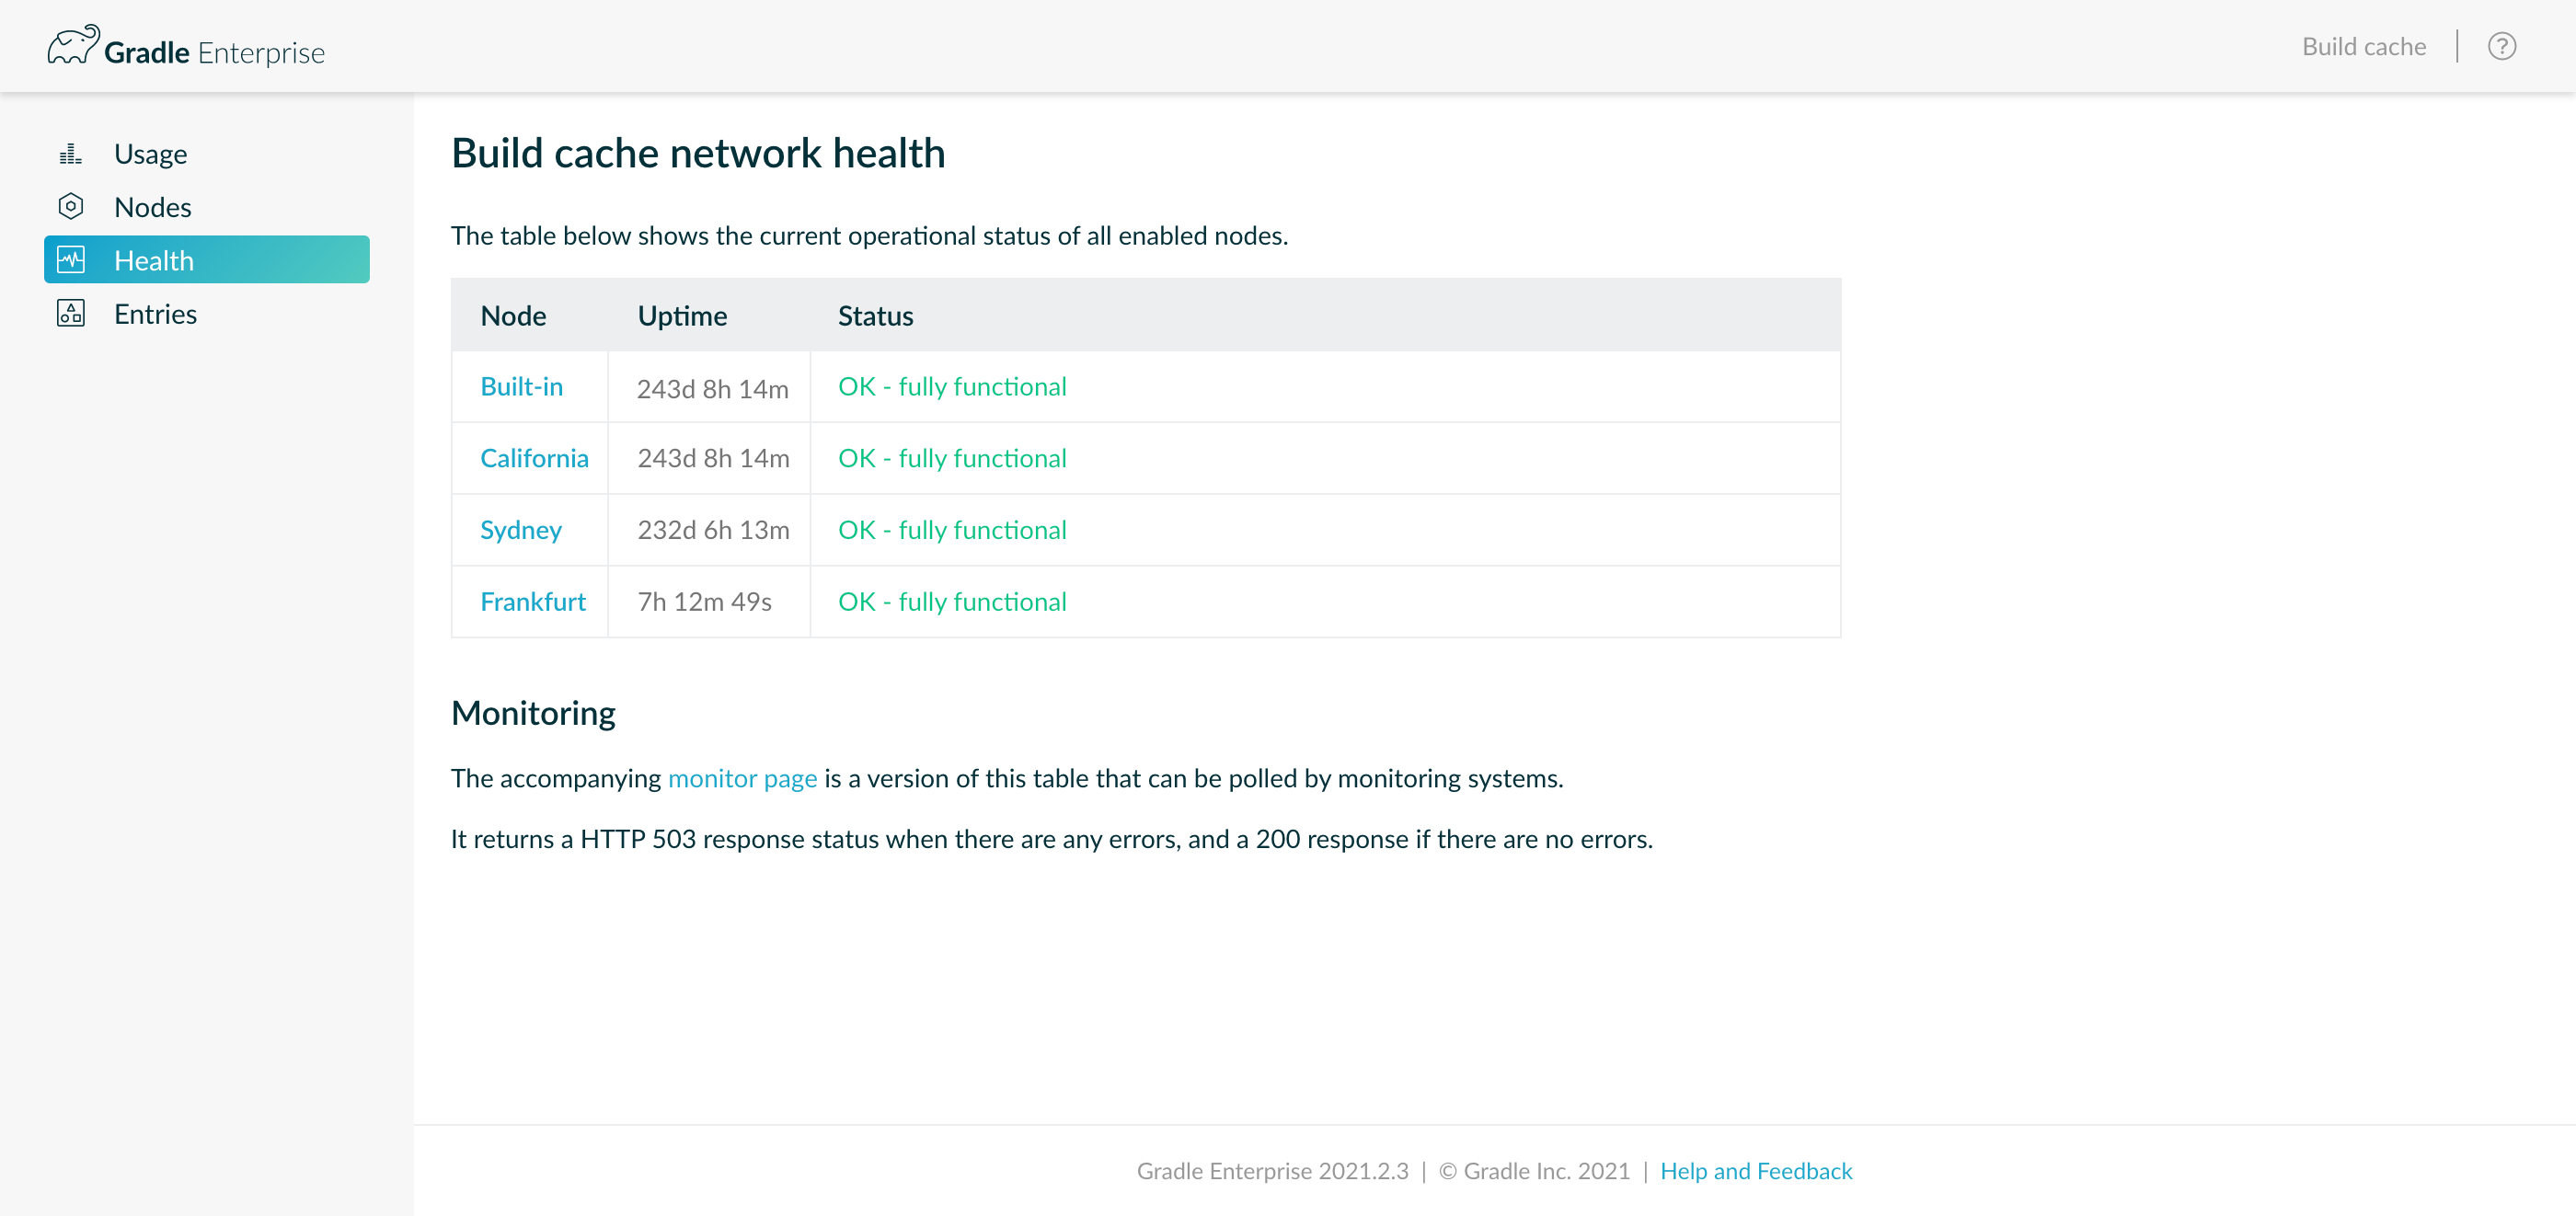
Each node may have a status of OK, WARN or ERROR. If all nodes are reported as OK, you can be assured that your build cache network is operating well.
WARN indicates that there is a non-critical issue, or that there is a problem that is expected to resolve itself soon. If the issue does not resolve itself, or for immediately critical issues, the ERROR status is used.
A monitoring tool friendly version of this page is available via the Monitoring page link towards the bottom of the page. This endpoint returns the statuses in plain text. If there are any ERROR statuses, the HTTP response status code for this page will be 503. Otherwise, it will be 200.
Test Distribution
Gradle Enterprise Test Distribution takes your existing test suites and distributes them across multiple compute resources to execute them faster. It requires connecting one or more test execution “agents” to Gradle Enterprise. Builds that have enabled Test Distribution connect to Gradle Enterprise, which then distributes the tests to be executed on connected agents.
Connecting builds
Please consult the Gradle Enterprise Test Distribution User Manual for information on build configuration.
Gradle Enterprise users must be granted the “Test Distribution” access control role to be able to use Test Distribution.
| Builds and agents connect to the Gradle Enterprise server using a WebSocket connection. Thus, you need to ensure WebSocket support is enabled on every load balancer or proxy that is used in between the build/agent and the Gradle Enterprise server. |
The “Jobs” tab provides an overview of the currently active jobs, where each row represents a running test task or goal in a Gradle or Maven build, respectively.
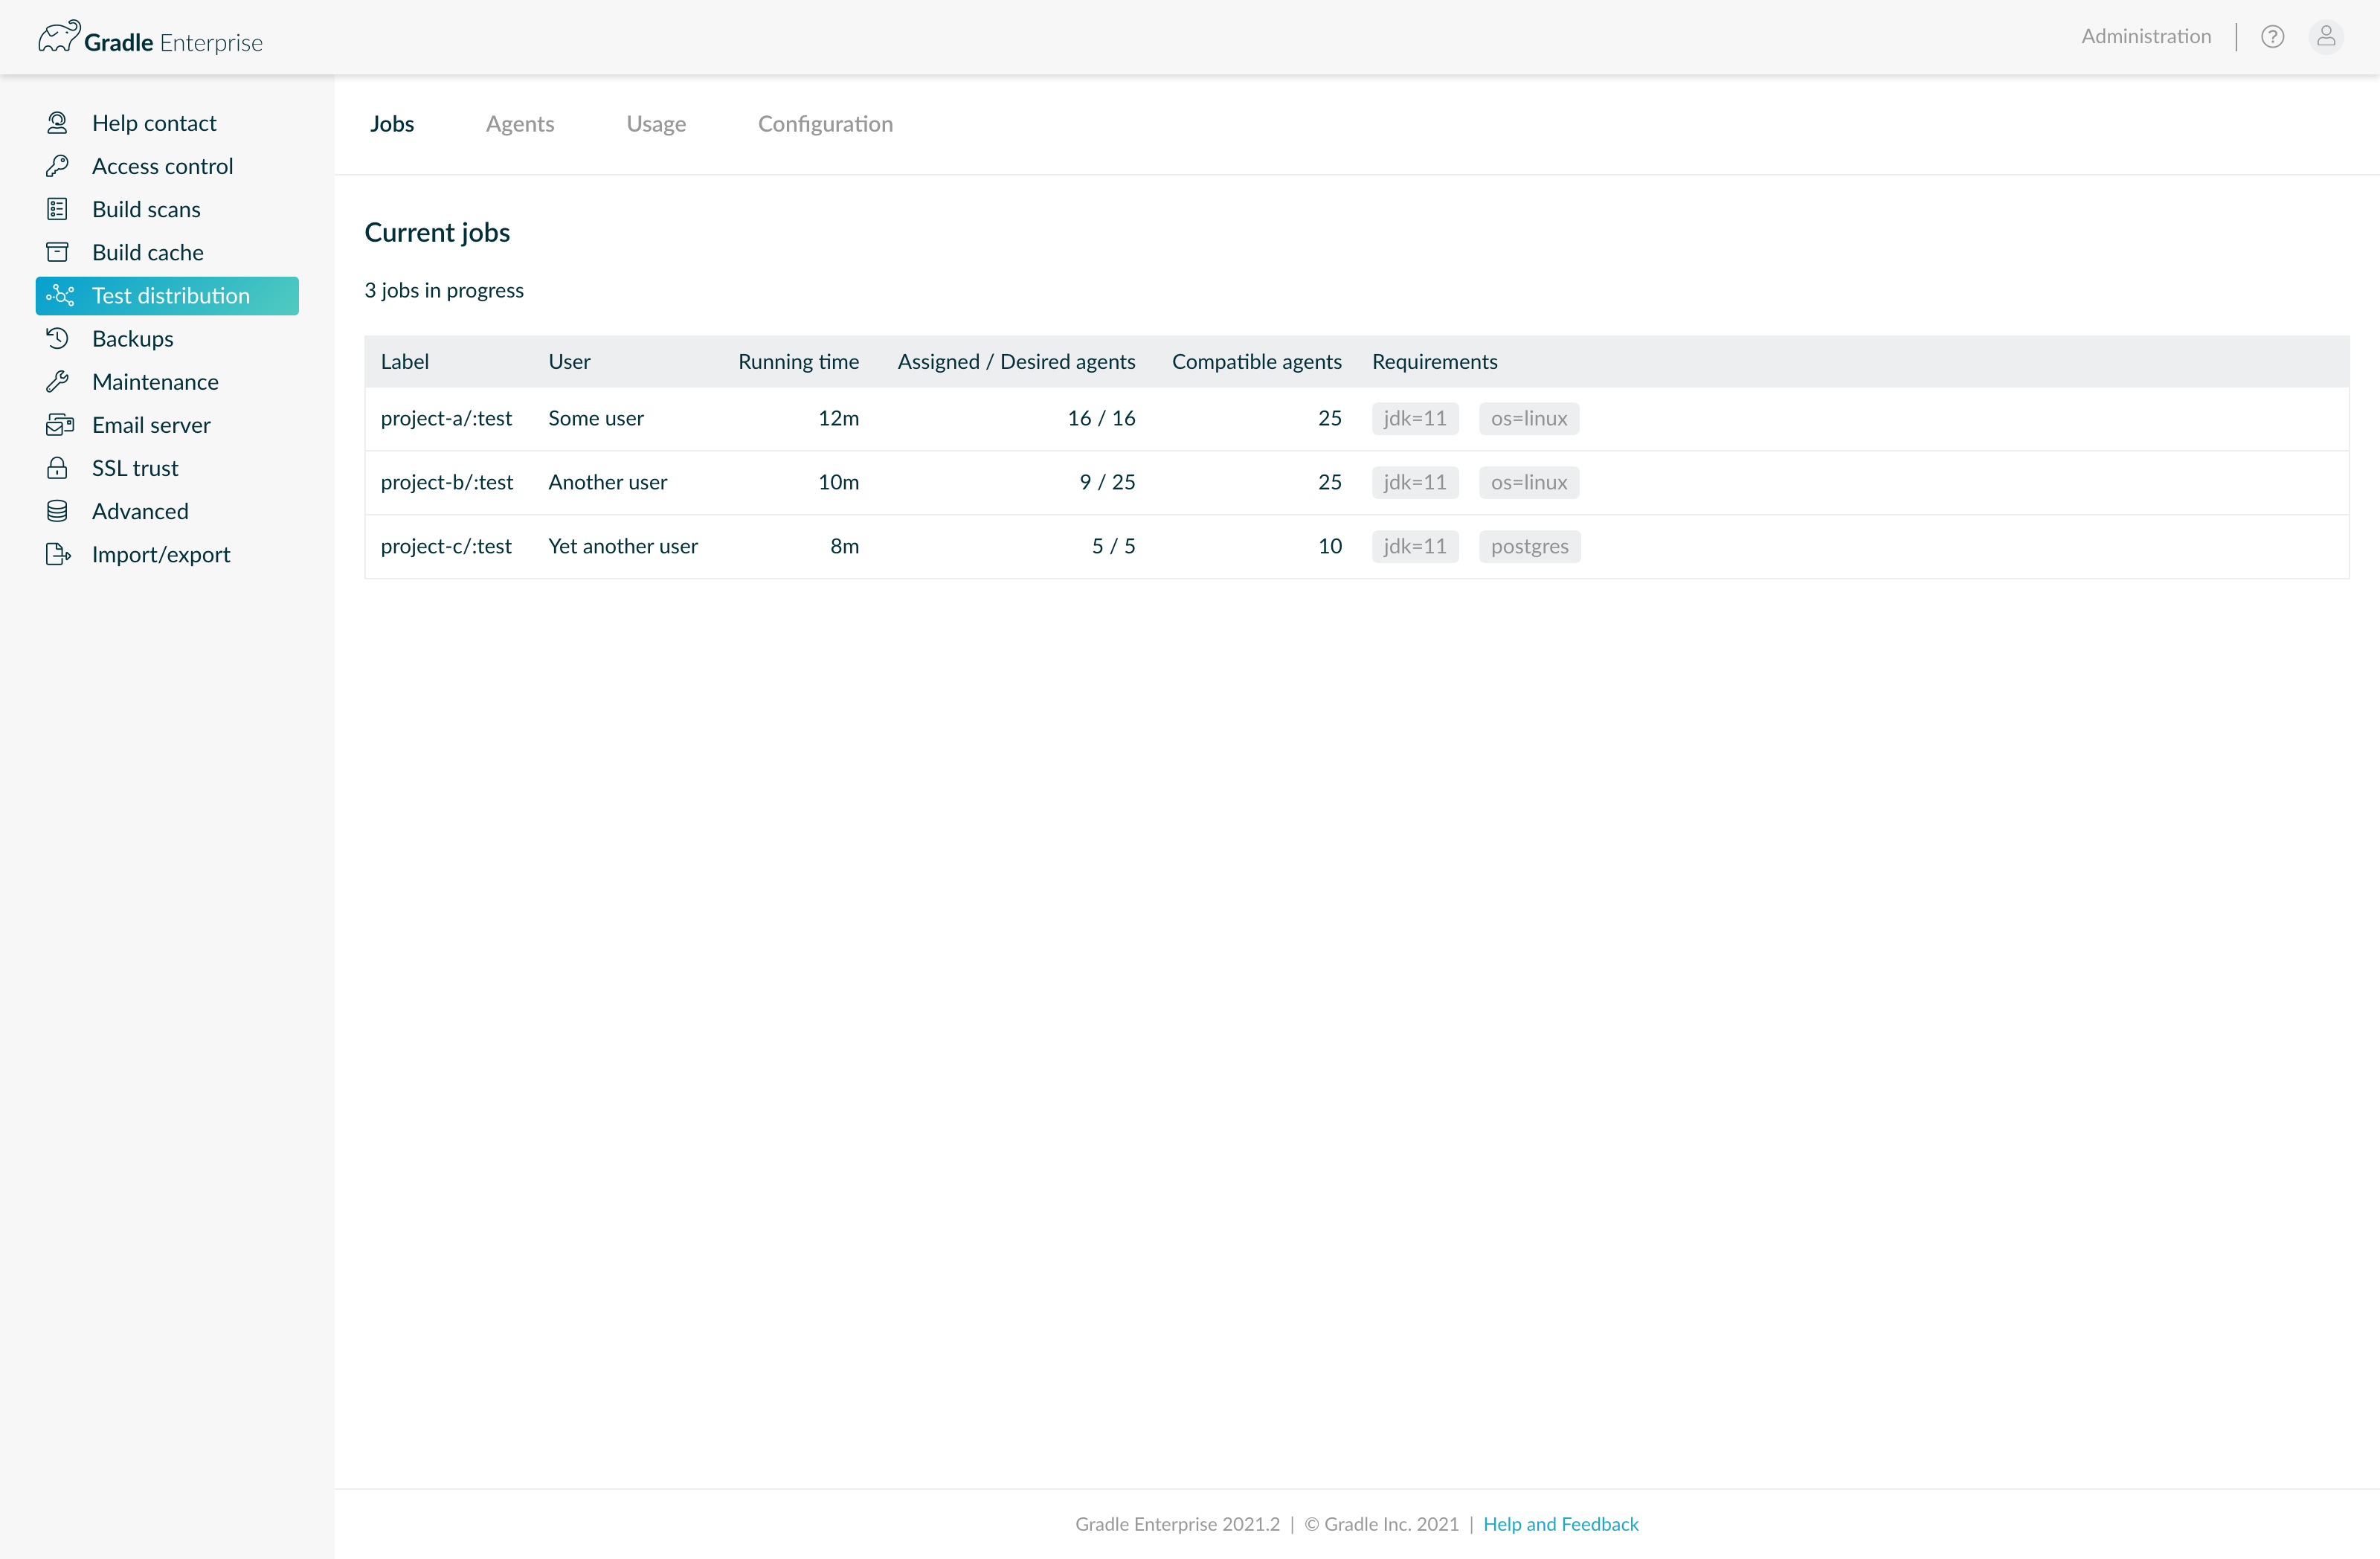
The first part of the label indicates the root project name of the build, while the second part identifies the particular task or goal. The count of assigned/desired agents shows how many agents are currently assigned to/desired by the job. More agents may be assigned as they become available. The count of compatible agents shows how many currently connected agents have capabilities that satisfy the requirements of the job.
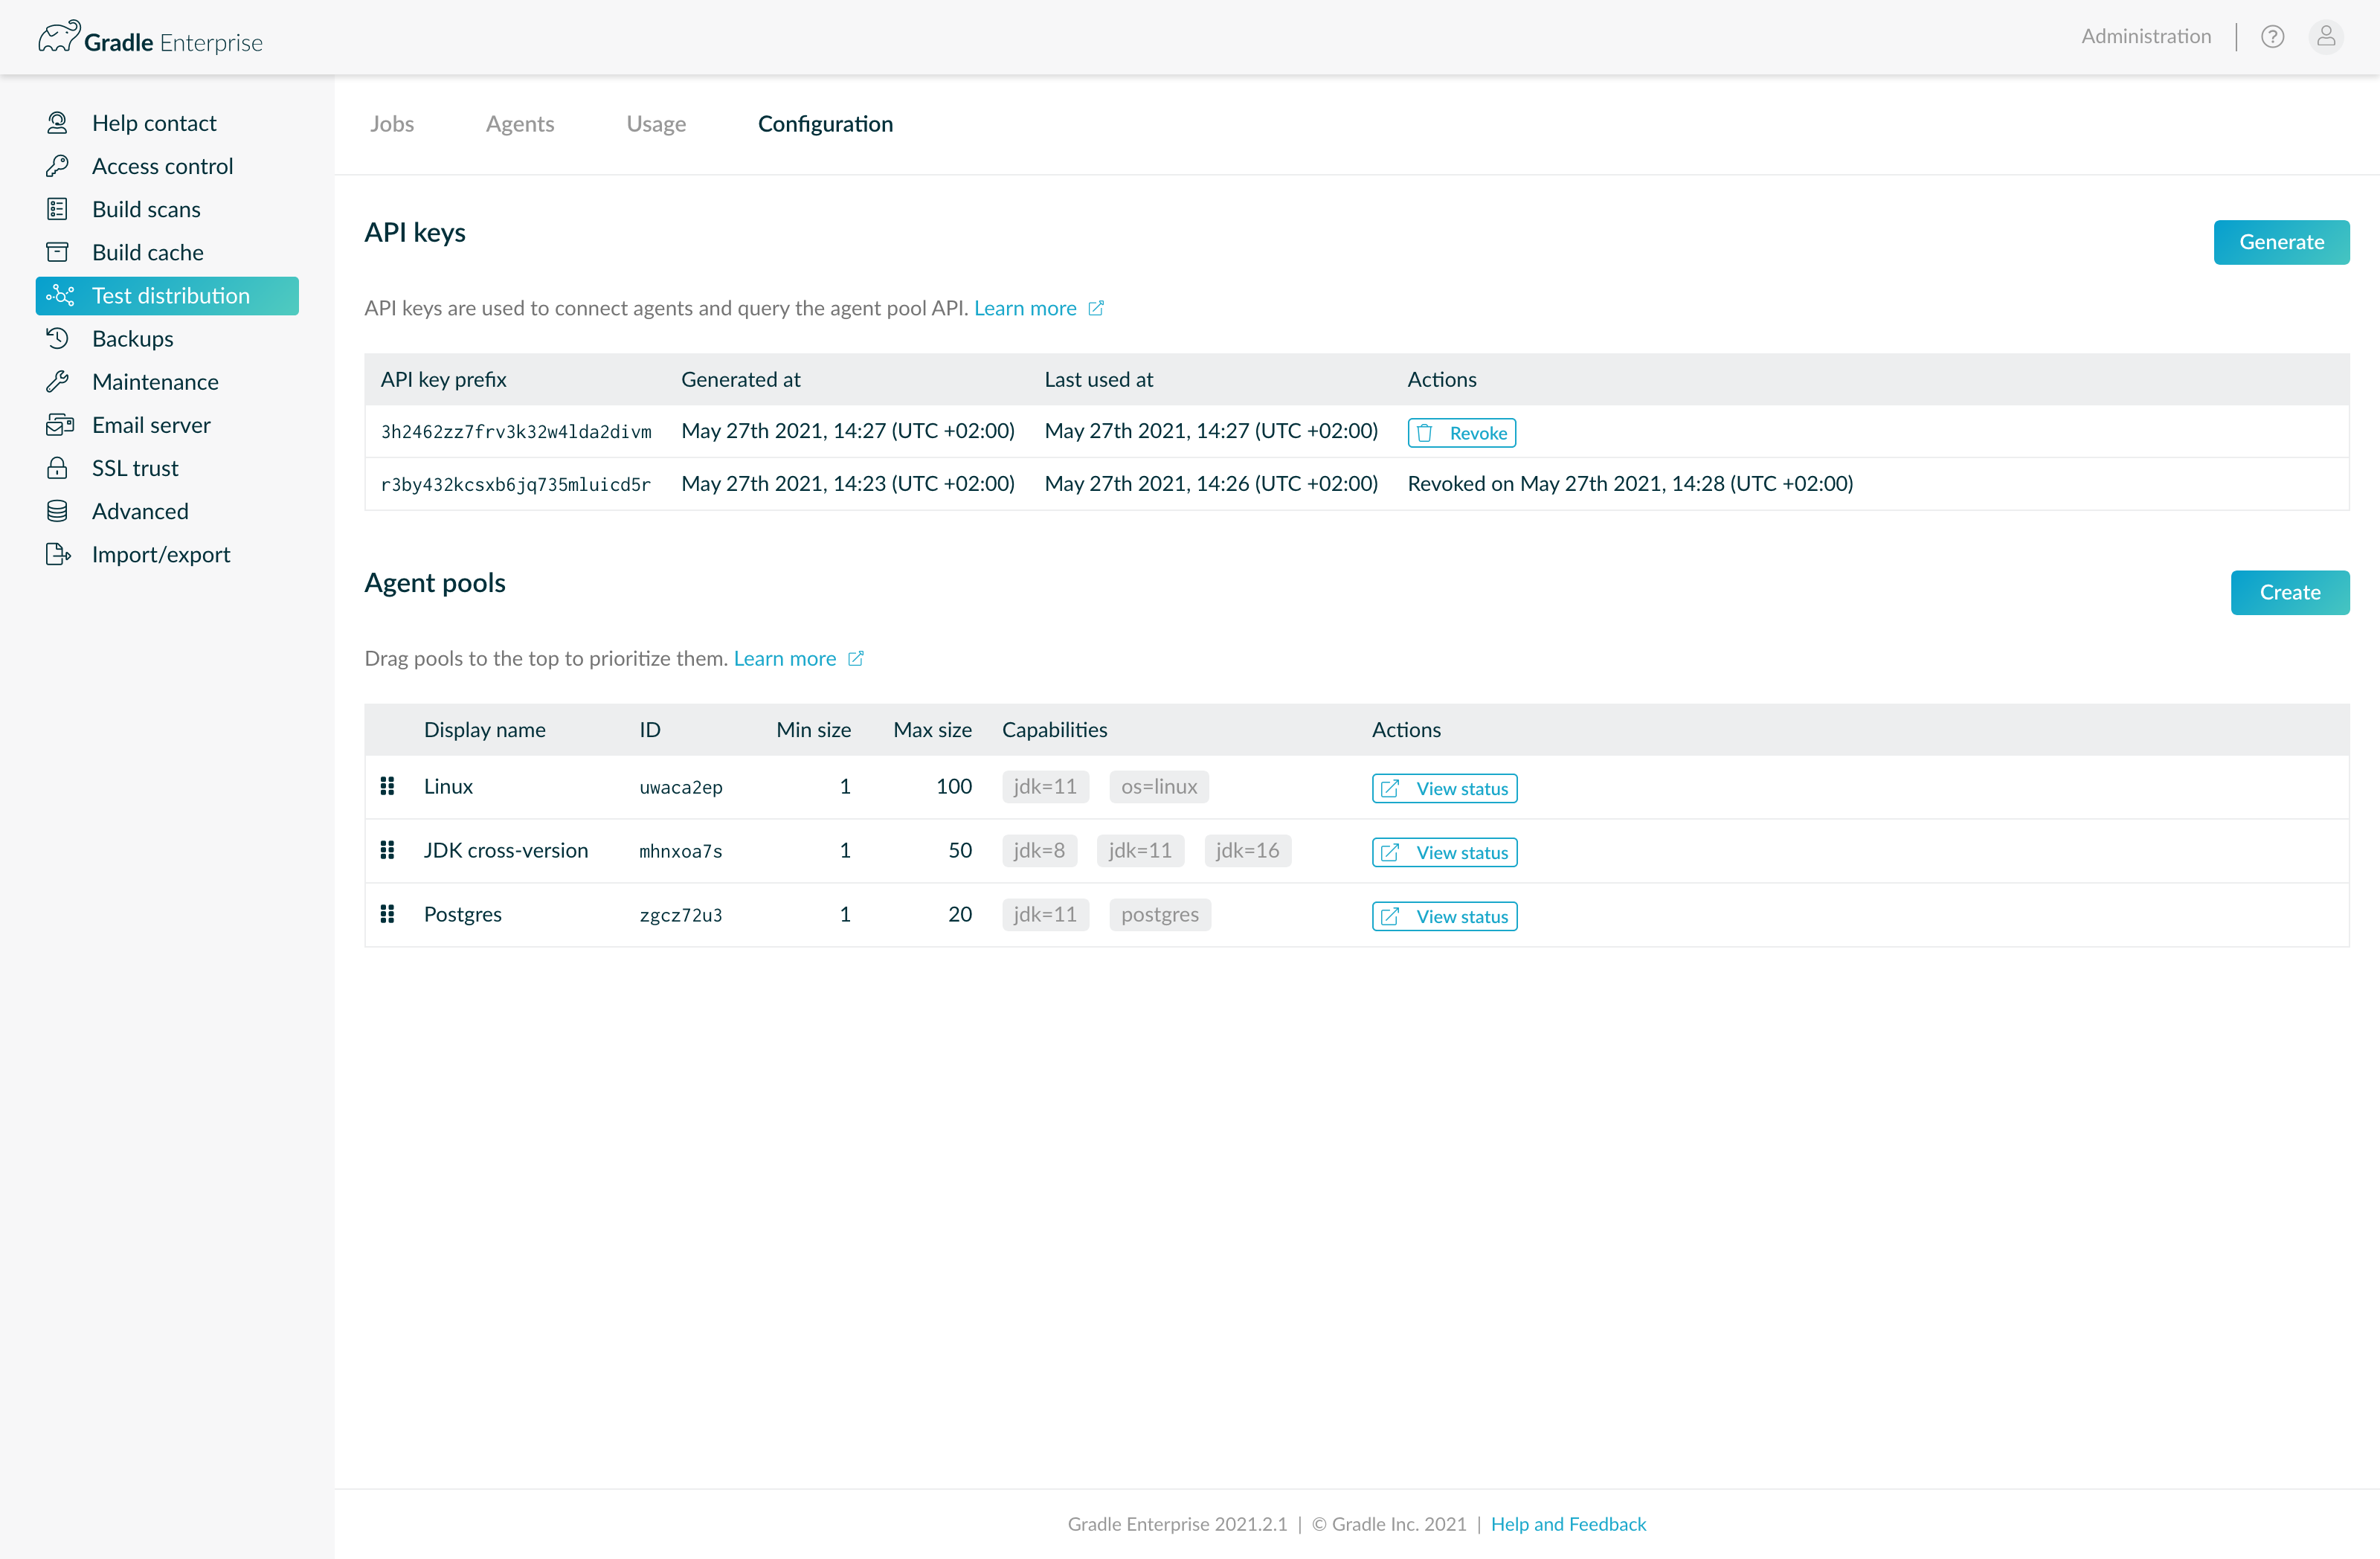
API keys
API keys are used by agents to authorize their connection to Gradle Enterprise, and for authorizing connections to Test Distribution APIs provided by Gradle Enterprise.
API keys can be generated on the “Configuration” tab. A single API key may be used my multiple agents. Multiple can be created to facilitate a rolling update if required. Revoking an API key prevents it from being used for future registrations and API access. Connected agents will be forcibly disconnected one hour after the API key they used to connect is revoked.
Agents
Utilizing Test Distribution requires connecting additional compute resources, called agents, to Gradle Enterprise. The Test Distribution agent is available as a Docker image or standalone JAR and is easy to deploy and operate via Kubernetes or any modern compute platform. Please consult the Gradle Enterprise Test Distribution Agent User Manual for more on deploying and operating agents.
The “Agents” tab shows all currently connected agents.
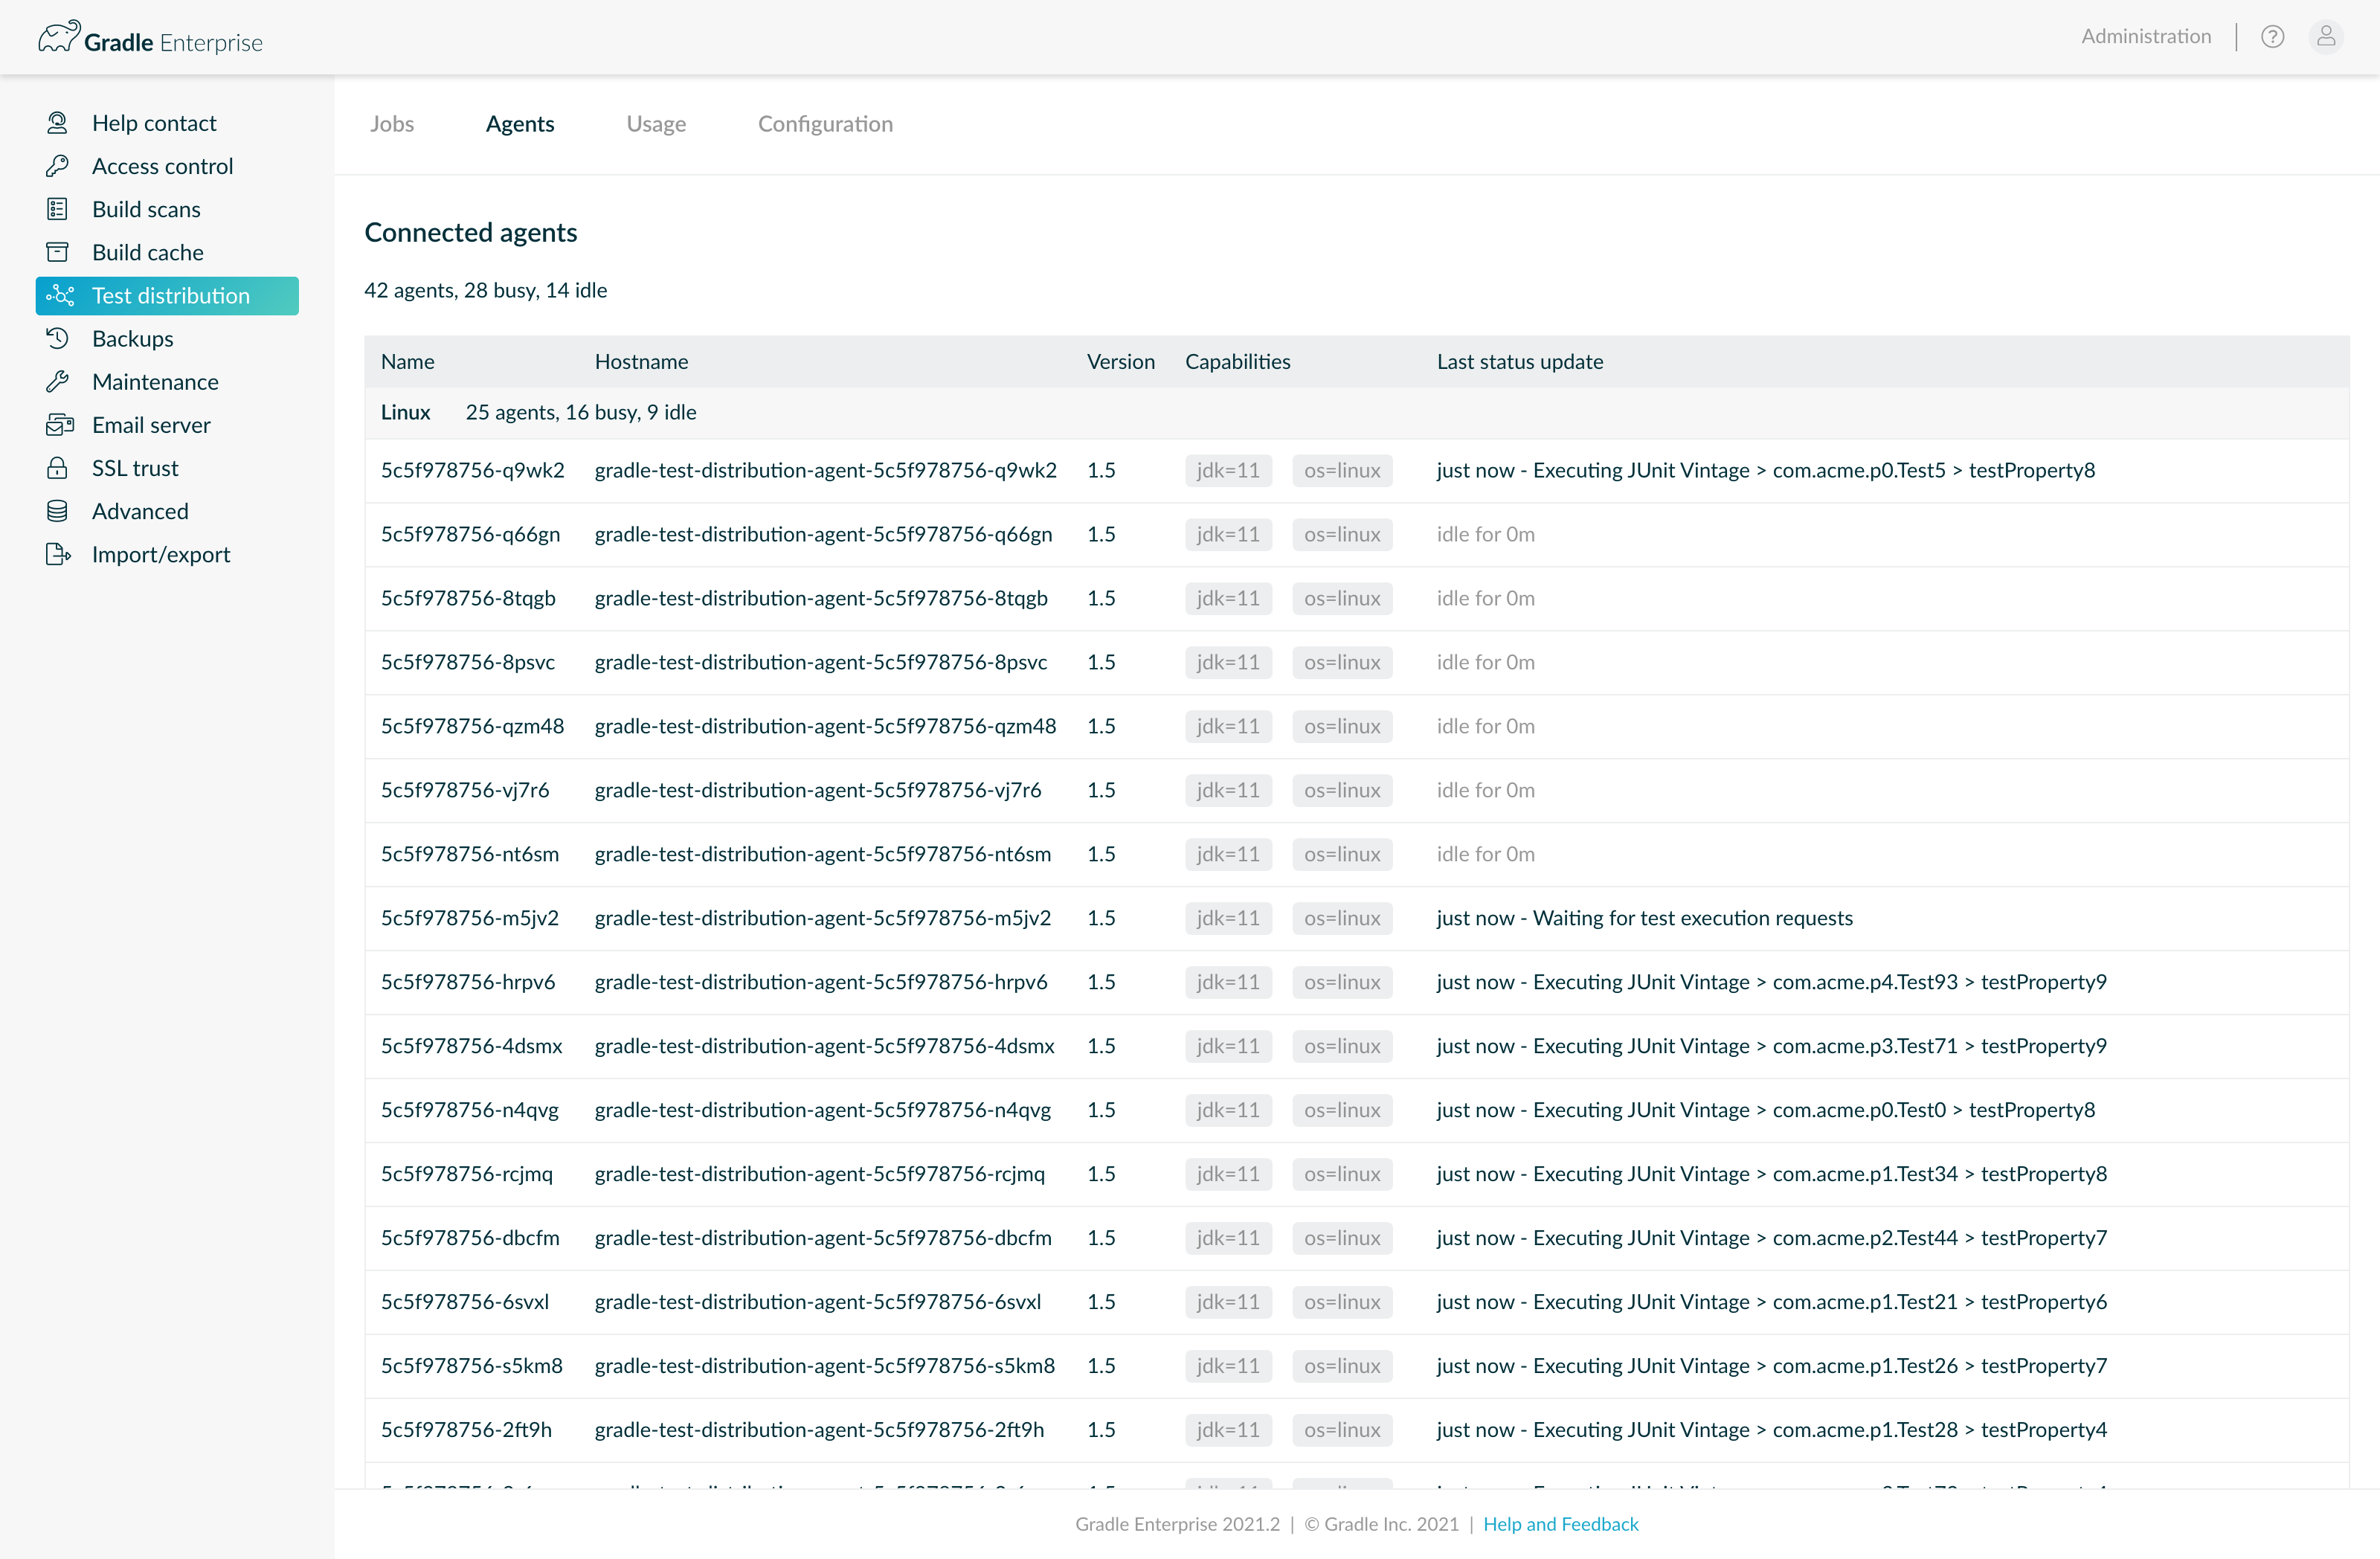
Auto scaling agents with pools
An agent pool is a group of agents that are to be scaled up and down based on demand. Each pool has a generated unique ID that is specified by an agent when connecting to indicate its pool, and can be used by compute platform auto scalers to determine the desired number of agents at any time for that pool.
| Please refer to the Gradle Enterprise Test Distribution Agent User Manual for step-by-step instructions for auto scaling with Kubernetes. |

Minimum and maximum size
The minimum and maximum size of an agent pool is used to determine the desired number of agents at a given moment.
Ultimately, the actual number of agents is determined by the compute platform, which may impose incompatible limits. Where possible, ensure that the limits imposed by the compute platform are either identical to or compatible with those configured in Gradle Enterprise.
To temporarily disable a pool, set both minimum and maximum to zero.
Capabilities
Agents in a pool are expected to provide a certain set of capabilities. While an agent may provide additional capabilities, it will be rejected when connecting without at least the mandatory capabilities configured on its agent pool.
While computing the number of desired agents for a pool its capabilities are matched against the requirements of the current jobs. A pool is only utilized if it satisfies all of a job’s requirements. Therefore, you should at least add a jdk=… capability to each agent pool since such a requirement is added implicitly to each job. Moreover, each agent has an implicit os=… capability which should be added to the agent pool for the sake of consistency and in case it’s an explicit requirement of any job.
Already connected agents that don’t provide all mandatory capabilities will stay connected for up to 4 hours after adding capabilities to an agent pool. During that time they will be shown with a warning indicator on the “Agents” tab. In order to add capabilities to an existing pool, it is recommended to first add the capability to all connected agents and then edit the agent pool.
Priority
Pools with higher priority are utilized before pools with lower priority. If tests to be executed can be executed by agents from different pools, agents of the pool with the highest priority are requested. When scaling to meet demand, higher priority pools are scaled to their configured maximum before scaling lower priority pools.
You can change the priority of agent pools by dragging them on the “Configuration” tab. Pools that are higher on the list are prioritized over those below.
Deletion
Agent pools can be deleted at will when they are no longer needed. It is recommended to stop all agents in the agent pool before deleting it.
Already connected agents will stay connected for up to 4 hours after deleting an agent pool. During that time they will be shown with a warning indicator on the “Agents” tab.
Querying pool status
Agent auto scaling relies on auto scaling machinery of a compute platform regularly querying Gradle Enterprise for a pool’s desired size and starting/stopping agents to match the desired size.
The https://«hostname»/distribution/agent-pools/«pool-id» endpoint conveys a pool’s desired size at the moment, along with other information about the pool, as a JSON document.
Accessing the endpoint requires an API key via the X-API-KEY HTTP header. It can also be accessed by administrators in a browser when signed in to Gradle Enterprise.
The following demonstrates using curl to access the endpoint:
$ curl -H "X-API-KEY: «api-key»" https://«hostname»/distribution/agent-pools/«pool-id»Which will produce output of the following form:
{
  "id": "«pool-id»",
  "name": "Linux",
  "capabilities": [
    "jdk=11",
    "os=linux"
  ],
  "minimumAgents": 1,
  "maximumAgents": 100,
  "connectedAgents": 25,
  "idleAgents": 9,
  "desiredAgents": 16
}
Auto scalers need only consider the desiredAgents field and adjust the number of running agents to match this number.
Historical usage
The “Usage” tab provides a historical overview of workload in terms of number of active jobs, agent utilization, and agent pool metrics, for the last hour, 24 hours, or 7 days.
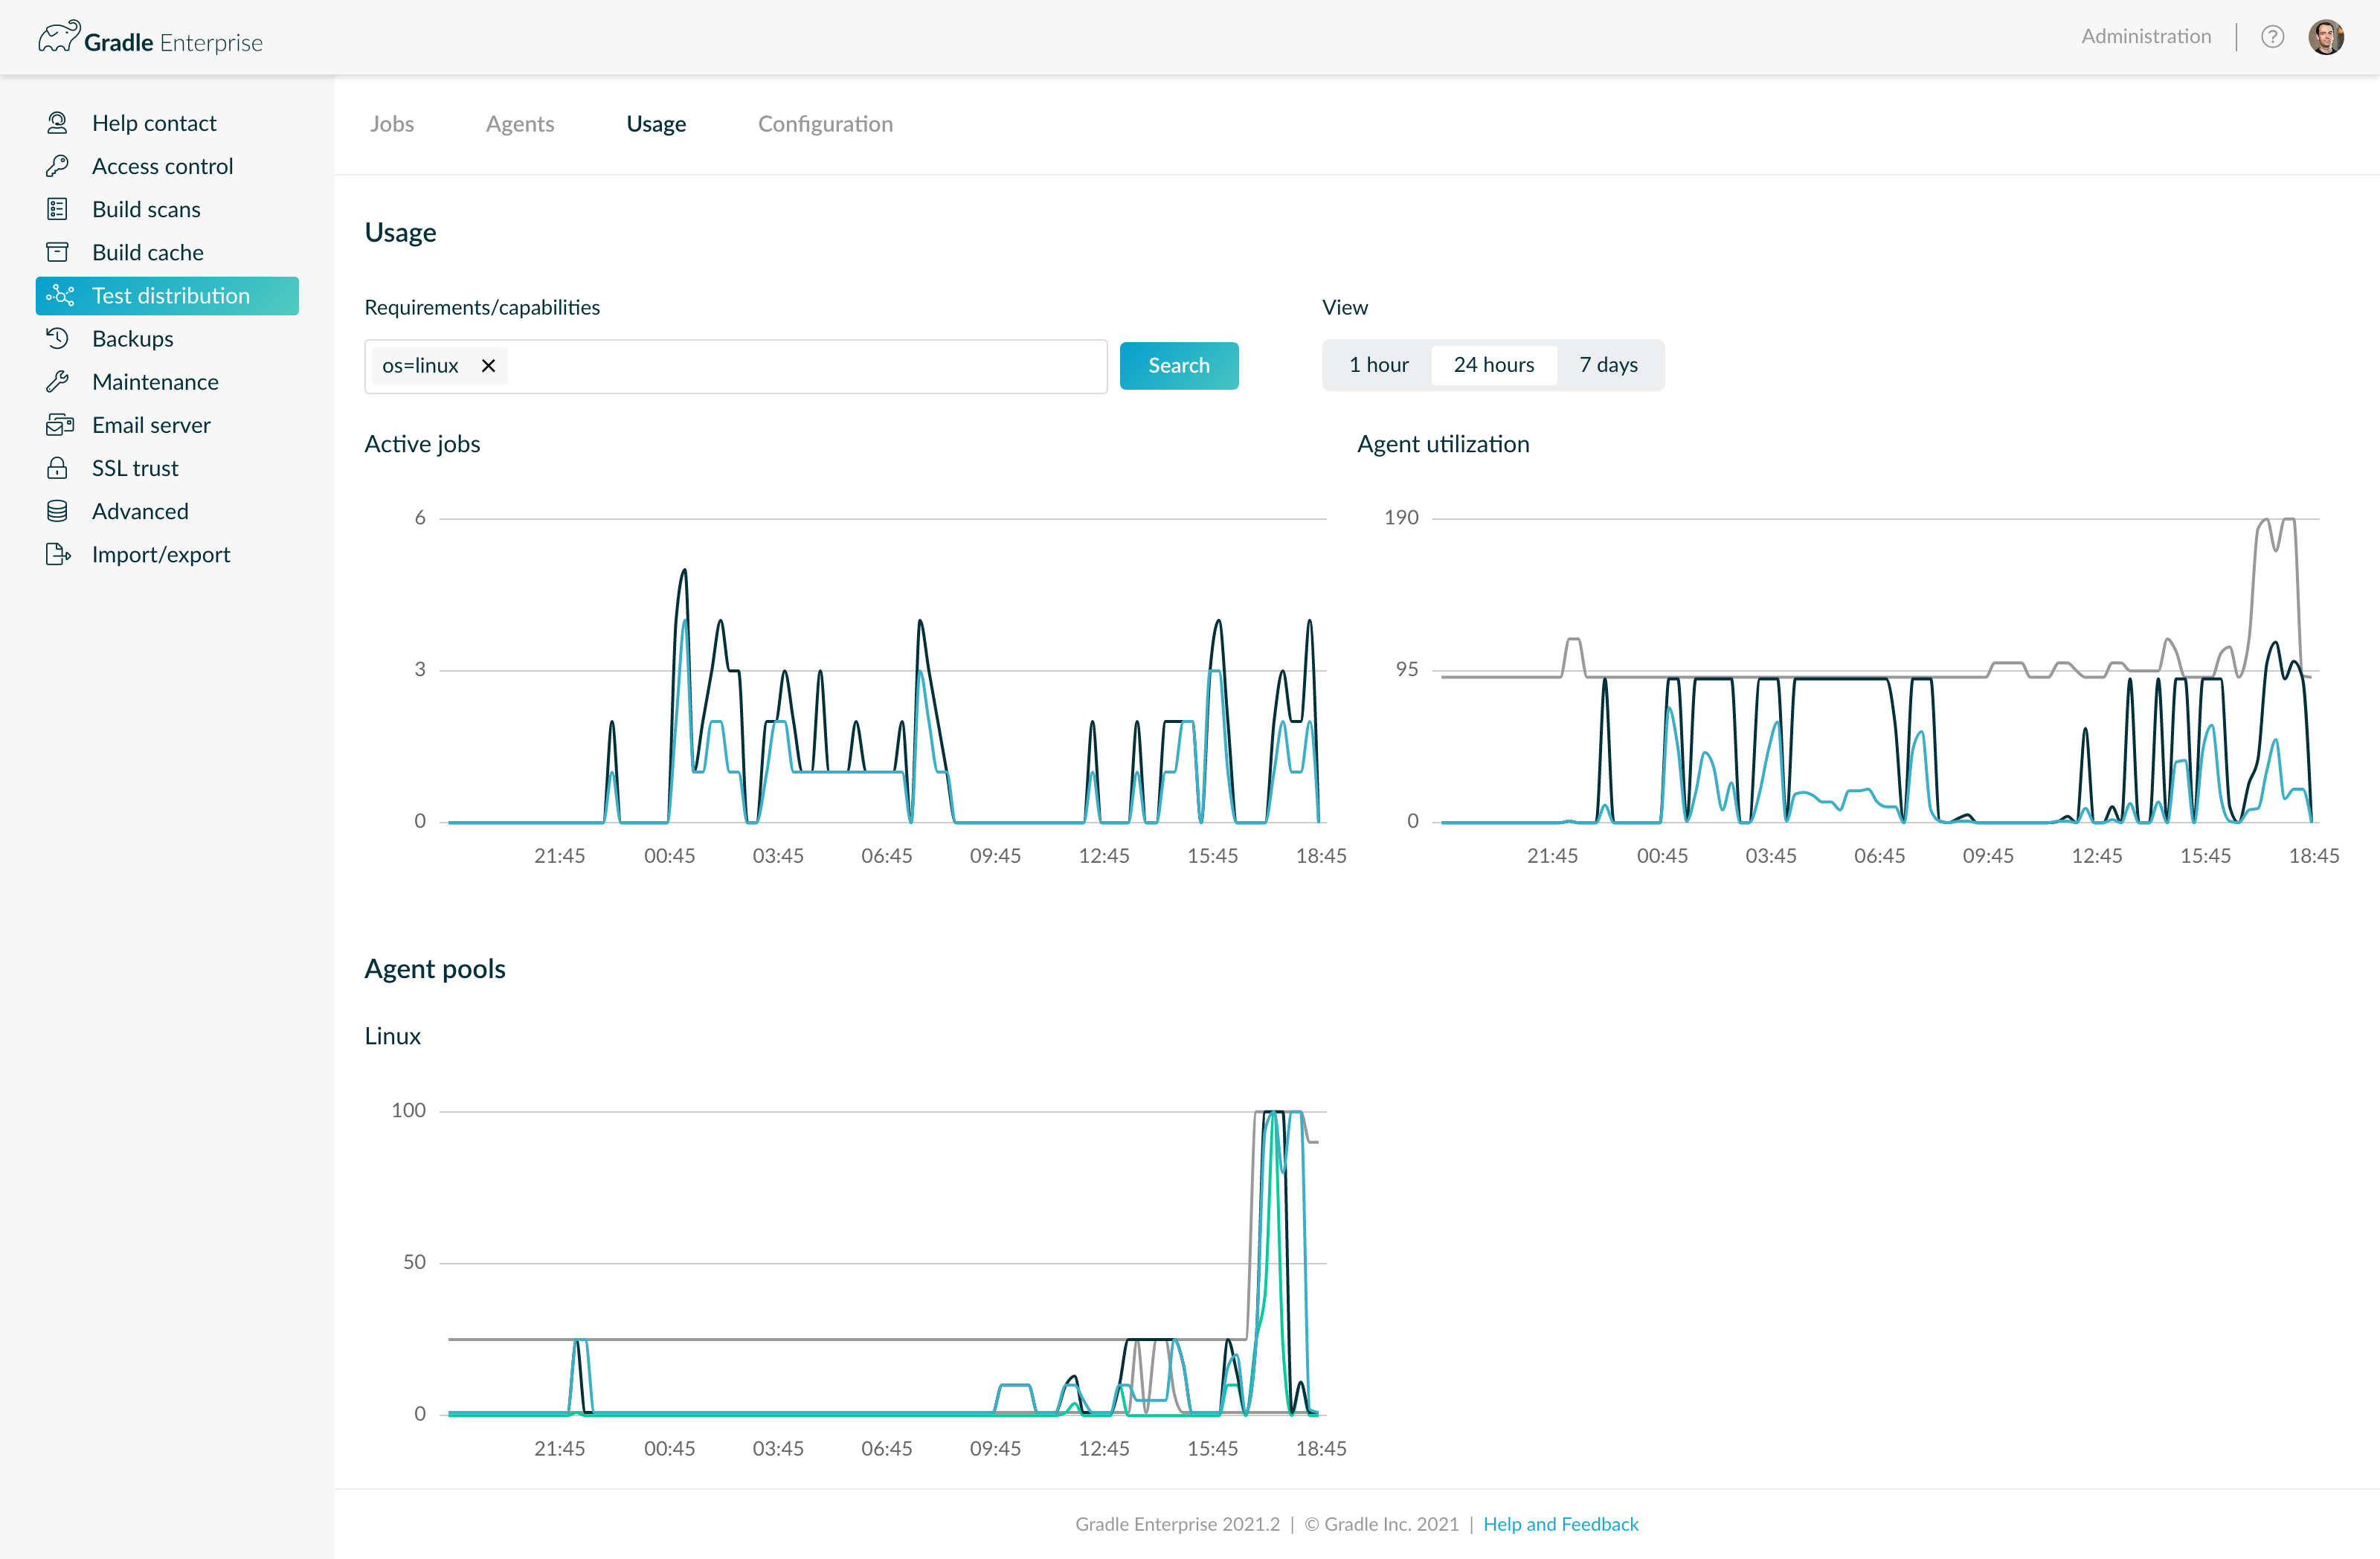
By default, all jobs, agents, and agent pools are shown. Adding requirement/capability criteria shows only the jobs with at least the specified requirements, only the agents with at least the specified capabilities, and only the agent pools with at least the specified capabilities.
Predictive Test Selection
Gradle Enterprise Predictive Test Selection allows developers to get faster feedback by running only tests that are likely to provide useful feedback on a particular code change using a probabilistic machine learning model. It is available for Gradle and Apache Maven™ builds.
Builds that have enabled Predictive Test Selection connect to Gradle Enterprise to select relevant tests. Gradle Enterprise users must be granted the “Build Scan view” access control role to be able to use Predictive Test Selection. For information on how to use Predictive Test Selection, please consult the Predictive Test Selection User Manual.
Appendix A: Upgrade notes
Please see upgrade notes in the Gradle Enterprise Kubernetes Helm Installation Manual for Kubernetes cluster installations or the Gradle Enterprise Helm Standalone Installation Manual for installation onto a single host.
Appendix B: Gradle Enterprise distributions
Gradle Enterprise comes in two distribution options. These are referred to as the Gradle Enterprise standalone distribution and the Gradle Enterprise Kubernetes distribution. You might notice that the two installation manuals (standalone, Kubernetes) are named accordingly.
To find out which installation you are using, you can check the name of the Helm chart you used to install Gradle Enterprise by e.g. looking at the output of helm ls --namespace <the namespace where your gradle enterprise instance is installed>. The Helm chart for your installation will be prefixed with "gradle-enterprise-standalone" if you are using the standalone distribution, whereas it will be prefixed only with "gradle-enterprise" if you are using the Kubernetes distribution.
Standalone distribution
The standalone distribution is an installation of Gradle Enterprise that runs on a single host, using K3s, a lightweight Kubernetes distribution. It is designed for administrators who want an "out-of-the-box" experience.
Kubernetes distribution
The Kubernetes distribution is an installation of Gradle Enterprise that is intended for use by organizations with existing Kubernetes infrastructure and administrators who are comfortable operating a Kubernetes cluster.
Appendix C: Unattended configuration
Many aspects of Gradle Enterprise’s behaviour can be configured via the Admin user interface as described above.
Gradle Enterprise can optionally have this configuration set without user intervention, by specifying the configuration to Helm during installation and upgrades. This allows scripted installations or installation by configuration management tools.
In addition, the current configuration can be exported and then re-imported later, allowing rollback or restoration of configuration changes.
The configuration takes the form of a yaml file, with an optional encryption key used to encrypt secrets. The expected yaml content of file is described by a schema.
Exporting the configuration file
The easiest way to get a functional configuration yaml file is to configure Gradle Enterprise using the Admin UI, and then export the yaml file. You can download the Gradle Enterprise configuration file from a running installation by vising the Administration page, then going to Import/export and then Export.
You should then have a yaml file downloaded, and if you encrypted secrets in the file with a key, you will need to keep this key available to provide to Helm.
Writing the configuration file
The Gradle Enterprise configuration file must be well-formed yaml and conform to a specific schema. There is a brief reference of some common options later in this guide.
When editing the file you can use the latest JSON schema for code completion and validation. You can also use schemastore support on your preferred editor.
In addition, the latest Gradle Enterprise Admin CLI tool can be used to validate a the file, by running the config-file validate command.
Minimal file example
Below is a minimal example of a valid Gradle Enterprise configuration file. It must contain the configuration schema version and the hashed password of the system user.
version: 4
systemPassword: XXXXXXXXXXXXXX==
To hash the value for the system password, use the Gradle Enterprise Admin CLI config-file hash command:
$ echo "secret-password" | gradle-enterprise-admin config-file hash -o secret.txt -s -$ cat secret.txtqdymI+AH5/3Y1jVqex1EGoMA+GBlmjV15OSQqzxuCww=:Orxv5Rtj8CBujeHOf/i6RZD+ympYO8wo9QmzZ/03LdS1tUMliPVcpw6ia/i8I2PkHtMeHQVj6GGlbxtpaX33QQ==
|
If using the Docker form of the Gradle Enterprise Admin CLI, the shell alias recommended in the guide does not allow piping input as above. To make it work, omit the |
Encrypting secret values
The system password must be hashed, but other secrets in this file can optionally be symmetrically encrypted. It is only recommended to use plain text for secrets if the values will be securely injected as part of your automation. Encrypted values will have a prefix of aes256:, as shown below.
email:
  authentication:
    password: aes256:aExYdWTRU24ZZ4Yo:wKcjYYRJajU4J4B5:Uz66aGkDDZqI2kNQ81mj4/q1oyi2Q88=
Secrets that are included in the configuration file as plain text must be prefixed with “plain:”, as shown below.
email:
  authentication:
    password: plain:MySecretPassword
The Gradle Enterprise Admin CLI can be used to generate a new encryption key, and to encrypt secret configuration values using the generated key.
$ gradle-enterprise-admin config-file generate-key -o key.txt
$ echo "secret_value" | gradle-enterprise-admin config-file encrypt -k key.txt -o encrypted.txt -s -
$ cat key.txtaes256:7l1odtTnuza0B9aa:1q2Bx/E7yz1zronpuJpOxAsgos5qpq4CtDsE2K5QnRs=
$ cat encrypted.txtaes256:7l1odtTnuza0B9aa:VFVkWB9OBsXz79Ue:njXgHpQJIVDCkqZgUUJXl6X2eItkJndW4vT762TesaY=
Configuration values which are applicable for encryption have the type EncryptedSecret in the JSON schema.
|
As with hashing values, if using the Docker form of the Gradle Enterprise Admin CLI, the shell alias recommended in the guide does not allow piping input as above. To make it work, either omit the key and secret from the command and enter the values interactively: aes256:bCy08OAN8tIbwMbW:EobFycmy1VtAGX/0motfSpVZzex3cHHf4sr6pmOrwWo= Enter key: Enter secret: aes256:bCy08OAN8tIbwMbW:XbOx4IFZ/LtMBINV:RZ4z75rcl0F94WSyIljRd/a8aw== Or run the Docker command directly: aes256:bCy08OAN8tIbwMbW:XbOx4IFZ/LtMBINV:RZ4z75rcl0F94WSyIljRd/a8aw== |
Configuring Gradle Enterprise to use an unattended configuration file
For details on how to configure Gradle Enterprise unattended configuration file, please see the Gradle Enterprise Kubernetes Helm Installation Manual for Kubernetes cluster installations or the Gradle Enterprise Helm Standalone Installation Manual for installation onto a single host.
How Gradle Enterprise determines the configuration it should use
Upon startup, if Gradle Enterprise has been configured with an unattended configuration file, it will store this in the database and use its configuration immediately.
Otherwise it will use a previously stored configuration set by making changes in the Administration UI, or will generate a new one based on defaults.
A given configuration file will only be used once. This means that if a configuration file has been applied, and then later changes are made through the Administration UI, the configuration file will not be reapplied unless its content changes. This ensures that changes made through the UI persist and are not overwritten.
| Updating the Gradle Enterprise configuration file and restarting the system will result in its configuration being imported. Any configuration changes made via the Admin UI since the last import will be overwritten. If the file is unchanged between system restarts, any configuration changes made via the Admin UI will be preserved. |
If you keep a copy of your Gradle Enterprise configuration for disaster recovery or creating test installations, you should regularly export your configuration from your instance, or instruct users with administration permission to avoid changing settings via the UI.
Appendix D: Gradle Enterprise config reference
The JSON schema describes all configuration options. Some common settings are described in more detail here.
Additionally, you can learn more about what these configuration options do by reading above, and exploring the administration page of your Gradle Enterprise instance.
| Attribute | Description |
|---|---|
|
|
Required. |
|
|
Required. |
|
|
Every day, Gradle Enterprise runs maintenance operations on the database to keep things running smoothly. This maintenance temporarily effects Gradle Enterprise’s performance, so you should set this to a time of day (UTC) in which you anticipate low Build Scan ingest traffic. |
|
|
A newline-separated list of certificates which Gradle Enterprise should trust when communicating with servers using certificates not trusted by default, for example if they are signed by an internal CA. |
|
|
The protocol used to connect to the proxy. Supported values are |
|
|
HTTP proxy host name. |
|
|
HTTP proxy port. |
|
|
A comma-delimited list that controls what hosts should not be proxied. The list can contain individual host names as well as domain patterns (e.g. '*.internal') which match all hosts for a particular domain. Any requests sent to these hosts will be sent directly rather than being sent through the HTTP proxy. |
|
|
A username used to authenticate with the HTTP Proxy. |
|
|
A password used to authenticate with the HTTP Proxy. |
|
|
Some events related to Gradle Enterprise may warrant a notification to the administrators of your installation. For example, if your installation’s disk space is running low, or if a backup was created. The |
|
|
Determines the permissions of users of your Gradle Enterprise instance who are not logged in. For example, you may want all Build Scans to be published by authenticated developers, in which case you should not enable the |
|
|
Configures external identity providers, using either LDAP or SAML. For example, your organization might use a Google or Microsoft product to manage permissions for all tools centrally and globally. You can configure |
|
|
Can be set to one of
|
|
|
You should not configure any values under |
S3 Gradle Enterprise configuration reference
It is possible to configure S3 connection details using the Gradle Enterprise configuration mechanism.
If using a static Access Key ID / Secret Access Key pair, you should first encrypt the secret key. The configuration should then look like this:
buildScans:
  storage:
    incomingStorageType: s3
    s3:
      bucket: your-bucket-name
      region: your-gradle-enterprise-aws-region
      prefix: optional/key/prefix
      credentials:
        source: configuration
        accessKey: AKIA1234ABCD7890
        secretKey: aes256:7l1odtTnuza0B9aa:VFVkWB9OBsXz79Ue:njXgHpQJIVDCkqZgUUJXl6X2eItkJndW4vT762TesaY=
If using dynamically provisioned credentials, the configuration should look like this:
buildScans:
  storage:
    incomingStorageType: s3
    s3:
      bucket: your-bucket-name
      region: your-gradle-enterprise-aws-region
      prefix: optional/key/prefix
      credentials:
        source: environment
In both cases, you should increase the heap memory allocated to the Gradle Enterprise application. If you already have a heap memory setting, increase this by 2048. If you do not, set the value to 5632.
advanced:
  app:
    heapMemory: 5632
You will also need to increase Gradle Enterprise’s memory requests and limits by the same amount in your Helm values file:
enterprise:
  resources:
    requests:
      memory: 6Gi (1)
    limits:
memory: 6Gi (1)| 1 | If you have already set a custom value here, instead increase it by 2Gi. |
If you are using EKS service account based credentials, ensure that you have configured Helm with the necessary service account annotation and redeployed.
Appendix E: Amazon S3 Build Scan storage
Create an S3 bucket for Build Scan storage
You will need to know the AWS region that your Gradle Enterprise installation is running in.
If using the AWS web console:
-
Go to S3 in the AWS console
-
In the navigation pane, choose Buckets and then choose Create bucket.
-
Enter the name you want for your bucket e.g.
gradle-enterprise-build-scans. Make sure the bucket is in the same region as your Gradle Enterprise installation. Leave the other settings as their default values. -
Click Create bucket.
Alternatively, use the AWS command line utility:
$ aws s3 mb s3://«your-bucket-name»Create a policy allowing access to the S3 bucket
The following policy allows access to the S3 bucket. Granting the policy to a user or role that Gradle Enterprise will access it as is a separate step.
If using the AWS web console:
-
Go to IAM in the AWS console
-
In the navigation pane, choose Policies and then choose Create policy.
-
Click on the JSON tab to define the policy using JSON directly.
-
Enter the following policy JSON, replacing
«your-bucket-name»with the name of your bucket:{ "Version": "2012-10-17", "Statement": [ { "Sid": "VisualEditor0", "Effect": "Allow", "Action": [ "s3:ListBucket" ], "Resource": [ "arn:aws:s3:::«your-bucket-name»" ] }, { "Sid": "VisualEditor1", "Effect": "Allow", "Action": [ "s3:PutObject", "s3:GetObject", "s3:DeleteObject", "s3:AbortMultipartUpload" ], "Resource": [ "arn:aws:s3:::«your-bucket-name»/*" ] } ] } -
Click Next: Tags.
-
Add any tags that your organization requires, and click Next: Review.
-
Enter a name for this policy e.g.
GradleEnterpriseBuildScanStorage, and optionally also a description -
Click Create policy.
Alternatively, use the AWS command line utility:
-
First, save the above JSON policy to a file
policy.json. -
Run the following command:
$ aws iam create-policy \
    --policy-name "«your-policy-name»" \
    --policy-document file://policy.json
It is possible to add tags and a description using the CLI, see the documentation.
-
Note the policy ARN.
Create an AWS user to access S3 for Build Scan storage
If using the AWS web console:
-
Go to IAM in the AWS console
-
In the navigation pane, choose Users and then choose Add users.
-
Enter a user name e.g.
gradle-enterprise-build-scans. -
Select Access key - programmatic access for the AWS credential type.
-
Click Next: Permissions.
-
Select Attach existing policies directly.
-
Select the IAM policy you created above, and no others.
-
Click Next: Tags* and add any tags that your organization requires.
-
Click Next: Review, then Create user
-
At this point, you will be shown the access key credentials for your new user, the Access key ID and the Secret access key. Store these somewhere secure. They will be needed to configure Gradle Enterprise for S3 Build Scan storage.
Alternatively, use the AWS command line utility:
$ aws iam create-user --user-name "«your-user-name»"
$ aws iam create-access-key --user-name "«your-user-name»"
It is possible to add tags using the CLI, see the documentation.
The output will contain the access key credentials for your new user in the AccessKeyId and SecretAccessKey fields. Store these somewhere secure. They will be needed to configure Gradle Enterprise for S3 Build Scan storage.
Create an AWS role for EC2 instance profile access to S3 for Build Scan storage
| If you already have a role that your EC2 instances are launched with, skip these steps and instead attach the policy to the existing role directly. |
If using the AWS web console:
-
Go to IAM in the AWS console
-
In the navigation pane, choose Roles and then choose Create role.
-
For the Trusted Entity type, choose AWS service, then EC2 for the Use case.
-
Click Next.
-
Find and select the IAM policy you created above.
-
If you are running Gradle Enterprise in Amazon EKS and wish to use node-associated roles, also add the built-in
AmazonEKSWorkerNodePolicyandAmazonEC2ContainerRegistryReadOnlypolicies, and an applicable network policy. See here for full steps on finding these in the console. -
Click Next.
-
Add a role name, e.g.
gradle-enterprise-build-scans. -
Add any tags that your organization requires.
-
Click Create role.
Alternatively, use the AWS command line utility:
-
Create a file
ec2-role-trust-policy.jsonand save it with the following content:{ "Version": "2012-10-17", "Statement": [ { "Effect": "Allow", "Principal": { "Service": "ec2.amazonaws.com"}, "Action": "sts:AssumeRole" } ] } -
Run the following commands, using the ARN of the policy created above:
$ aws iam create-role \
    --role-name "«your-role-name»" \
    --assume-role-policy-document file://ec2-role-trust-policy.json

$ aws iam attach-role-policy \
    --role-name "«your-role-name»" \
    --policy-arn "«your-policy-arn»"

$ aws iam create-instance-profile \
    --instance-profile-name "«your-role-name»"

$ aws iam add-role-to-instance-profile \
    --instance-profile-name "«your-role-name»" \
    --role-name "«your-role-name»"
It is possible to add tags using the CLI, see the documentation.
If you already have Gradle Enterprise installed on an EC2 instance, please follow these instructions to associate the instance with the new profile.
Create an AWS role for EKS service account access to S3 for Build Scan storage
You will need to know several pieces of information for the following instructions:
-
The service account name:
gradle-enterprise-app -
The namespace that Gradle Enterprise is installed in.
-
The EKS cluster name.
-
The ARN of the policy created above.
Once you have these, perform the following steps:
-
Create an IAM OIDC provider for your EKS cluster if one doesn’t already exist.
-
Create an IAM role associated with the Gradle Enterprise service account and attach the IAM policy created above. You will want to use the
--role-onlyflag, since you will configure Gradle Enterprise’s service account to use the role via Helm. AWS’s documentation for the same process contains some more details. -
Note the created role ARN.
-
Configure Helm with the necessary service account annotation and redeploy.
Appendix F: Gradle Enterprise config schema downloads
-
gradle-enterprise-config-schema-13.json (SHA-256 checksum, PGP signature, PGP signature SHA-256 checksum)
-
gradle-enterprise-config-schema-12.json (SHA-256 checksum, PGP signature, PGP signature SHA-256 checksum)
-
gradle-enterprise-config-schema-11.json (SHA-256 checksum, PGP signature, PGP signature SHA-256 checksum)
-
gradle-enterprise-config-schema-10.json (SHA-256 checksum, PGP signature, PGP signature SHA-256 checksum)
-
gradle-enterprise-config-schema-9.json (SHA-256 checksum, PGP signature, PGP signature SHA-256 checksum)
-
gradle-enterprise-config-schema-8.json (SHA-256 checksum, PGP signature, PGP signature SHA-256 checksum)
-
gradle-enterprise-config-schema-7.json (SHA-256 checksum, PGP signature, PGP signature SHA-256 checksum)
-
gradle-enterprise-config-schema-6.json (SHA-256 checksum, PGP signature, PGP signature SHA-256 checksum)
-
gradle-enterprise-config-schema-5.json (SHA-256 checksum, PGP signature, PGP signature SHA-256 checksum)
-
gradle-enterprise-config-schema-4.json (SHA-256 checksum, PGP signature, PGP signature SHA-256 checksum)
-
gradle-enterprise-config-schema-3.json (SHA-256 checksum, PGP signature, PGP signature SHA-256 checksum)
-
gradle-enterprise-config-schema-2.json (SHA-256 checksum, PGP signature, PGP signature SHA-256 checksum)
-
gradle-enterprise-config-schema-1.json (SHA-256 checksum, PGP signature, PGP signature SHA-256 checksum)